The Complete Guide to Full Stack MARN Web Apps Development: MongoDB, Apollo (GraphQL), React, and Node.js
This is a step-by-step overview for creating the front-end, backend, and persistence layer with MARN Stack: MongoDB, Apollo Server, React and Node.js. I also created a video version of this tutorial, which you can find on YouTube.
What is the MARN stack?
MARN stands for MongoDB, Apollo Server, React and Node.js.
- MongoDB — document database
- Apollo Server — GraphQL server
- React — a client-side JavaScript framework
- Node.js — back-end JavaScript runtime environment
MARN Stack is the next generation of popular MERN Stack (MongoDB, Express.js, React, Node.js). Using Apollo Server instead of Express.js makes it very easy to create GraphQL APIs.
Why Apollo Server instead of Express? Everything has its pros and cons. I like Apollo Server for its ease of setup, GraphiQL console (very useful during development), and support for many front-end frameworks. For more check out Comparison of Apollo Server with express-graphql.
There is a lot of documentation and tutorials for building GraphQL backend with Apollo Server. There is also a lot of documentation for consuming GraphQL API from React. Yet, there is nothing about building end-to-end web apps with React, Apollo Server backend, and MongoDB persistence layer.
In this article, I will show you how to build end to end web app with React front-end, and Node.js backend with GraphQL API (powered by Apollo Server) and MongoDB persistence layer.
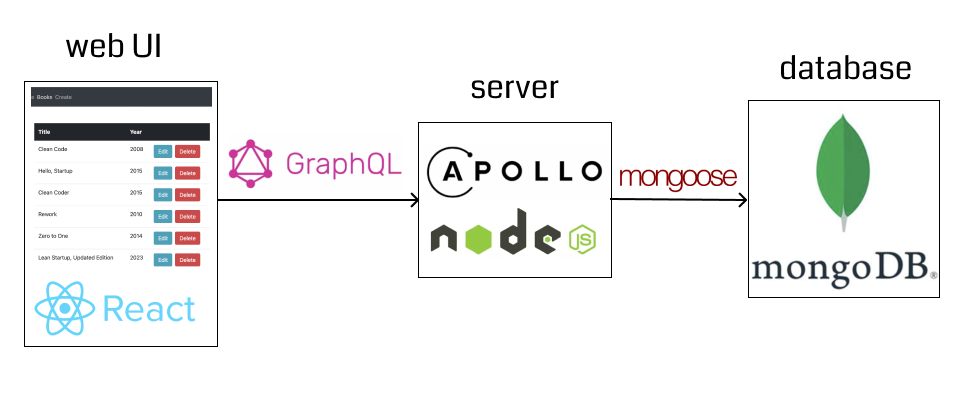
I created a video version of this guide:
Getting Started
Installing dependencies
- Install node.js: I recommend installing node with brew (I’m using node 16.14.2 and npm 8.5.0):
brew install node - Install nodemon (I am using version 2.0.20):
npm install nodemon - Install Mongo (instructions for Mac, instructions for Windows). I’m using MongoDB Community Edition 6.0. I recommend installing with brew (on Mac):
xcode-select --install  # installing XCode tools
brew tap mongodb/brew`
brew update`
brew install mongodb-community@6.0
Setup Apollo Server (GraphQL API) with Node.js
Create a new directory for your app:
mkdir marn-app
Create a new directory for Apollo Server
mkdir apollo-server
cd apollo-server
Install dependencies:
npm install @apollo/server graphql-tag
npm install @babel/core @babel/node --save-dev
Add script to run Apollo Server with nodemon to package.json:
"scripts": {
    "start": "nodemon --exec babel-node --presets='@babel/preset-env' -- src/index.js"
},
Add type=module property to package.json to enable ES 6 modules:
"type": "module"Create src/index.js file with GraphQL schema and resolvers:
import { ApolloServer } from '@apollo/server';
import { startStandaloneServer } from '@apollo/server/standalone';
import gql from 'graphql-tag';

// GraphQL Schema
const typeDefs = gql`
  type Query {
    hello: String
  }
`;

// GraphQL Resolvers
const resolvers = {
    Query: {
        hello: () => "Hello from Apollo Server"
    }
};

const server = new ApolloServer({typeDefs, resolvers});

const { url } = await startStandaloneServer(server, {
    listen: { port: 4000 },
});

console.info(`🚀 Server ready at ${url}`);
GraphQL schema describes the shape of your available data.
GraphQL resolvers are responsible for populating data into fields in Schema.
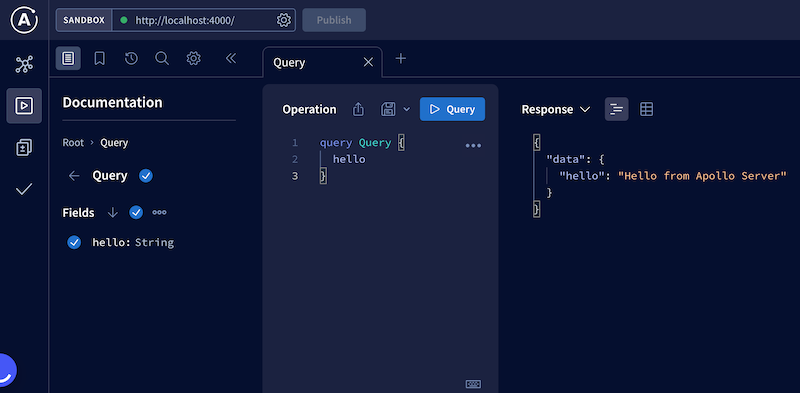
The above code defines 1 field (hello) in GraphQL Schema, and the resolver function returns "Hello from Apollo Server" when querying that field.
Start Apollo Server with:
npm start
If you go to http://localhost:4000 you should see GraphQL Playground where you can execute queries:
Create Web UI with React
Create react app from your project root directory:
npx create-react-app web-ui
cd web-ui
npm install @apollo/client graphql
npm start
Querying Apollo GraphQL API from React
Install @apollo/client module:
cd web-ui
npm install @apollo/client
To call Apollo Server with Apollo Client module, we need to do two things:
Initialize client:
const client = new ApolloClient({
  uri: 'http://localhost:4000',
  cache: new InMemoryCache(),
});
Wrap React components with ApolloProvider component and pass ApolloClient instance to it:
export default function App() {
  return (
    <ApolloProvider client={client}>
      ...
    </ApolloProvider>
  );
}
To query the Apollo GraphQL endpoint we can use useQuery React hook provided by @apollo/client module.
Call 'hello' query from React
Let’s create Hello React component that will perform a call to GraphQL API and display the returned result. We need to define a GraphQL query and pass it to useQuery. The neat thing about the Apollo server is the ability to directly copy/paste queries from the playground.
import { gql, useQuery } from '@apollo/client';

const HELLO_QUERY = gql`
query Query {
  hello
}
`;

export default function Hello() {
    const { data, loading, error } = useQuery(HELLO_QUERY);

    if (loading) return <p>Loading...</p>;
    if (error) {
        console.error('HELLO_QUERY error', error);
    }

    return <div>
        {loading && 'Loading...'}
        {error && 'Error (check console logs)'}
        {!loading && !error && data?.hello}
    </div>;
}
To make it work we need to update App.js with changes mentioned in the previous section: initializing ApolloCLient and wrapping components with ApolloProvider:
import { ApolloClient, InMemoryCache, ApolloProvider } from '@apollo/client';
import Hello from './components/Hello';

const client = new ApolloClient({
  uri: 'http://localhost:4000',
  cache: new InMemoryCache(),
});

export default function App() {
  return (
    <ApolloProvider client={client}>
      <Hello />
    </ApolloProvider>
  );
}
This should display Hello from Apollo Server in the browser coming from GraphQL API!

Add parameter to GraphQL query
So far, the query is pretty simple. Let’s make it more sophisticated by adding a parameter name, and changing the response to Hello ${name}.
To do that we need to modify GraphQL schema and resolvers in the backend:
const typeDefs = gql`
    type Query {
        hello(name: String): String
    }
`;

const resolvers = {
    Query: {
        hello: (_, {name}) => `Hello ${name}`,
    }
};
Notice that we extract name param from the second argument of the resolver function.
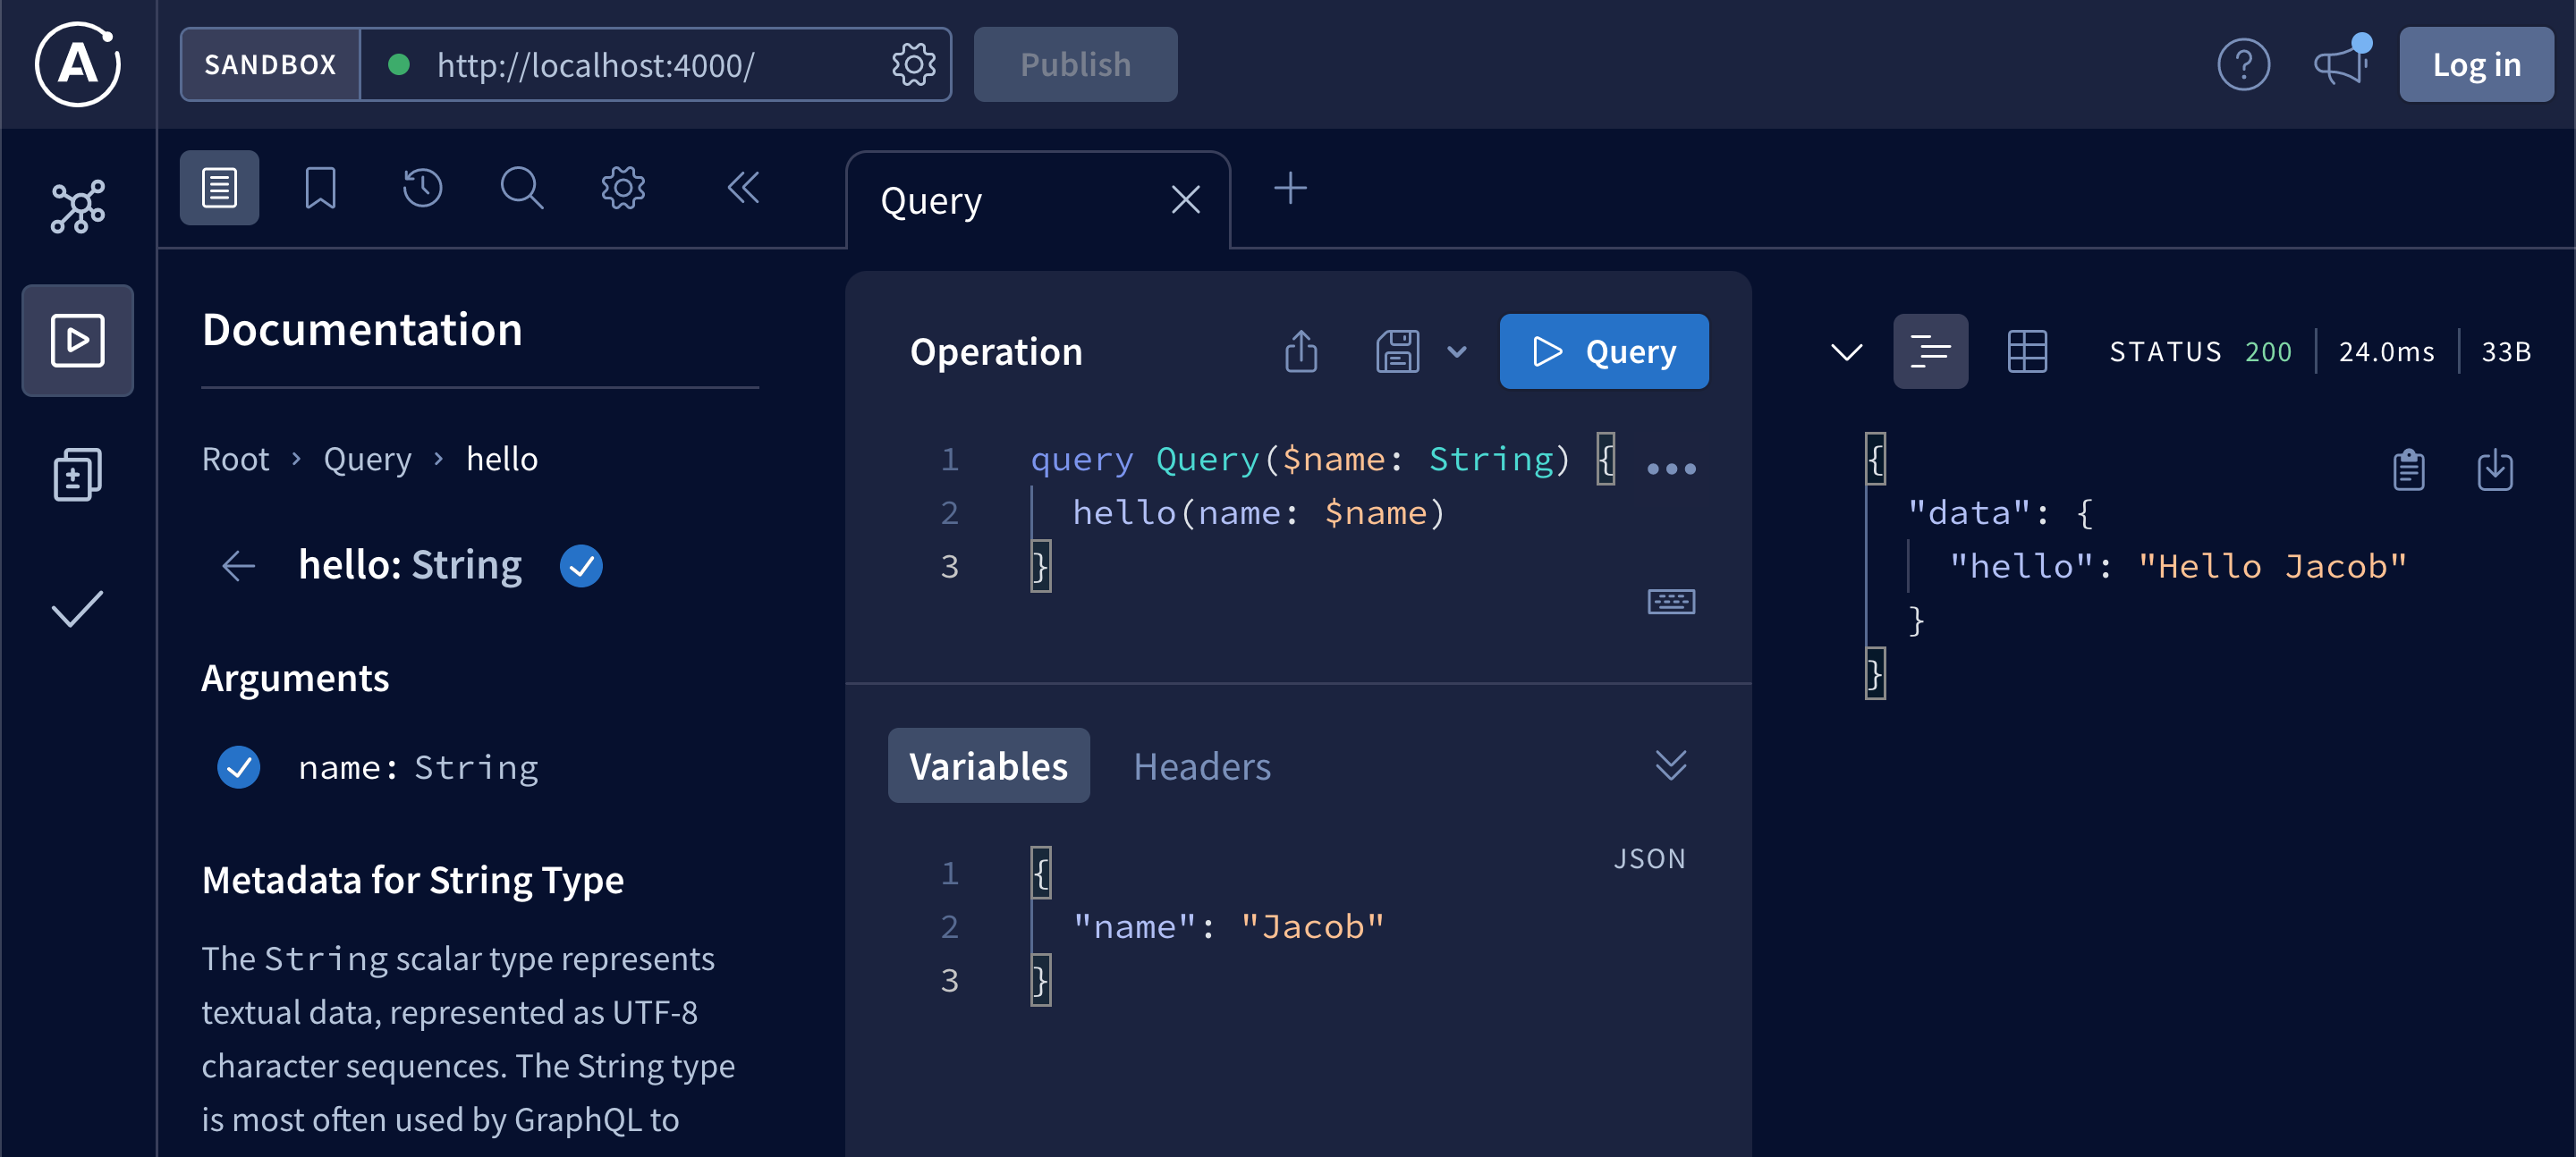
We can use GraphQL Playground to test it, and help us to generate the query with a parameter:
Call GraphQL query with parameter from React
We need to update our HELLO_QUERY. You can copy/paste the query from GraphQL Playground:
const HELLO_QUERY = gql`
    query Query($name: String) {
        hello(name: $name)
    }
`;
We also need to pass name variable to useQuery:
const { data, loading, error } = useQuery(HELLO_QUERY, {
    variables: {name: "Jacob"},
});
This should result in displaying Hello Jacob in the browser:

Refactoring resolvers and schema to separate components
Before we move to the next section, let’s clean up our backend code by extracting schema and resolvers to separate modules.
Create new file src/models/typeDefs.js:
import gql from 'graphql-tag';

export const typeDefs = gql`
    type Query {
        hello(name: String): String
    }
`;
Create new file src/resolvers.js:
export const resolvers = {
    Query: {
        hello: (_, {name}) => `Hello ${name}`,
    }
};
Remove equivalent pieces of code from src/index.js and import modules instead:
import {resolvers} from './resolvers.js';
import {typeDefs} from './models/typeDefs.js';
This will set us up for the next section. You should always extract independent modules as much as possible to keep your code clean.
CRUD with MongoDB
CRUD stands for Create, Read, Update, Delete. It’s the backbone of every web app. Except Twitter. They didn’t support Update for a while xD
In this section, I’ll describe how to create simple CRUD for books. Every book will have a title and year when it was published. Data will be stored in MongoDB. Web UI will have an interface to display (Read), add (Create), edit (Update) and delete books through GraphQL API.
Working with MongoDB
To start mongo on Mac (docs):
brew services start mongodb-community@6.0
I recommend using MongoDB Compass for working with data in MongoDB. It’s much easier than using MongoDB Shell (mongosh). Of course, if you prefer using mongosh, go for it.
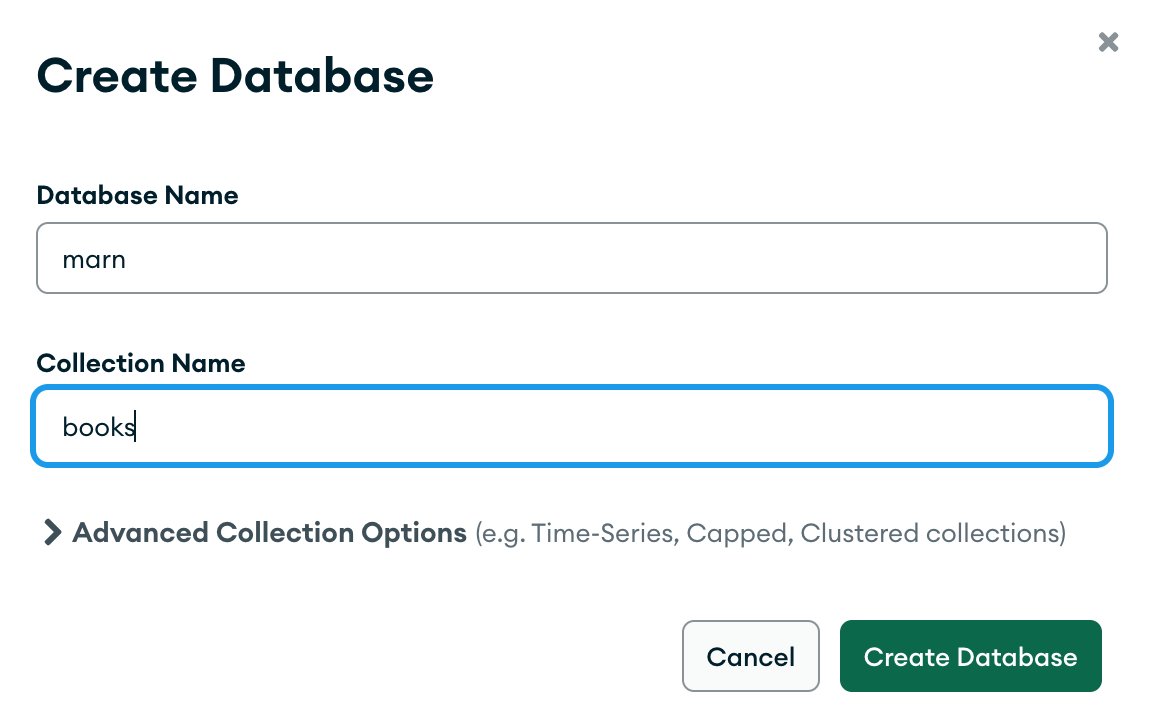
To get started with Books Library, let’s create new database called marn and new collection called books. It can be done easily with Compass:
Connect to MongoDB from node.js
To connect to MongoDB from node.js we will use mongoose.
It has to be installed from Apollo Server directory:
cd apollo-server
npm install mongoose
To connect to MongoDB we can establish a connection in src/index.js by adding this code:
import mongoose from 'mongoose';

mongoose.set('strictQuery', true);
const db = await mongoose.connect("mongodb://localhost:27017/marn", {
    useNewUrlParser: true,
});
console.info('📚 Connected to db', db?.connections[0]?._connectionString);
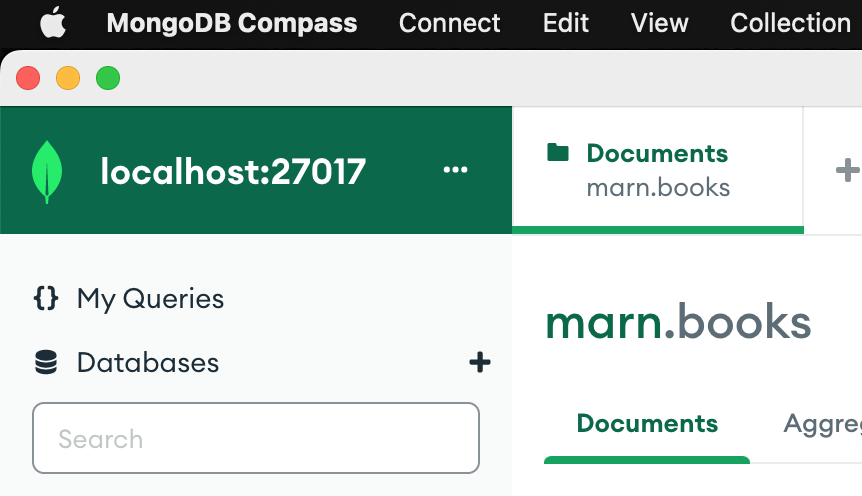
Make sure your MongoDB uses port 27017. If not, update the URI. You can find the URI in Compass UI:
Create Book model and query data from MongoDB
We can map MongoDB collections to JavaScript objects by creating models with mongoose. Create Book model in src/models/Book.js file:
import mongoose from 'mongoose';

export const Book = mongoose.model('Book', { title: String, year: Number });
We can query all books by simply calling the Book model:
Book.find({})To make data accessible through GraphQL, we need to add Book type to GraphQL schema and books query that returns an array of Book elements in src/models/typeDefs.js:
import gql from 'graphql-tag';

export const typeDefs = gql`
    type Query {
        hello(name: String): String
        books: [Book]
    }
    type Book {
        id: ID,
        title: String,
        year: Int,
    }
`;
We also need to add the resolver that is querying MongoDB with mongoose in src/resolvers.js:
import {Book} from './models/Book.js';

export const resolvers = {
    Query: {
        hello: (_, {name}) => `Hello ${name}`,
        books: async () => await Book.find({}),
    }
};
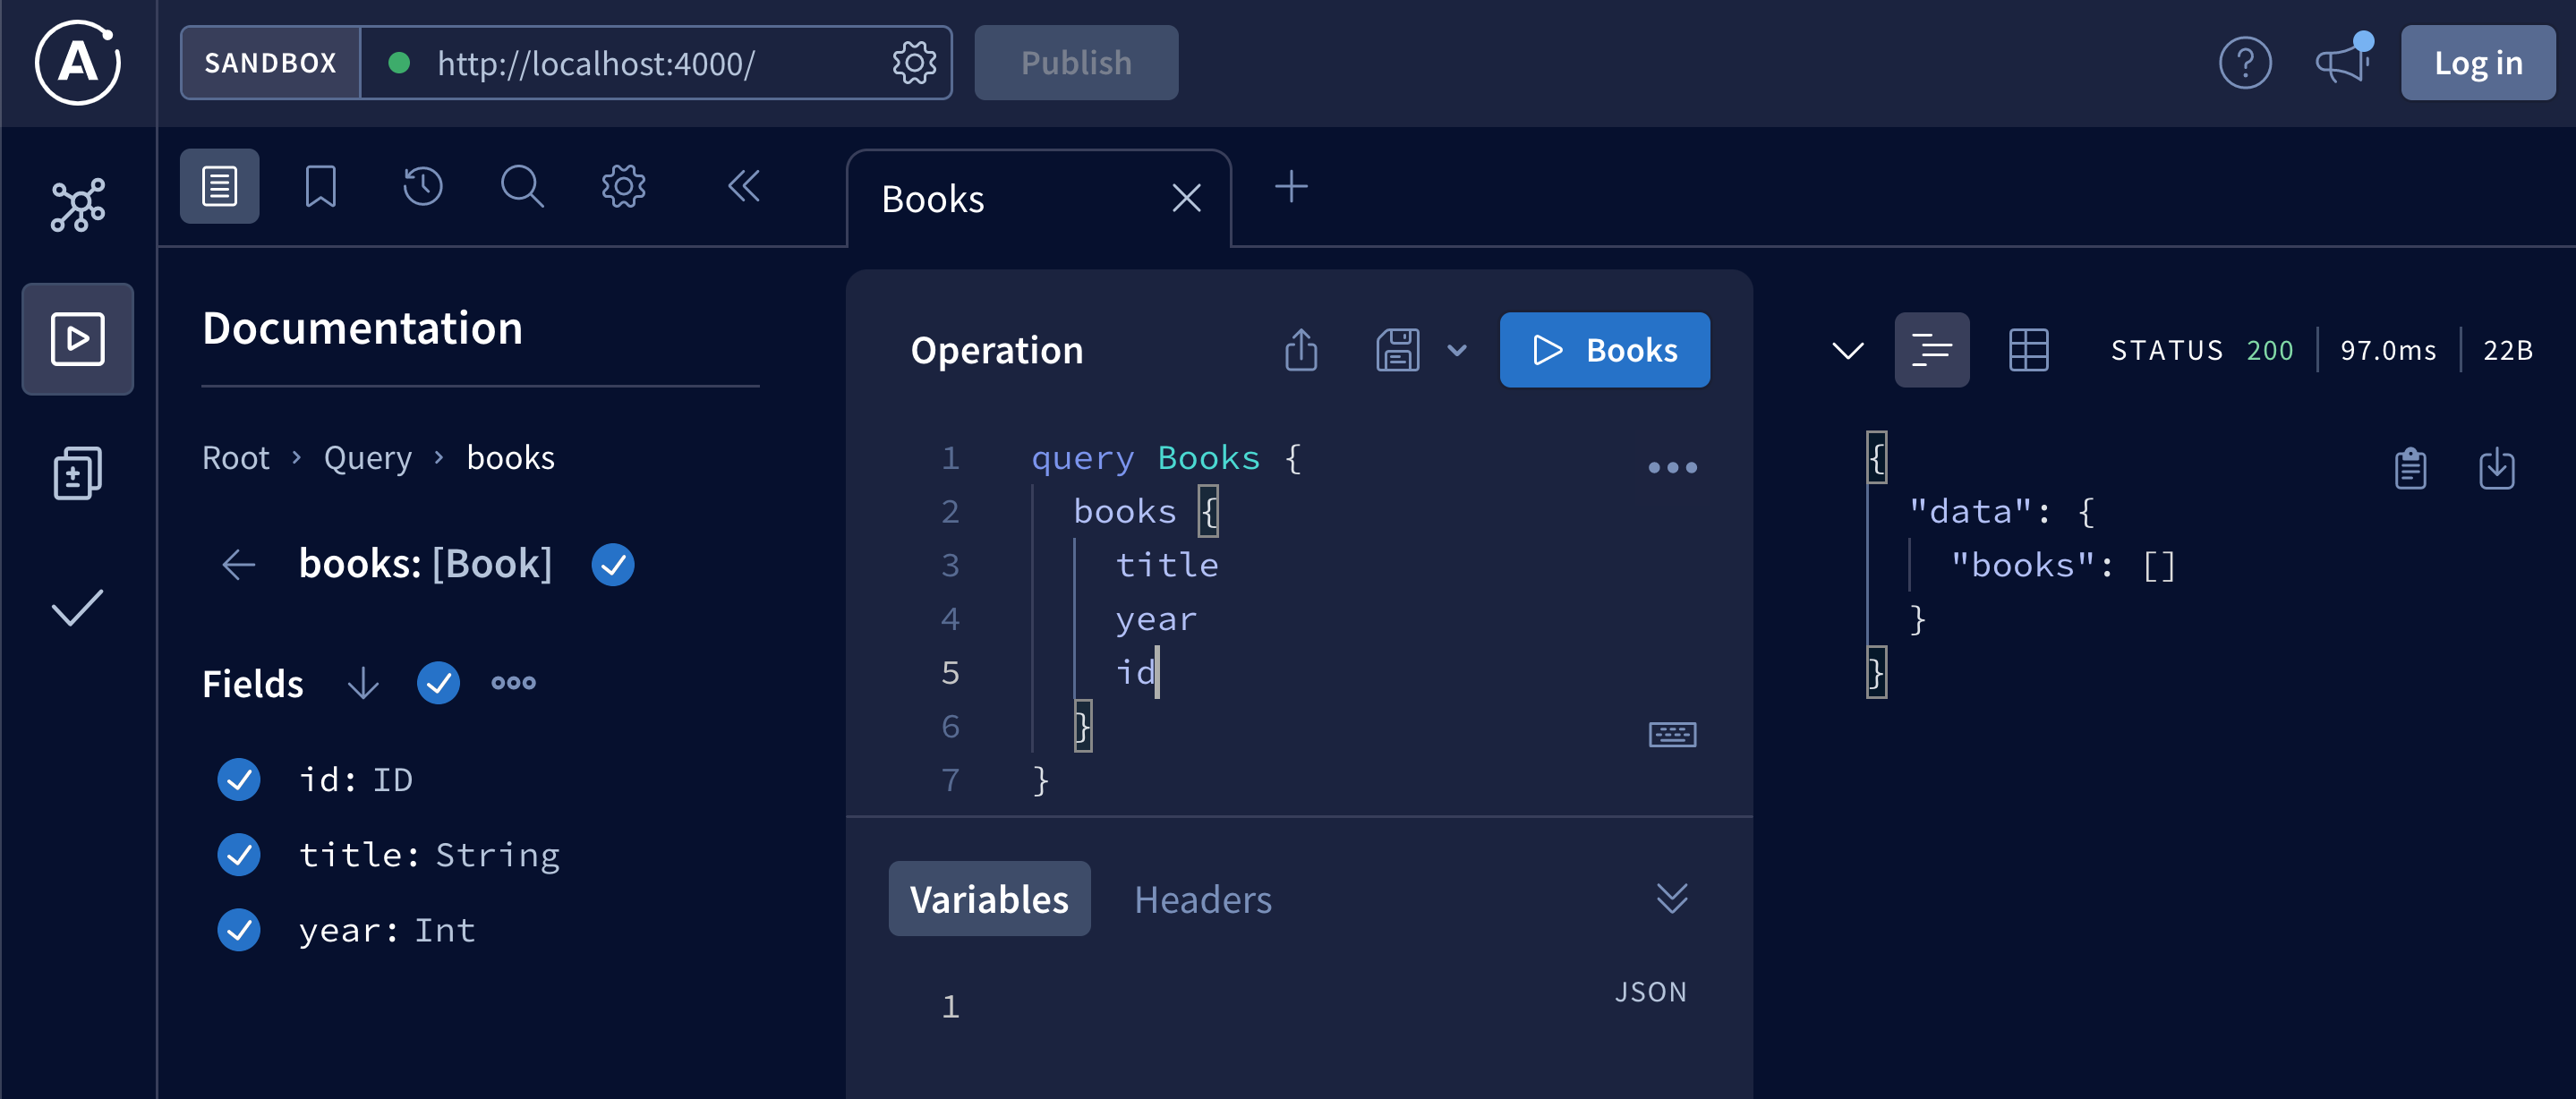
Querying with Playground should return an empty array:
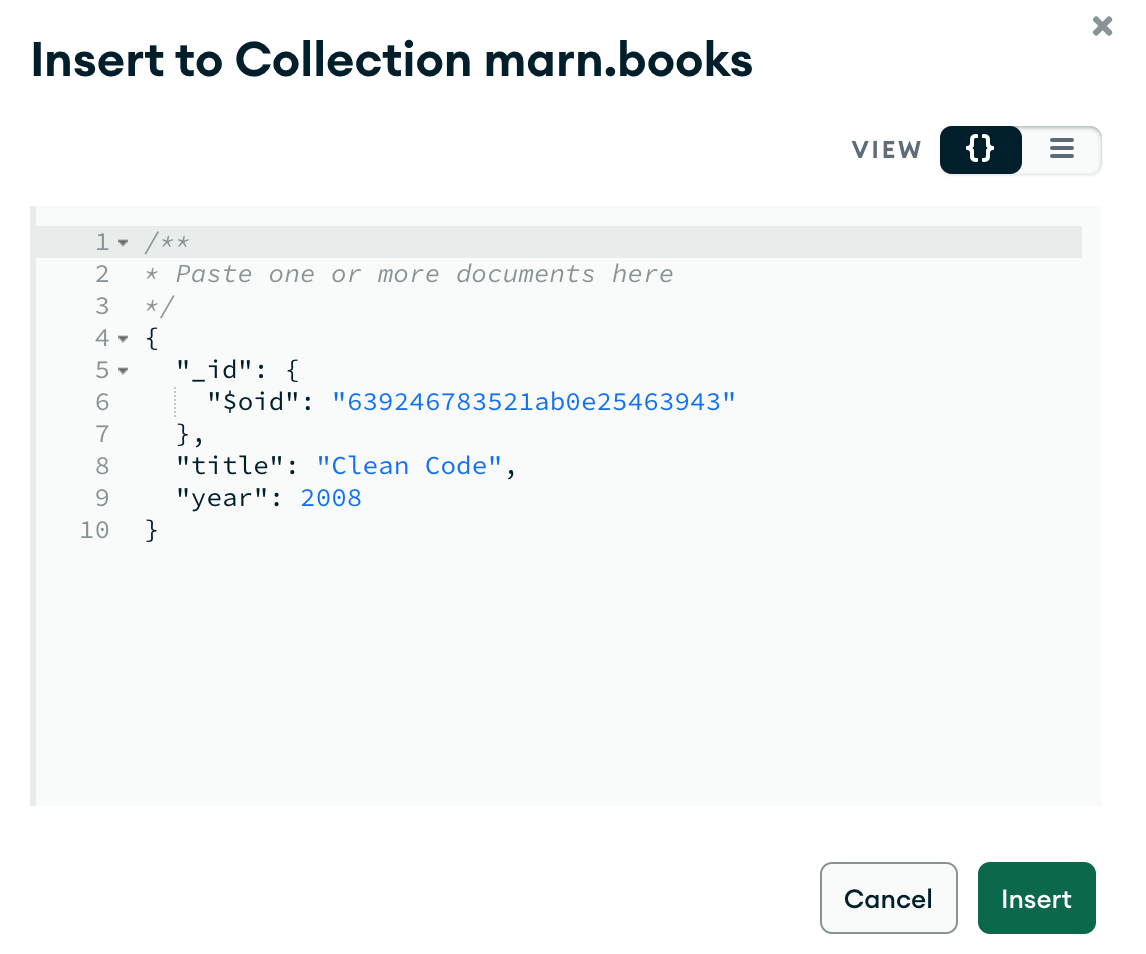
Let’s add a book to MongoDB with Compass by clicking ADD DATA -> Insert document:
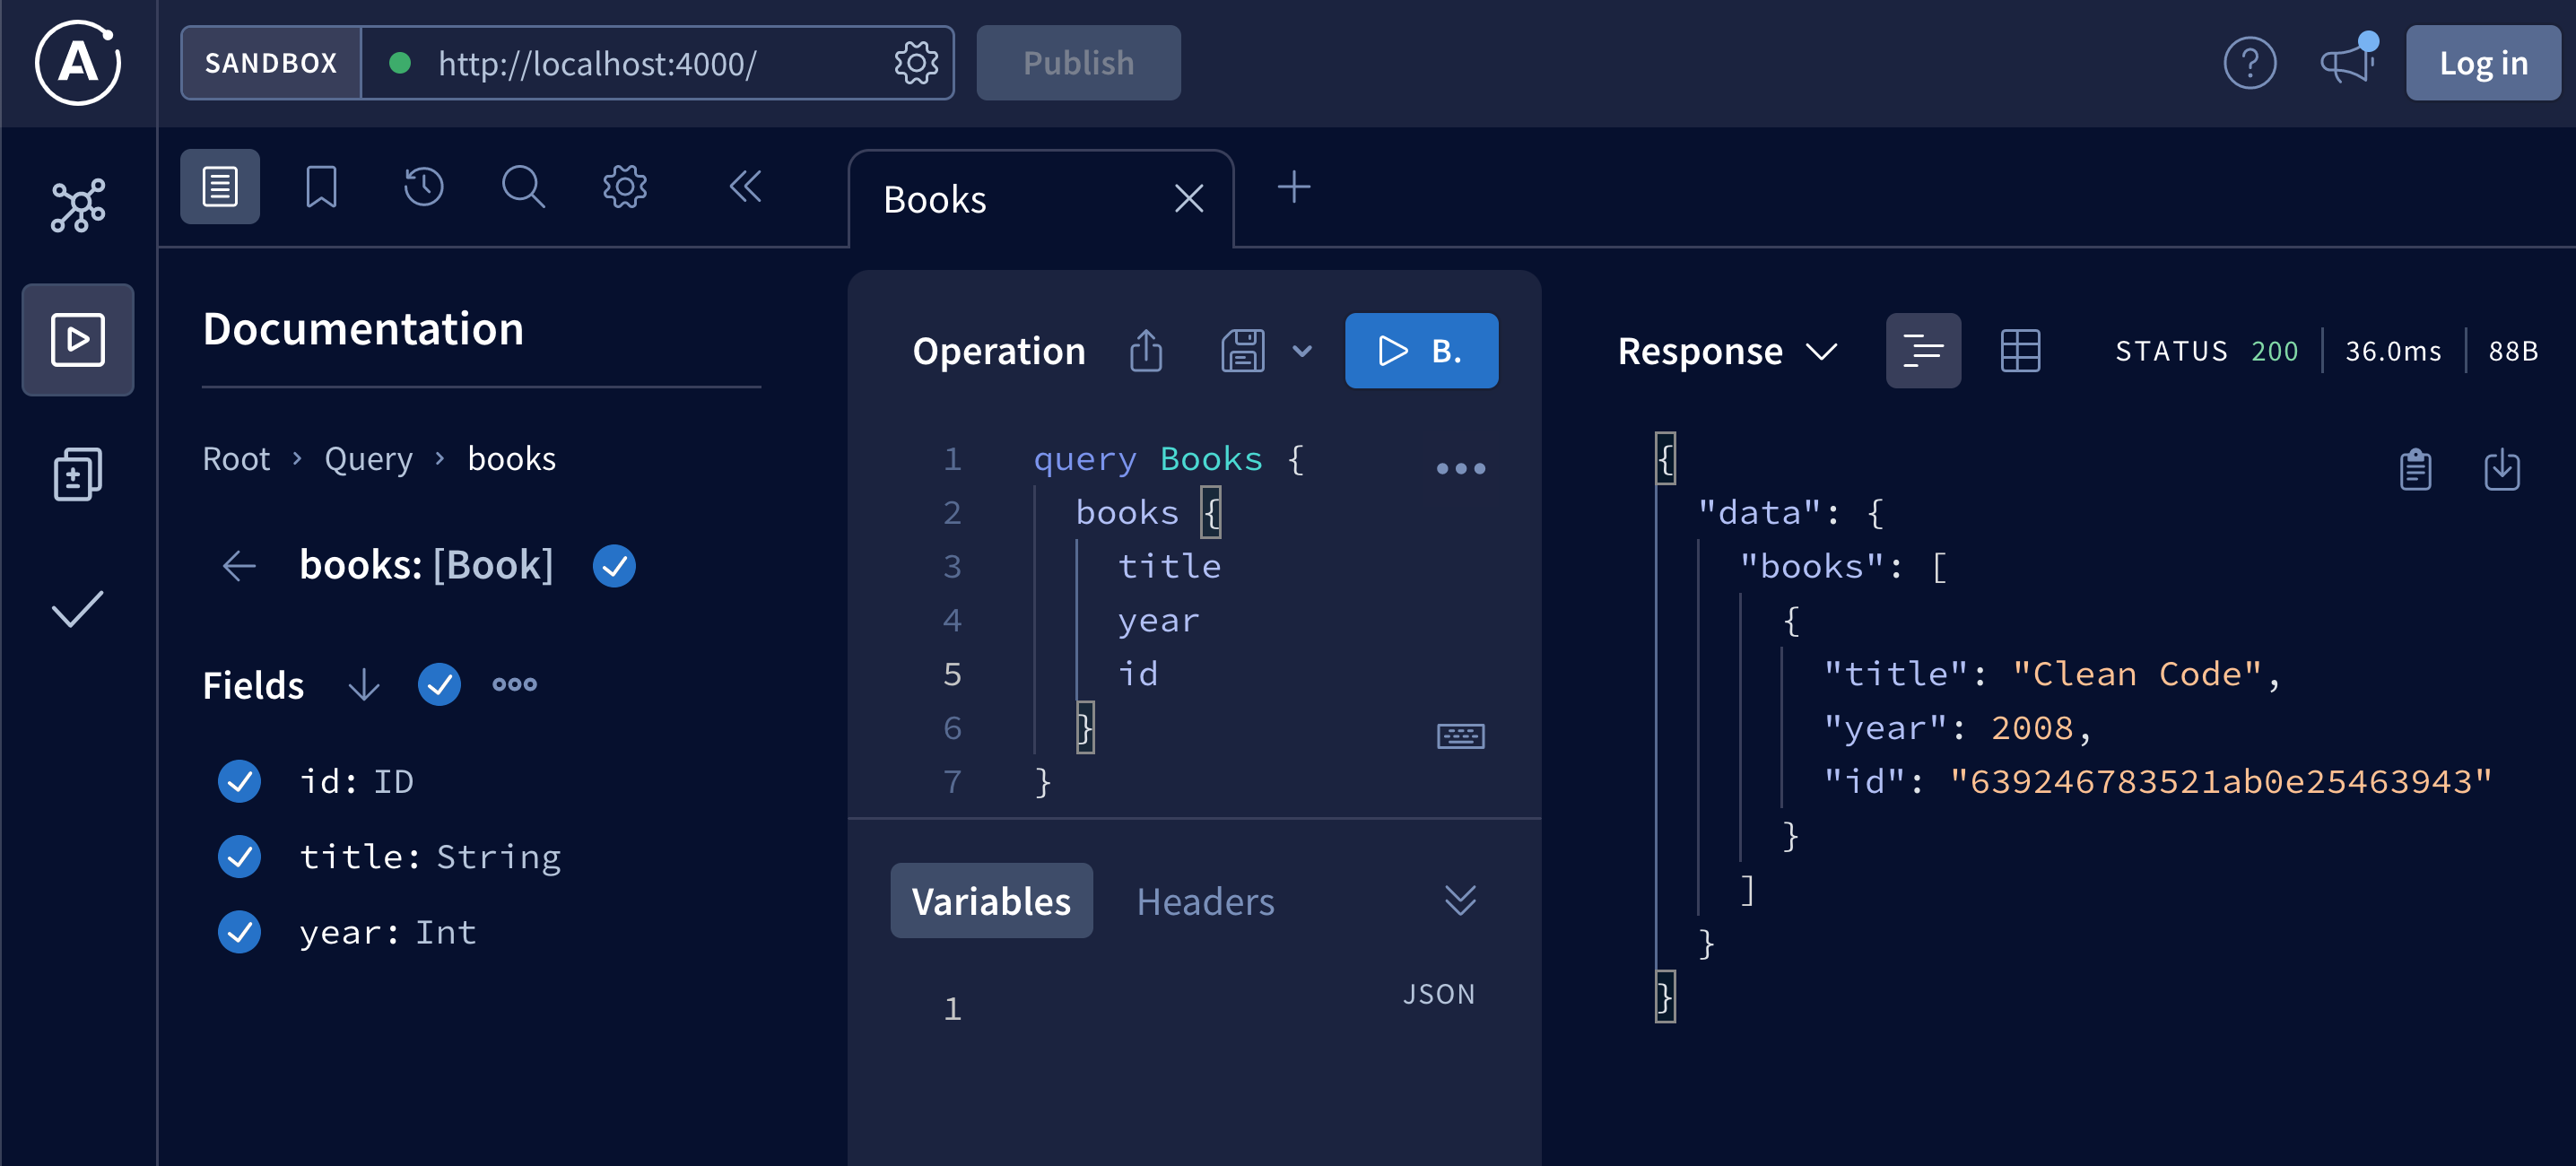
Once the book is added it should be returned in books query:
Display books in React UI
To make styling easier, let’s use Twitter Bootstrap.
Add bootstrap CSS to web-ui/public/index.html in <head> section:
<link rel="stylesheet" href="https://cdn.jsdelivr.net/npm/bootstrap@4.0.0/dist/css/bootstrap.min.css" integrity="sha384-Gn5384xqQ1aoWXA+058RXPxPg6fy4IWvTNh0E263XmFcJlSAwiGgFAW/dAiS6JXm" crossorigin="anonymous">To display books, we will create two components:
Books- for querying GraphQL API and displaying all booksBook- for displaying a single book (data will be passed fromBookscomponent)
Let’s start with Book component. Create new file src/components/Book.js:
export default function Book({book}) {
    return (
        <tr>
            <td>{book.title}</td>
            <td>{book.year}</td>
        </tr>
    );
}
The Books component will use the Book component to display all books from MongoDB. It will also fetch data from GraphQL API. We need to define GraphQL query (which we can copy from Playground), and query Apollo Server with useQuery. Create new file src\components\Books.js:
import { gql, useQuery } from '@apollo/client';
import Book from './Book';

const BOOKS_QUERY = gql`
    query Books {
        books {
            title
            year
            id
        }
    }
`;

export default function Books() {
    const {data, error, loading} = useQuery(BOOKS_QUERY);

    if (error) {
        console.error('BOOKS_QUERY error', error);
    }

    return <div>
        <table className='table'>
            <thead className='thead-dark'>
                <tr>
                    <th>Title</th>
                    <th>Year</th>
                </tr>
            </thead>
            <tbody>
                {loading && <tr><td>Loading...</td></tr>}
                {error && <tr><td>Check console for error logs</td></tr>}
                {!loading && !error && data?.books.map(book => <Book book={book} key={book.id} />)}
            </tbody>
        </table>
    </div>;
}
Import Books component in App component and display it on the main page:
import { ApolloClient, InMemoryCache, ApolloProvider } from '@apollo/client';
import Hello from './components/Hello';
import Books from './components/Books';

const client = new ApolloClient({
  uri: 'http://localhost:4000',
  cache: new InMemoryCache(),
});

export default function App() {
  return (
    <ApolloProvider client={client}>
      <Hello />
      <Books />
    </ApolloProvider>
  );
}
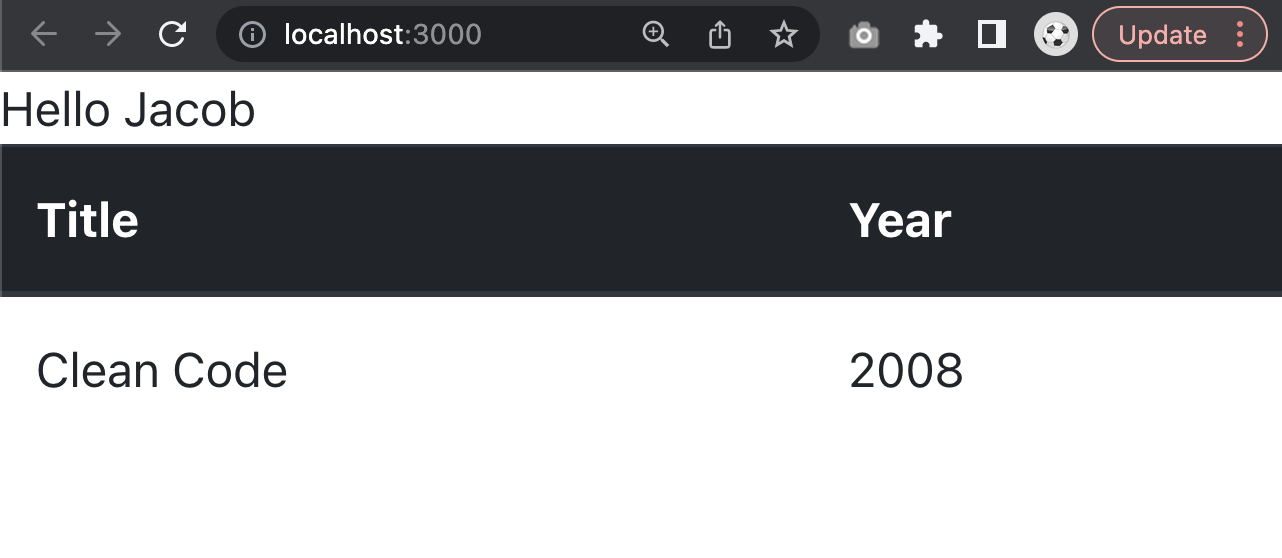
When you go back to the website you should see the book, which we added to the database displayed in a table:
React Router
Before we start working on creating, deleting and updating books, let’s add navigation to our UI with React Router. This will allow us to separate different views instead of cluttering them on the same page.
First, we need to install react-router-dom in our React app:
cd web-ui
npm install react-router-dom
We need to wrap all components in BrowserRouter, map routes to components, and add links allowing us to navigate between routes.
All changes that need to be done take place in src/App.js:
import { ApolloClient, InMemoryCache, ApolloProvider } from '@apollo/client';
import Hello from './components/Hello';
import Books from './components/Books';
import { Link, BrowserRouter, Route, Routes } from 'react-router-dom';

const client = new ApolloClient({
  uri: 'http://localhost:4000',
  cache: new InMemoryCache(),
});

export default function App() {
  return (
    <ApolloProvider client={client}>
      <BrowserRouter>
        <nav className="navbar navbar-dark bg-dark">
          <div className="navbar-nav mr-auto flex-row">
            <Link to="/" className="nav-link mr-2">Home</Link>
            <Link to="/books" className="nav-link mr-2">Books</Link>
          </div>
        </nav>
        <div className="container mt-5">
          <Routes>
            <Route path="/" element={<Hello />} />
            <Route path="/books" element={<Books />} />
          </Routes>
        </div>
      </BrowserRouter>
    </ApolloProvider>
  );
}
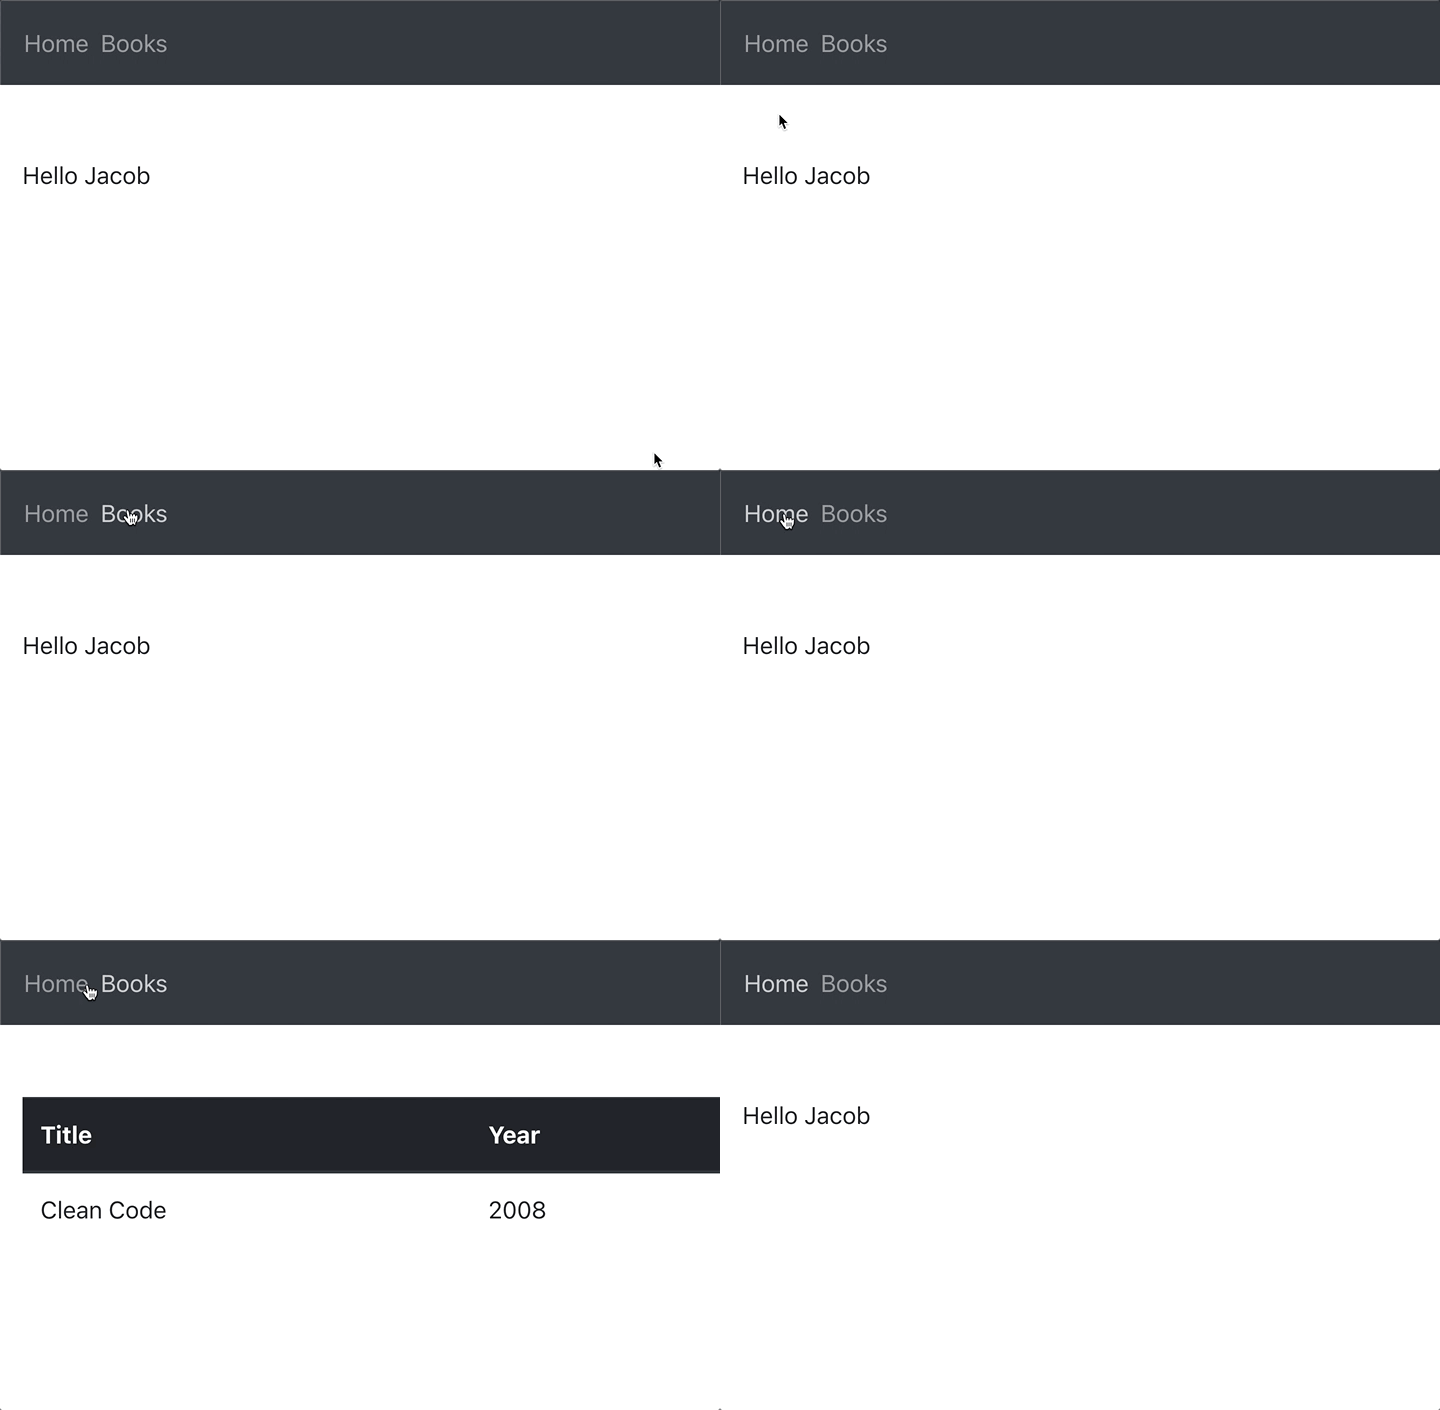
After that, you should see the main page with navigation and links to home that displays Hello component, and a link to books that display the list of books from MongoDB in a table:
Create book mutation
To insert a new book into MongoDB, we need to create a Mutation.
In GraphQL we can fetch data with Query, but to create or modify data, we need to create a Mutation.
Let’s start with updating the schema. Mutations are in a separate block in the schema. We will add create a mutation that takes title and year parameters, and returns Book object to src/models/typeDefs.js file:
import gql from 'graphql-tag';

export const typeDefs = gql`
    type Query {
        hello(name: String): String
        books: [Book]
    }
    type Book {
        id: ID,
        title: String,
        year: Int,
    }
    type Mutation {
        create(title: String, year: Int): Book
    }
`;
Now, we need to implement a resolver for the create mutation. Similarly to the schema, we need to add a new block Mutation to our resolvers and create a function. In the create function we need to add logic to create a new book and save it to MongoDB. This is src/resolvers.js after updates:
import {Book} from './models/Book.js';

export const resolvers = {
    Query: {
        hello: (_, {name}) => `Hello ${name}`,
        books: async () => await Book.find({}),
    },
    Mutation: {
        create: async (_, {title, year}) => {
            const newBook = new Book({
                title, year
            });
            await newBook.save();
            return newBook;
        }
    }
};
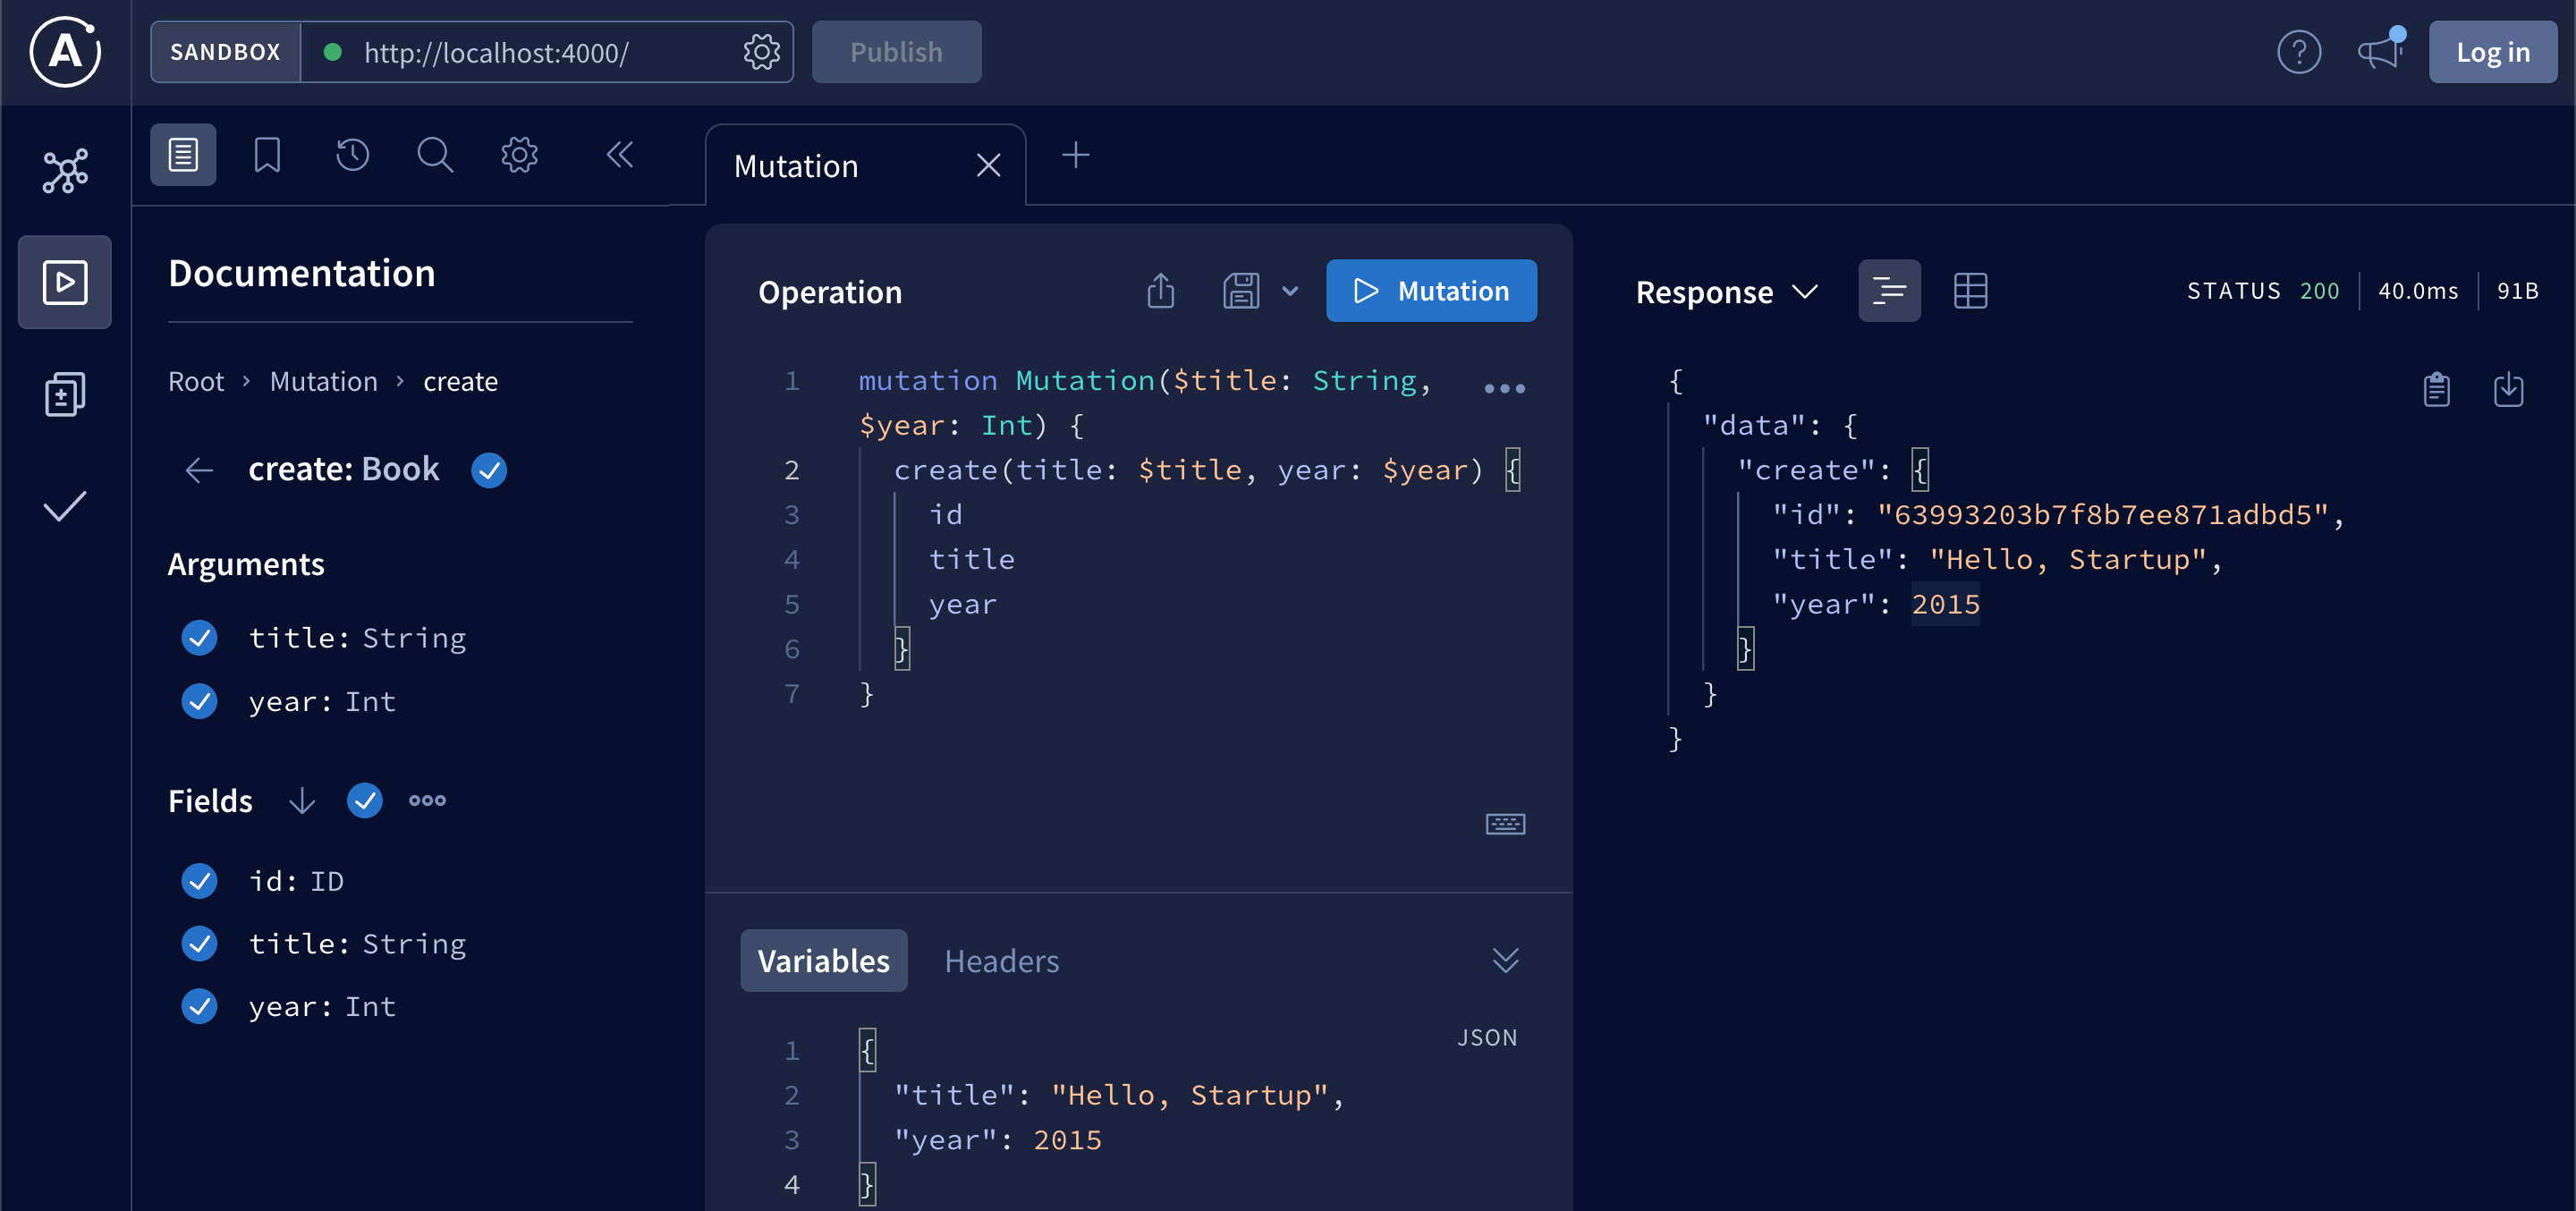
We can test creating books with GraphQL Playground:
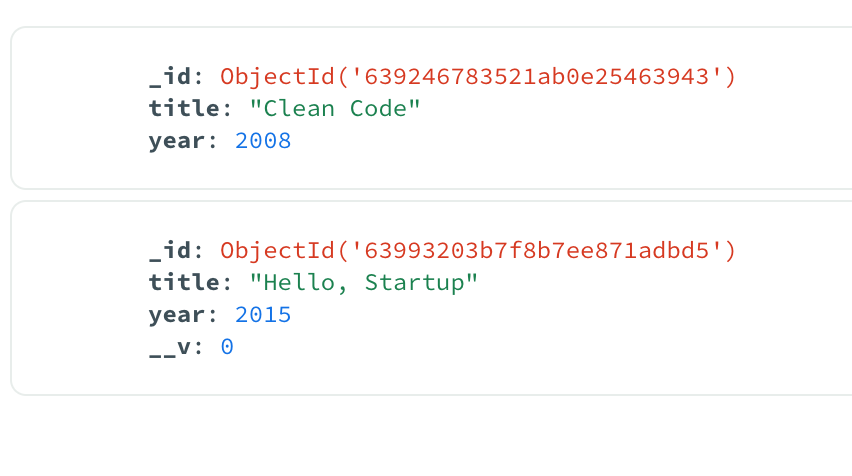
If everything went well you should see a new book in MongoDB. Notice __v0 field in the book inserted with Mongoose. This is versionKey property, which is set on each document when first created by Mongoose.
UI for creating books
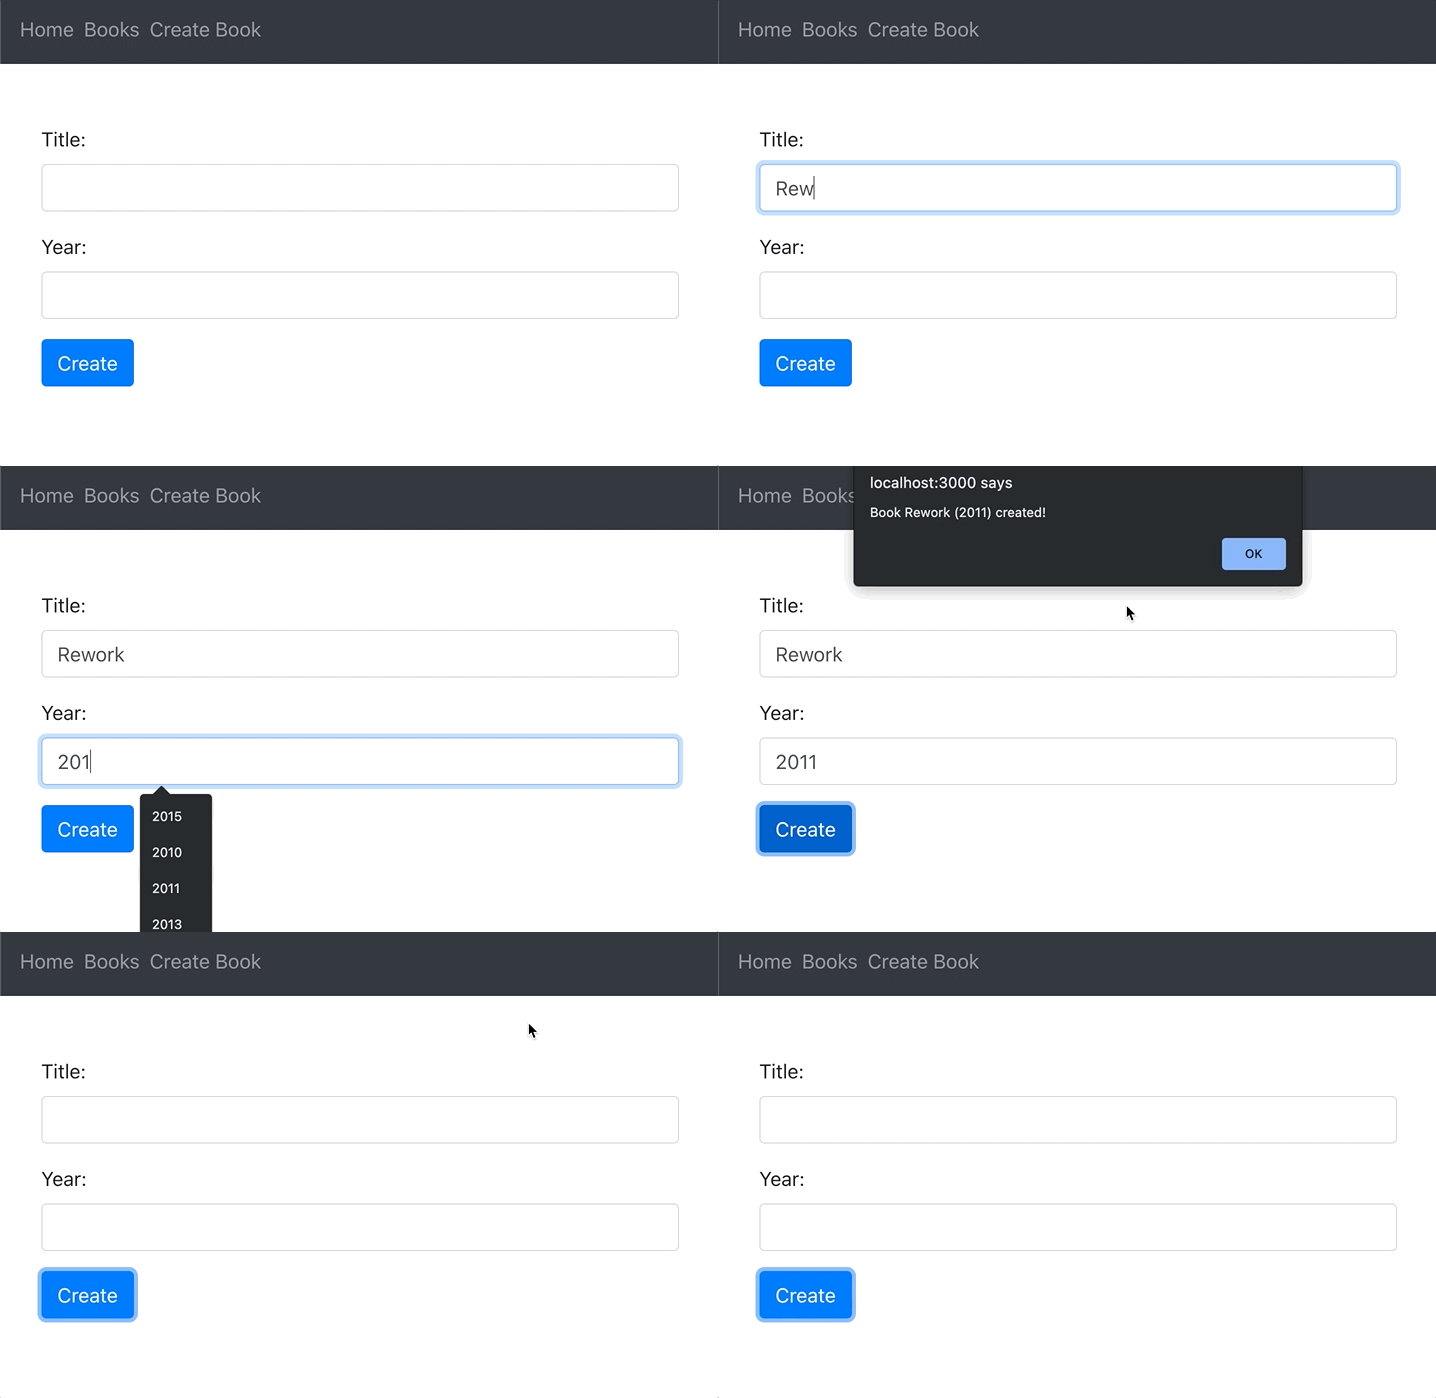
Let’s start with a new CreateBook component. We need to create a new form to collect title and year, and call the create mutation we created in the previous section.
We will utilize useState hook to access input field data (title and year).
To call mutation, we will use useMutation hook from @apollo/client.
We can get CREATE_BOOK_MUTATION from GraphQL playground.
Make sure to convert year from string to integer when passing it as a variable to mutation. Otherwise, it will return an error. You can simply add + before the variable to convert a string to an integer.
Add src/components/CreateBook.js file to web-ui folder:
import { useState } from 'react';
import { gql, useMutation } from '@apollo/client';

const CREATE_BOOK_MUTATION = gql`
    mutation Mutation($title: String, $year: Int) {
        create(title: $title, year: $year) {
            id
            title
            year
        }
    }
`;

export default function CreateBook() {
    const [title, setTitle] = useState('');
    const [year, setYear] = useState('');
    const [createMutation] = useMutation(CREATE_BOOK_MUTATION);

    const handleSubmit = evt => {
        evt.preventDefault();
        console.info('Creating Book...', title, year);
        createMutation({
            variables: {
                title,
                year: +year,
            }
        });
        alert(`Book ${title} (${year}) created!`);
        setTitle('');
        setYear('');
    };

    return <form onSubmit={evt => handleSubmit(evt)}>
        <div className="form-group">
            <label htmlFor="title">Title:</label>
            <input
                type="text"
                name="title"
                className="form-control"
                value={title}
                onChange={e => setTitle(e.target.value)}
                />
        </div>
        <div className="form-group">
            <label htmlFor="year">Year:</label>
            <input
                type="text"
                name="year"
                className="form-control"
                value={year}
                onChange={e => setYear(e.target.value)}
                />
        </div>
        <input type="submit" value="Create" className="btn btn-primary" />
    </form>;
}
We will also create a separate route /create to display the CreateBook component, and a link to that route. Update src/App.js:
import { ApolloClient, InMemoryCache, ApolloProvider } from '@apollo/client';
import Hello from './components/Hello';
import Books from './components/Books';
import CreateBook from './components/CreateBook';
import { Link, BrowserRouter, Route, Routes } from 'react-router-dom';

const client = new ApolloClient({
  uri: 'http://localhost:4000',
  cache: new InMemoryCache(),
});

export default function App() {
  return (
    <ApolloProvider client={client}>
      <BrowserRouter>
        <nav className="navbar navbar-dark bg-dark">
          <div className="navbar-nav mr-auto flex-row">
            <Link to="/" className="nav-link mr-2">Home</Link>
            <Link to="/books" className="nav-link mr-2">Books</Link>
            <Link to="/create" className="nav-link mr-2">Create Book</Link>
          </div>
        </nav>
        <div className="container mt-5">
          <Routes>
            <Route path="/" element={<Hello />} />
            <Route path="/books" element={<Books />} />
            <Route path="/create" element={<CreateBook />} />
          </Routes>
        </div>
      </BrowserRouter>
    </ApolloProvider>
  );
}
You may notice that a new book does not appear on the books list without a refresh. There are two ways to fix it:
- Update local GraphQL cache - use this approach when performance is a priority over correctness
- Refetch query - use this approach when correctness is more important than performance
We will use the refetch query approach, which is usually the best default answer unless you really care about high performance.
This requires passing a list of queries to refetch to useMutation hook:
const [createMutation] = useMutation(CREATE_BOOK_MUTATION, {
    refetchQueries: [
        {query: BOOKS_QUERY}
    ]
});
As you can see, we need BOOKS_QUERY, which we already defined in Books component. To do not copy/pasta, let’s extract all GraphQL queries and mutations to src/graphql.js file:
import { gql } from '@apollo/client';

export const CREATE_BOOK_MUTATION = gql`
    mutation Mutation($title: String, $year: Int) {
        create(title: $title, year: $year) {
            id
            title
            year
        }
    }
`;

export const BOOKS_QUERY = gql`
    query Books {
        books {
            title
            year
            id
        }
    }
`;
Now you can remove BOOKS_QUERY variable from Books component and just import it from graphql.js:
import { BOOKS_QUERY } from '../graphql';Similarly in, CreateBook component you can remove CREATE_BOOK_MUTATION, and import both CREATE_BOOK_MUTATION and BOOKS_QUERY from graphql.js:
import { BOOKS_QUERY, CREATE_BOOK_MUTATION } from '../graphql';Deleting books
Delete mutation will be very similar to create mutation from the previous section. We just need a mutation that takes id of a book we want to delete.
Let’s update schema in src/models/typeDefs.js by adding delete mutation that takes id parameter and returns the same id if book is successfully deleted:
import gql from 'graphql-tag';

export const typeDefs = gql`
    type Query {
        hello(name: String): String
        books: [Book]
    }
    type Book {
        id: ID,
        title: String,
        year: Int,
    }
    type Mutation {
        create(title: String, year: Int): Book
        delete(id: ID): ID
    }
`;
And implement the resolver function in src/resolvers.js:
import {Book} from './models/Book.js';

export const resolvers = {
    Query: {
        hello: (_, {name}) => `Hello ${name}`,
        books: async () => await Book.find({}),
    },
    Mutation: {
        create: async (_, {title, year}) => {
            const newBook = new Book({
                title, year
            });
            await newBook.save();
            return newBook;
        },
        delete: async (_, {id}) => {
            const result = await Book.deleteOne({_id: id});
            if (result.acknowledged && result.deletedCount === 1) {
                return id;
            }
            return null;
        },
    }
};
We can test deleting book in the GraphQL playground by grabbing an id from MongoDB Compass:
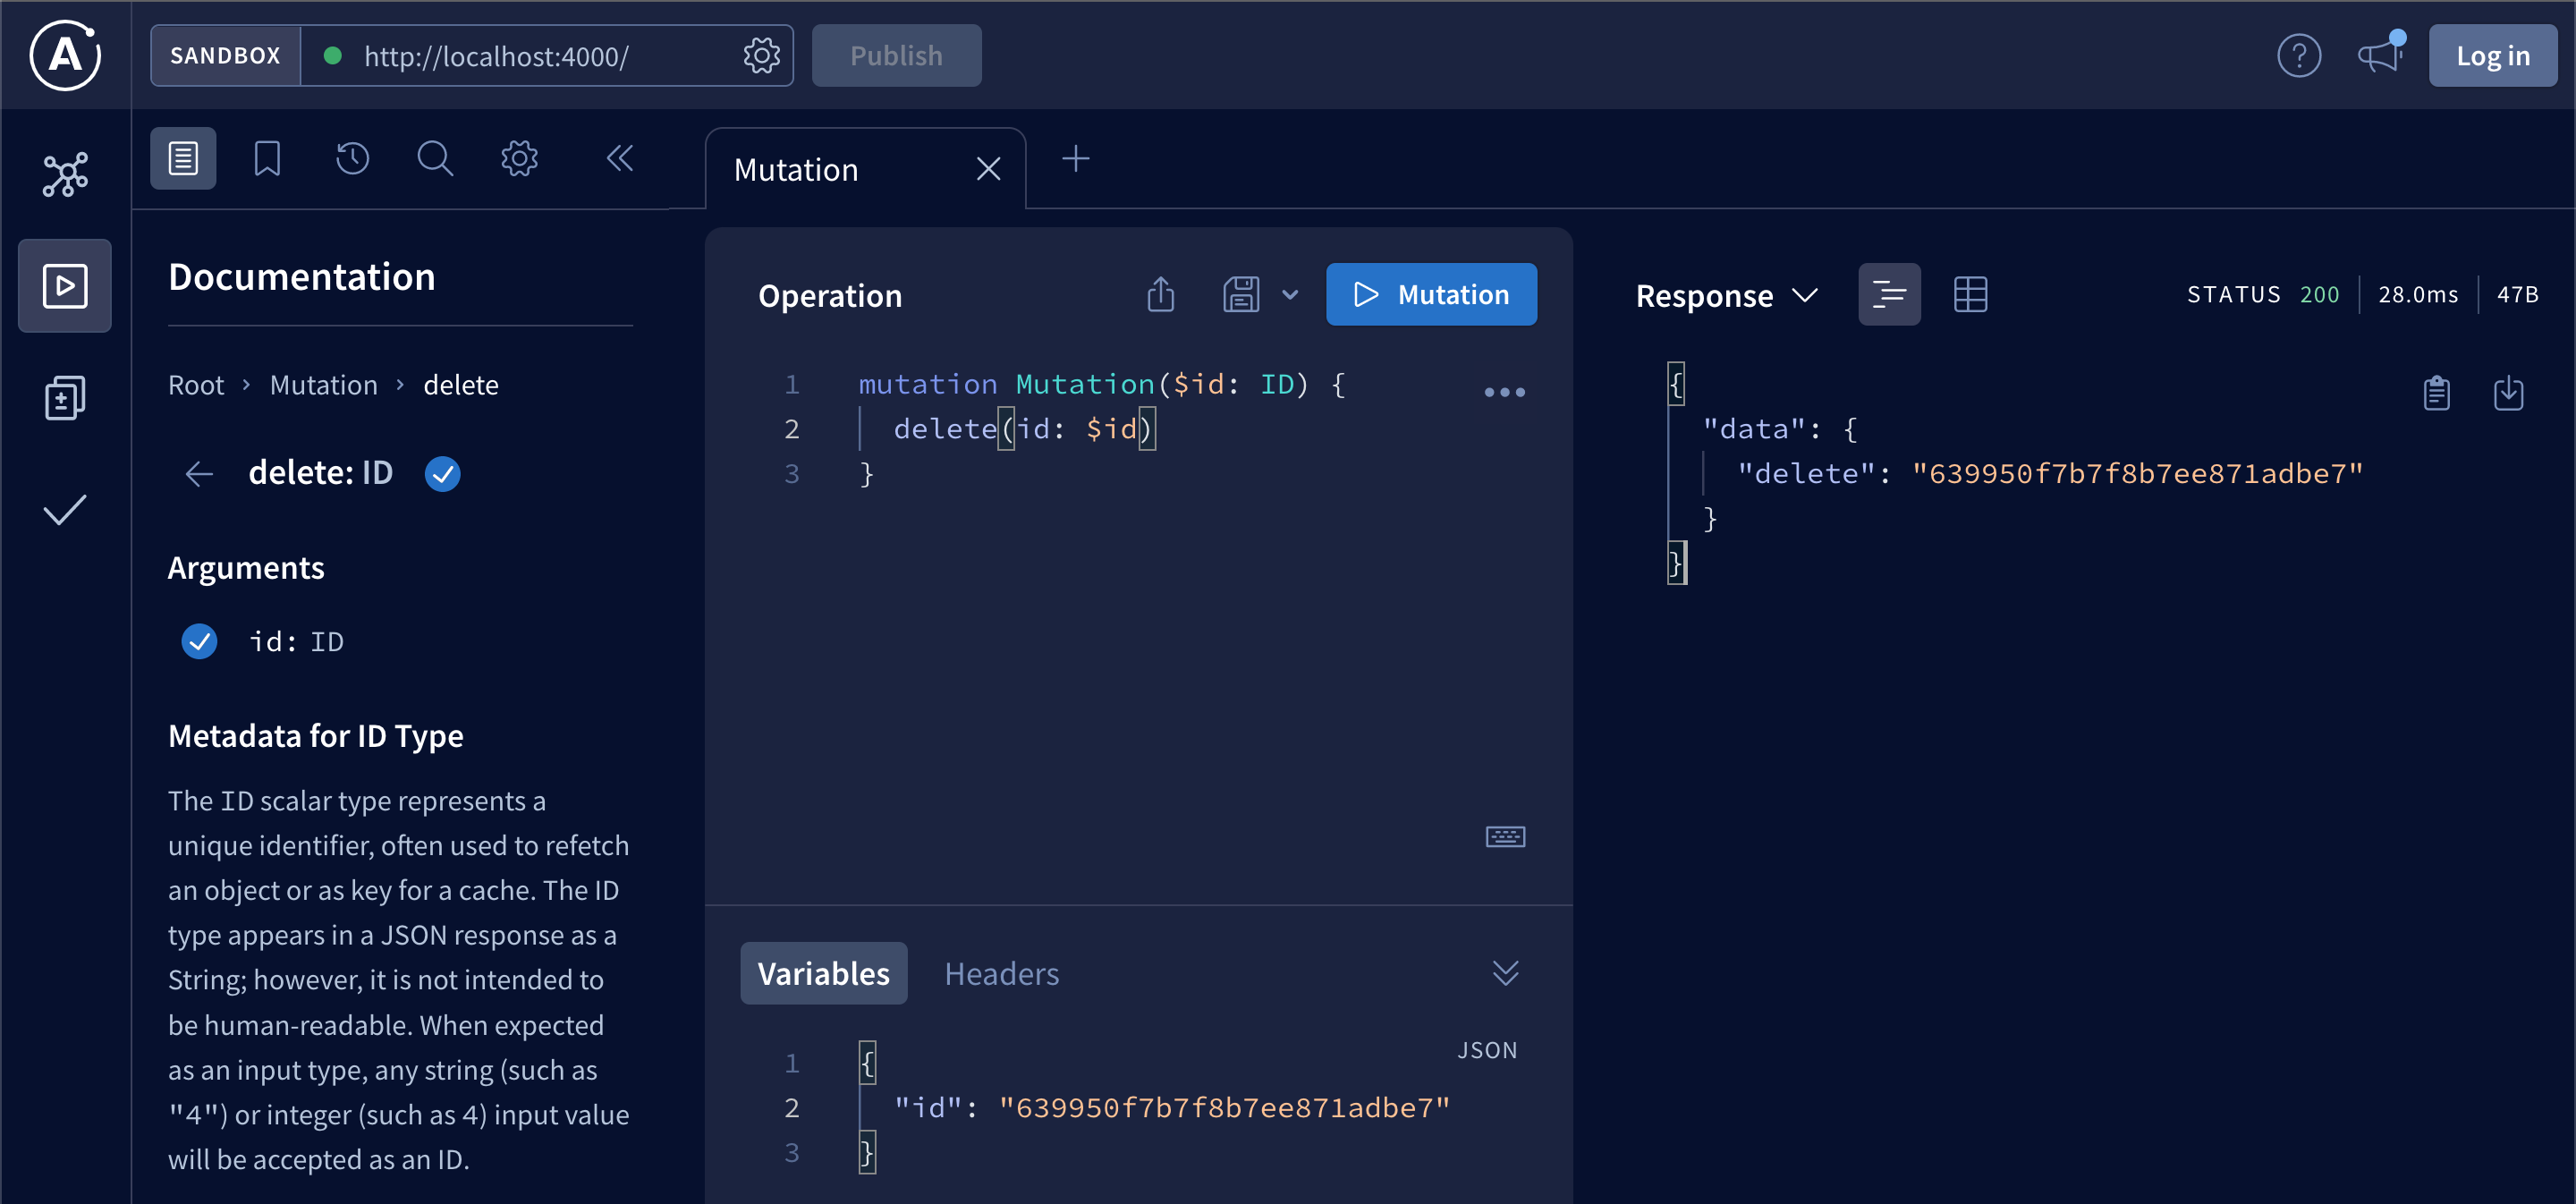
If we try to delete a book that doesn’t exist we should get null in response:
{
  "data": {
    "delete": null
  }
}
We have our backend working. Let’s add delete functionality to UI.
Add delete mutation to graphql.js (you can copy/paste from GraphQL Playground):
export const DELETE_BOOK_MUTATION = gql`
    mutation Mutation($id: ID) {
        delete(id: $id)
    }
`;
We will add a delete button to Book component, and call delete mutation from there:
import { useMutation } from "@apollo/client";
import { DELETE_BOOK_MUTATION, BOOKS_QUERY } from "../graphql";

export default function Book({book}) {
    const [deleteBookMutation] = useMutation(DELETE_BOOK_MUTATION, {
        refetchQueries: [
            {query: BOOKS_QUERY},
        ],
    });
    const deleteBook = () => {
        deleteBookMutation({
            variables: {
                id: book.id,
            },
        });
    };
    return (
        <tr>
            <td>{book.title}</td>
            <td>{book.year}</td>
            <td>
                <button className="btn btn-danger" onClick={deleteBook}>
                    Delete
                </button>
            </td>
        </tr>
    );
}
We also need to add a new column to the table header in Books component:
<thead className='thead-dark'>
    <tr>
        <th>Title</th>
        <th>Year</th>
        <th></th>
    </tr>
</thead>
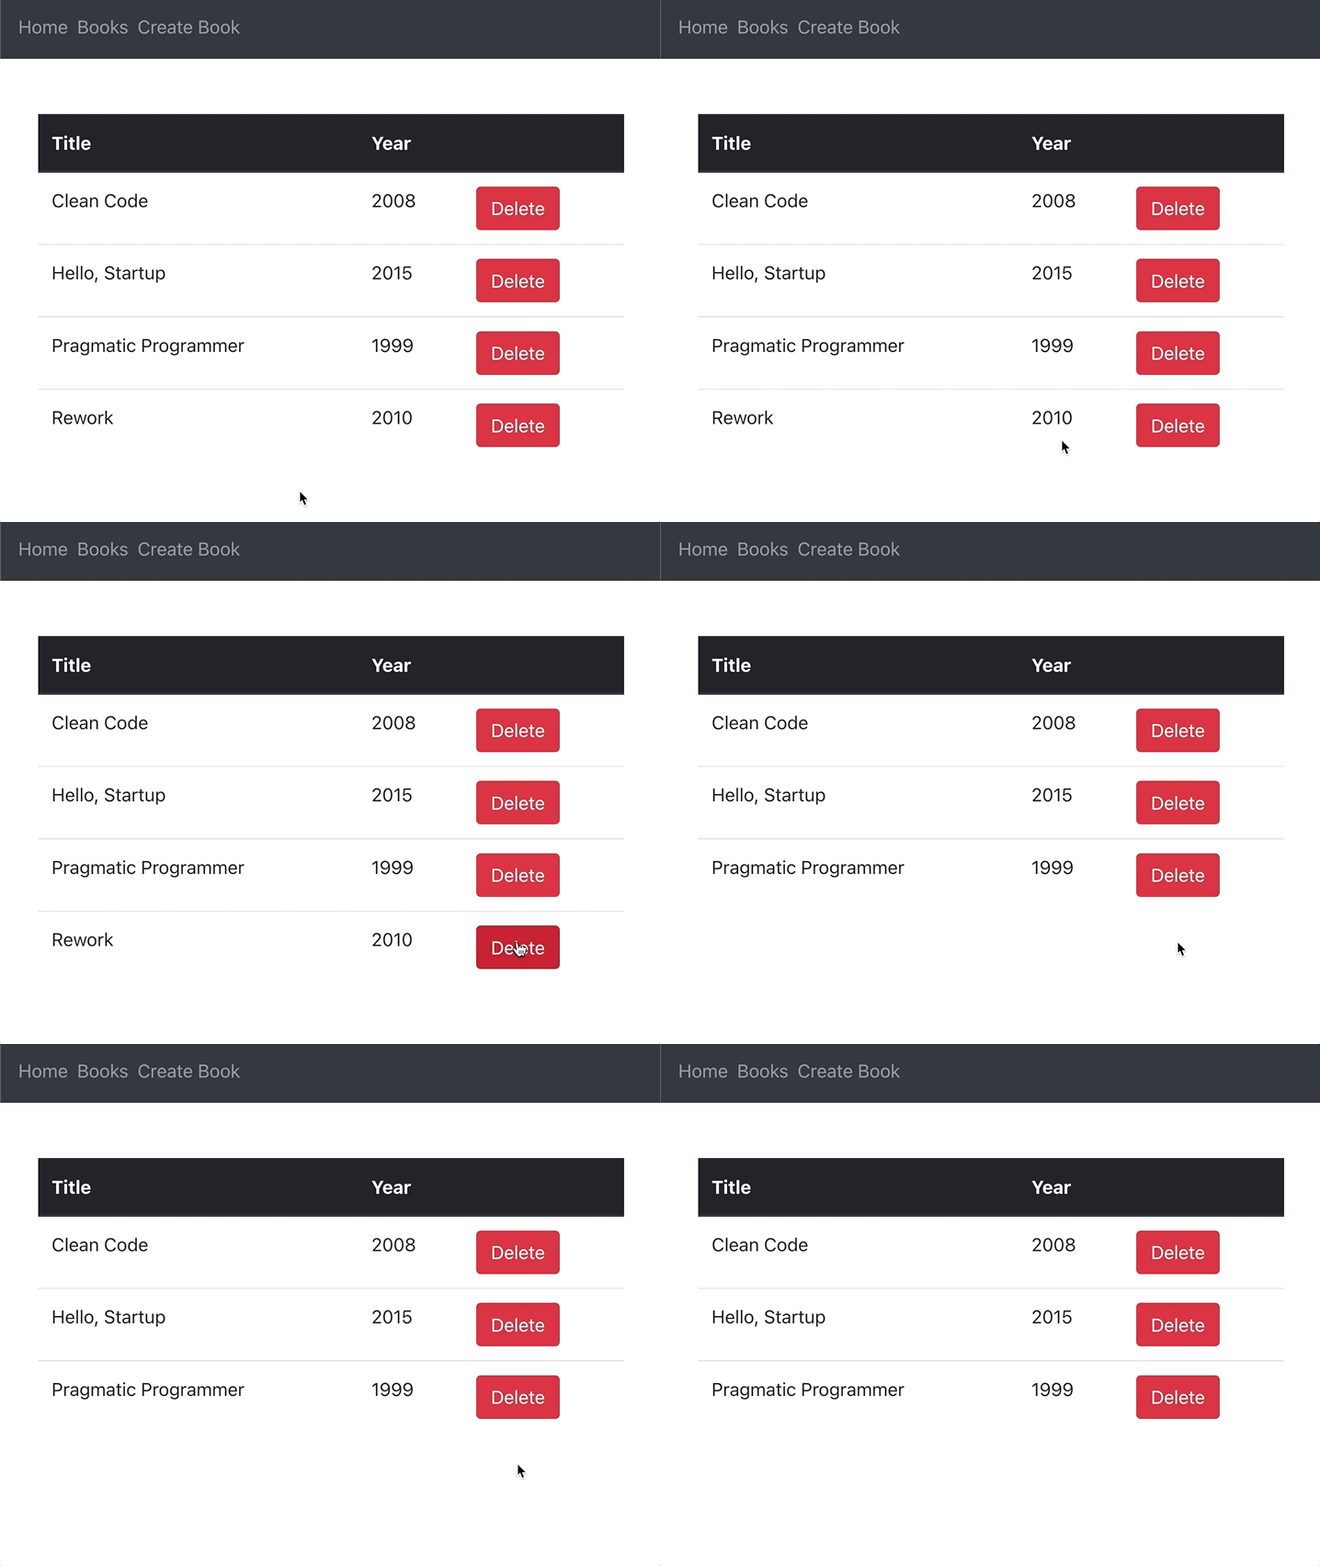
Clicking a delete button should delete a book from MongoDB and delete a row from the books list table:
Editing books
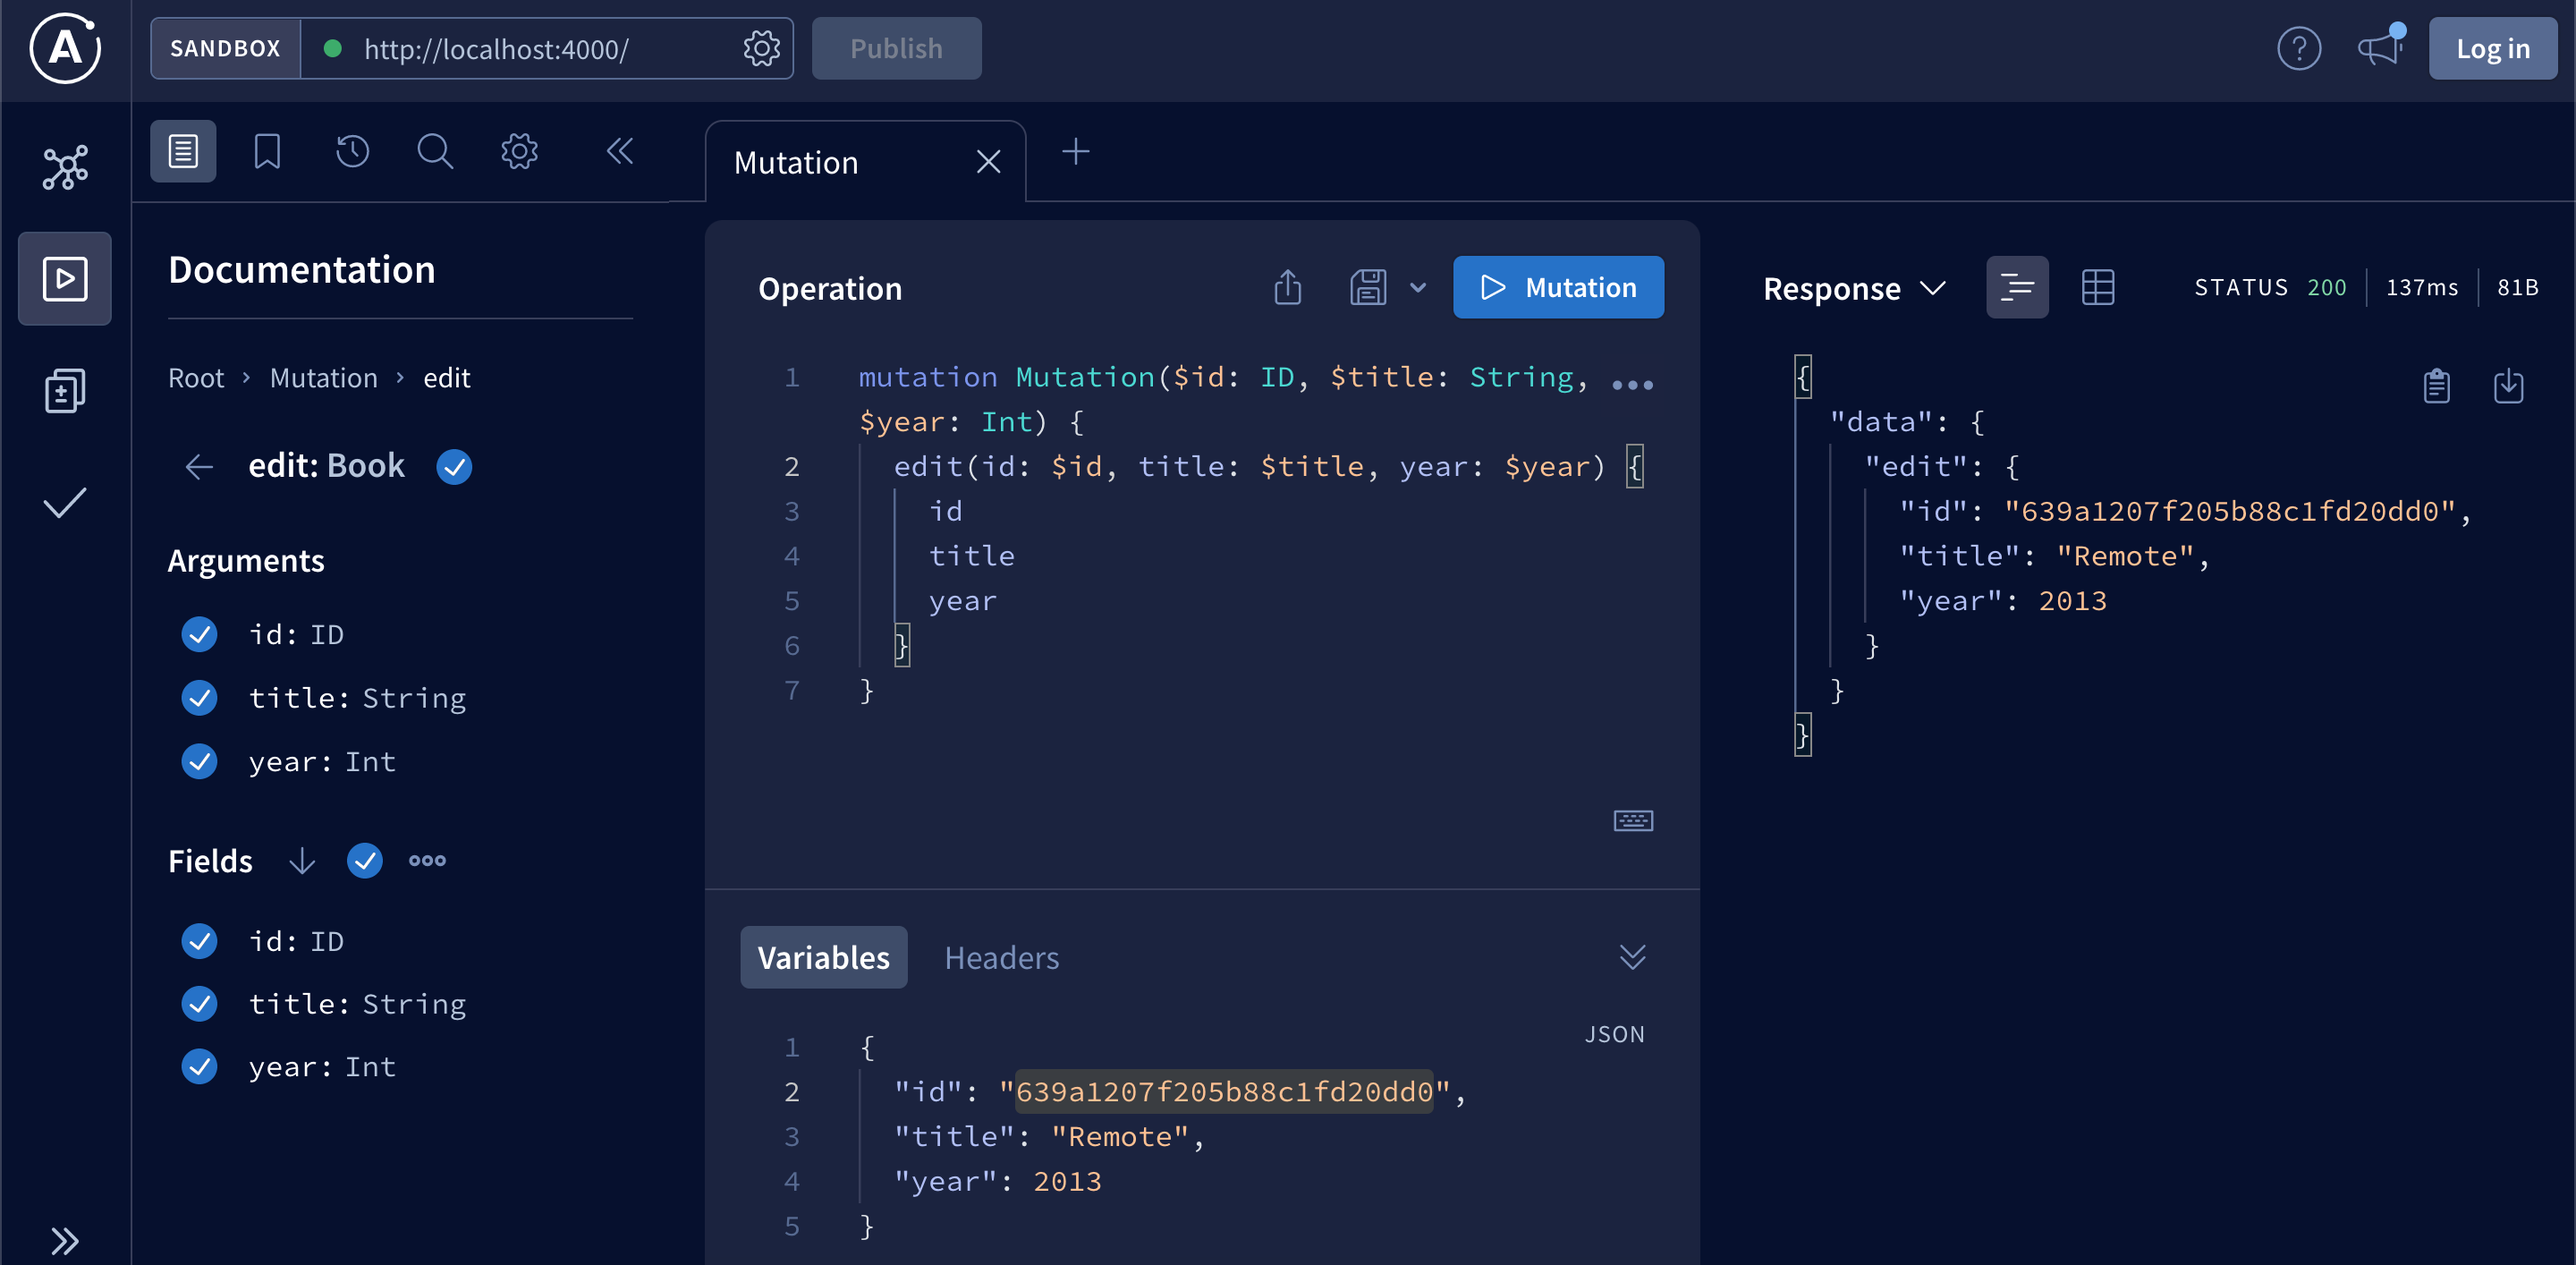
Editing is almost like creating. You need to pass id of an existing book in addition to title and year.
Let’s update the schema by adding edit mutation:
import gql from 'graphql-tag';

export const typeDefs = gql`
    type Query {
        hello(name: String): String
        books: [Book]
    }
    type Book {
        id: ID,
        title: String,
        year: Int,
    }
    type Mutation {
        create(title: String, year: Int): Book
        delete(id: ID): ID
        edit(id: ID, title: String, year: Int): Book
    }
`;
And resolvers, by implementing edit mutation:
import {Book} from './models/Book.js';

export const resolvers = {
    Query: {
        hello: (_, {name}) => `Hello ${name}`,
        books: async () => await Book.find({}),
    },
    Mutation: {
        create: async (_, {title, year}) => {
            const newBook = new Book({
                title, year
            });
            await newBook.save();
            return newBook;
        },
        delete: async (_, {id}) => {
            const result = await Book.deleteOne({_id: id});
            if (result.acknowledged && result.deletedCount === 1) {
                return id;
            }
            return null;
        },
        edit: async (_, {id, title, year}) => {
            const result = await Book.updateOne(
                {
                    _id: id,
                },
                {
                    $set: {
                        title,
                        year
                    },
                });
            if (result.acknowledged && result.modifiedCount === 1) {
                return await Book.findOne({_id: id});
            }
            return null;
        }
    }
};
Test in GraphQL Playground:
To enable editing from UI, we will add an edit button to Book component. It will change text to input fields when in editing mode, and display save and cancel buttons to commit or discard changes.
Let’s start with adding EDIT_BOOK_MUTATION to src/graphql.js:
export const EDIT_BOOK_MUTATION = gql`
    mutation Mutation($id: ID, $title: String, $year: Int) {
        edit(id: $id, title: $title, year: $year) {
            id
            title
            year
        }
    }
`;
Update src/components/Book.js by adding editing state, buttons and call to update book:
import { useMutation } from "@apollo/client";
import { DELETE_BOOK_MUTATION, BOOKS_QUERY, EDIT_BOOK_MUTATION } from "../graphql";
import { useState } from "react";

export default function Book({book}) {
    const [deleteBookMutation] = useMutation(DELETE_BOOK_MUTATION, {
        refetchQueries: [
            {query: BOOKS_QUERY},
        ],
    });
    const deleteBook = () => {
        deleteBookMutation({
            variables: {
                id: book.id,
            },
        });
    };

    const [isEditing, setIsEditing] = useState(false);
    const [title, setTitle] = useState(book.title);
    const [year, setYear] = useState(book.year);
    const [editBookMutation] = useMutation(EDIT_BOOK_MUTATION, {
        refetchQueries: [
            {query: BOOKS_QUERY},
        ],
    });

    const saveChanges = () => {
        editBookMutation({
            variables: {
                id: book.id,
                title: title,
                year: +year,
            },
        });
        setIsEditing(false);
    };

    const discardChanges = () => {
        setIsEditing(false);
        setTitle(book.title);
        setYear(book.year);
    };

    return (
        <tr>
            <td>
                {isEditing
                 ? <input type="text"
                    value={title}
                    onChange={(e) => setTitle(e.target.value)}
                    className="form-control" />
                 : book.title}
            </td>
            <td>
                {isEditing
                 ? <input type="text"
                    value={year}
                    onChange={(e) => setYear(e.target.value)}
                    className="form-control" />
                 : book.year}
            </td>
            <td>
                {isEditing
                ? <>
                    <button className="btn btn-success mr-2" onClick={saveChanges}>
                        Save
                    </button>
                    <button className="btn btn-danger" onClick={discardChanges}>
                        Cancel
                    </button>
                </>
                : <>
                    <button className="btn btn-info mr-2" onClick={() => setIsEditing(true)}>
                        Edit
                    </button>
                    <button className="btn btn-danger" onClick={deleteBook}>
                        Delete
                    </button>
                </>
                }

            </td>
        </tr>
    );
}
Now, you should be able to edit books inline:
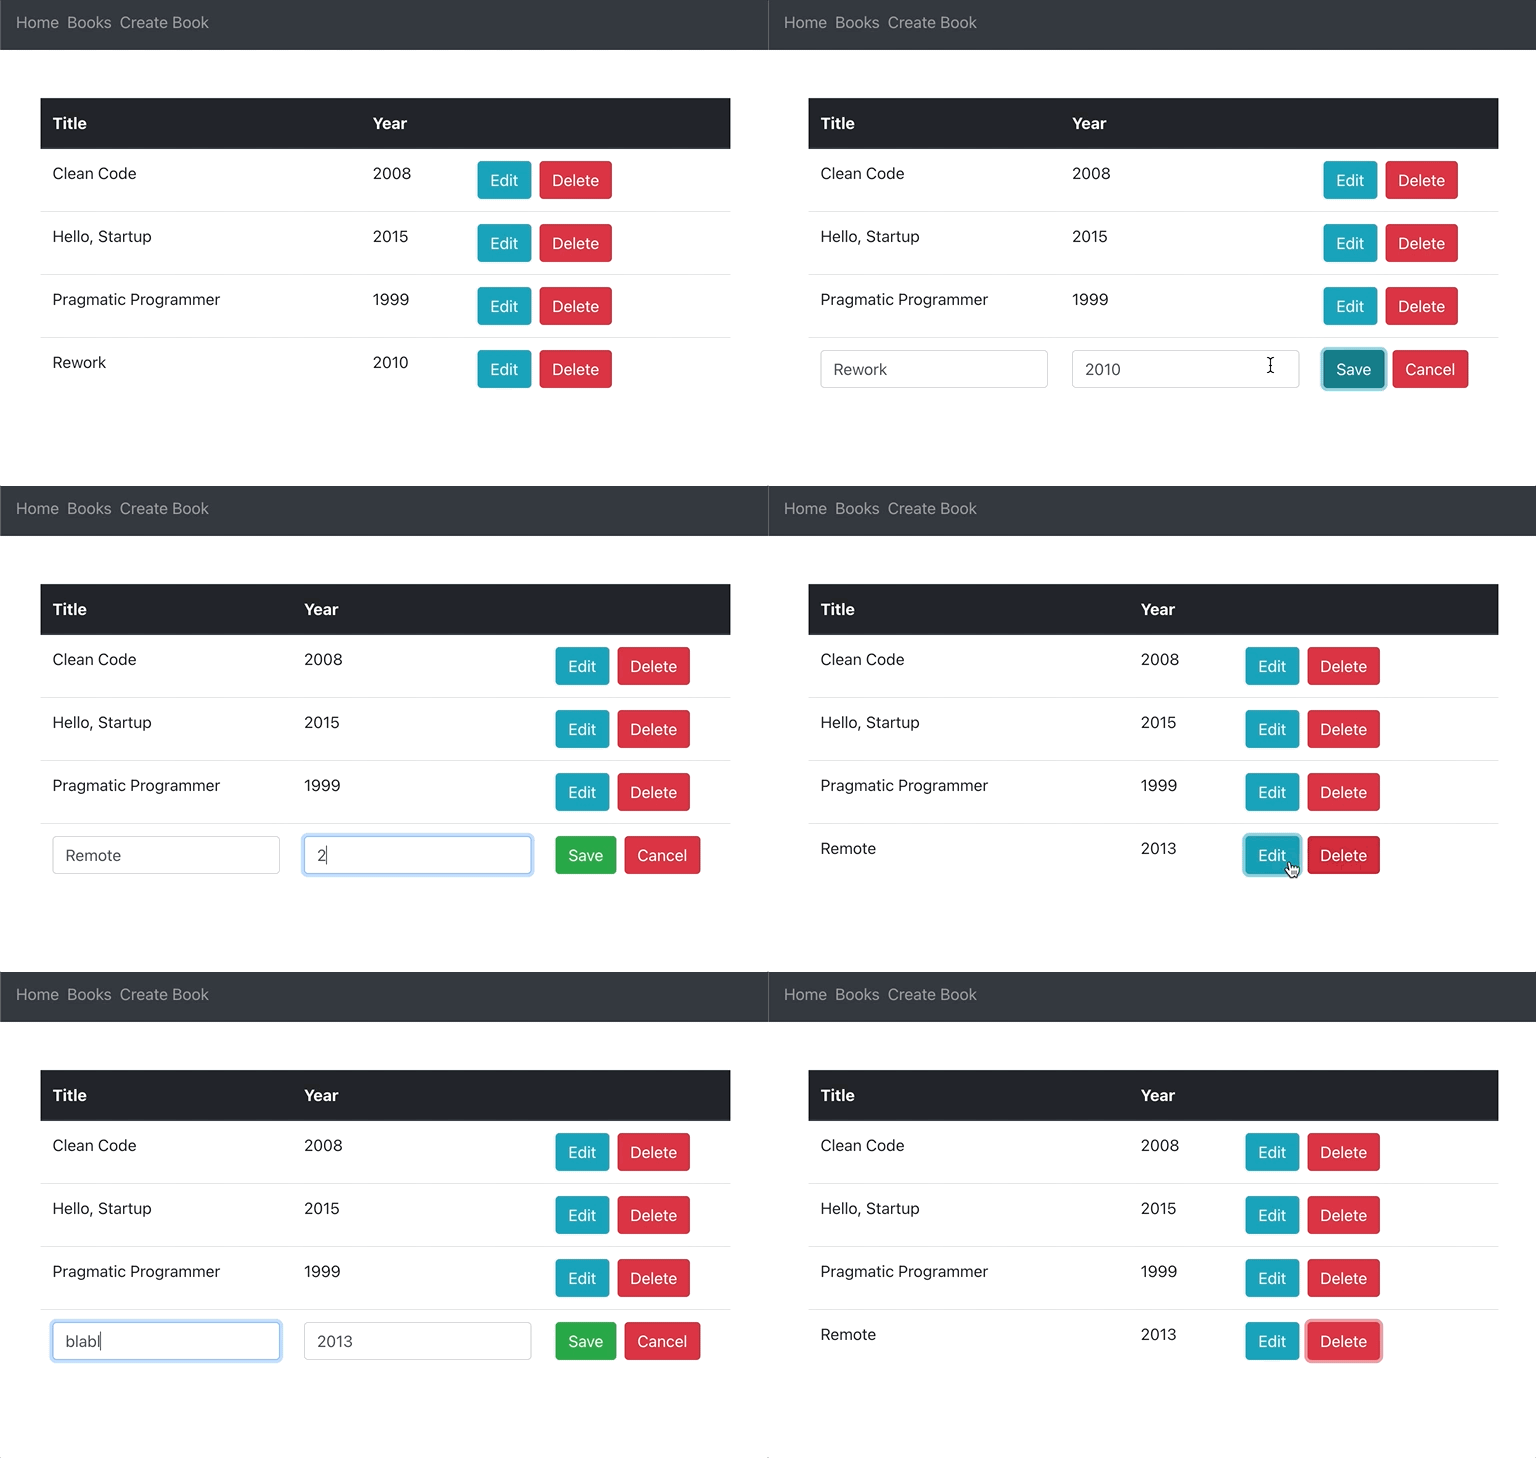
To make sure that everything works as expected, you can double-check if books are being properly created, deleted and updated in Mongo with MongoDB Compass.
Summary
Congratulations! Now, you know how to build web apps with MARN stack!
You can find the entire code in this GitHub repo: https://github.com/jj09/marn.
I also recorded a video version of this guide:
To learn more about Apollo Server, checkout Apollo docs. It’s pretty good!
To dive into MongoDB check out MongoDB CRUD Operations and mongoose API. Once you learn how to write Mongo queries with MongoDB Shell, you don’t really need to go over mongoose API as it’s almost identical.
If you are new to React, I recommend React Docs and ReactJS Crash Course.
You can very easily swap different components for MARN stack. E.g., swap React with Vue.js as I did for vue-apollo demo project.