Jekyll2024-03-12T06:17:03+00:00https://jj09.net/feed.xmlJacob JedryszekSoftware Engineer at Meta (Ex-MSFT)Generative AI: 10 things to know2023-08-26T00:00:00+00:002023-08-26T00:00:00+00:00https://jj09.net/generative-ai-10-things-to-know
Generative Artificial Intelligence (GenAI) has shown remarkable advancements in recent years and has the potential to revolutionize various industries by automating creative tasks, generating realistic content, and assisting humans in creative endeavors. GenAI is a subset of AI techniques and models that are designed to generate new text, images, videos, or audio content that is similar to what humans produce. This article explains the 10 most important things you need to know about the Generative AI world.
1. Large Language Model (LLM)
A large language model (LLM) is characterized by its large size. LLM can have over a trillion parameters, and take multiple Gigabytes of storage. Its size is enabled by AI accelerators, which can process vast amounts of text data, mostly scraped from the Internet. LLM is a neural network that can contain from tens of millions and up to billions of weights and is (pre-)trained using self-supervised learning and semi-supervised learning.
Language models work by taking an input text and repeatedly predicting the next token or word. Up to 2020, fine-tuning was the only way a model could be adapted to be able to accomplish specific tasks. Larger-sized models, such as GPT-4 or Llama 2, however, can be prompt-engineered to achieve similar results.
You can find a lot of open-source Large Language Models on HuggingFace, and build products on top of them!
2. Fine-tuning
You take a trained LLM and use new data to update its parameters for new settings or repurpose it for new applications. Fine-tuning can be done on the entire neural network, or on only a subset of its layers, in which case the layers that are not being fine-tuned are “frozen” (not updated during the backpropagation step).
Prompt engineering is a technique used in working with AI models, especially in the context of text-to-text models. It involves crafting well-structured and specific instructions or queries, known as prompts, to guide the AI in generating desired outputs. These prompts help the AI understand the task and generate relevant and accurate responses. Prompt engineering can include providing context, examples, instructions, or even specifying styles to ensure the AI produces the intended results.
You might be heard about Zero-shot prompting or few-shot prompting. Zero-shot prompting involves instructing a model to perform a task or generate text without providing any specific examples or labeled data during inference. This is what we usually do when using ChatGPT.
Example of zero-shot prompt:
What's the sentiment of this review: "It doesnt work!"
ChatGPT response:
The sentiment of the review "It doesn't work!" is negative.
Few-shot prompting, on the other hand, provides the model with a few examples or context during inference.
Example of a few-shot prompt:
Great product, 10/10: positive
Didn't work very well: negative
Super helpful, worth it: positive
It doesnt work!:
ChatGPT response:
The sentiment of the review "It doesn't work!" is negative.
In the context of Generative AI, “hallucination” refers to a situation where an AI model generates content that is not accurate or coherent based on the input or context. It essentially creates information that doesn’t exist in the source data or doesn’t align with the intended output. Hallucinations can occur when AI models extrapolate too much from the given data or when they lack proper training on specific aspects, leading to the generation of unrealistic or inaccurate content.
Imagine a language model trained on a large dataset of medical information. When asked to generate a description of a medical condition, the model responds with a detailed explanation that includes symptoms and treatments that don’t exist in reality. This response is a hallucination because the AI has generated information that is not accurate based on its training data, creating a scenario that doesn’t align with actual medical knowledge.
Hallucination is one of the biggest challenges in creating Large Language Models. It’s often hard to distinguish hallucination from accurate information in AI-generated content. That’s why it’s important to critically evaluate AI outputs and cross-reference them with reliable sources before considering them as factual information.
5. Transformer
A Transformer is a type of deep learning model architecture used in natural language processing tasks. Transformers are designed to handle sequential data, like sentences in language, in a more effective and context-aware way. Thanks to transformers we can train LLMs faster.
The core innovation of the Transformer is its “self-attention” mechanism, which allows the model to weigh the importance of different words in a sentence relative to each other. This enables the model to capture contextual relationships between words, making it well-suited for tasks like machine translation, text summarization, question-answering, and more. Transformers have become the foundation for various state-of-the-art natural language processing models, including GPT (Generative Pre-trained Transformer) and BERT (Bidirectional Encoder Representations from Transformers).
The Transformer model is highly parallelizable, which makes it well-suited for training on large datasets using modern hardware such as GPUs or TPUs. It has been shown to achieve state-of-the-art performance on a wide range of natural language processing tasks, including machine translation, language modeling, and text classification.
6. GPT
GPT stands for “Generative Pre-trained Transformer.” GPT models are designed to understand and generate human-like text by learning patterns from massive amounts of text data. The “Transformer” architecture they’re based on enables them to consider the context of words and phrases in a text, making their generated content coherent and contextually relevant. These models have been widely used for tasks like text generation, language translation, and more.
BERT stands for “Bidirectional Encoder Representations from Transformers.” It’s a sophisticated pre-trained language model developed by Google AI. BERT’s key innovation is its bidirectional context understanding, meaning it considers both the left and right context of words in a sentence. This makes it particularly skilled at understanding the nuances of language and context.
BERT is often used as a base model for various natural language processing tasks, like text classification, question answering, sentiment analysis, and more. By fine-tuning BERT on specific tasks, it can provide impressive results due to its advanced contextual understanding.
Embeddings in AI are numerical representations of objects or concepts within a higher-dimensional space. They are used to capture the relationships and meanings between these objects in a way that a machine-learning model can understand and work with.
In natural language processing, word embeddings are commonly used to represent words as dense vectors. These vectors are designed so that similar words have similar embeddings, and their relative distances in the vector space reflect semantic relationships. Embeddings allow AI models to process and analyze textual data by converting words into numerical forms that retain their contextual meanings.
Vector databases are specialized databases designed to efficiently store and query high-dimensional vector data. These databases are optimized for working with data that can be represented as vectors in a multi-dimensional space, such as embeddings from machine learning models or other numerical representations.
Vector databases offer efficient indexing and querying mechanisms that allow you to perform similarity searches, finding vectors that are closest in terms of distance to a given query vector. They are commonly used in various applications, including recommendation systems, content retrieval, image search, and natural language processing tasks where vector representations play a crucial role in understanding and comparing data points.
The most popular Vector databases are Pinecone and chroma.
Other database engines are starting to introduce vector search capabilities:
Prompt injection is a technique of adding carefully crafted prompts or instructions to the input of a language model to influence its generated output. This is commonly used in the context of fine-tuning or guiding the behavior of a generative AI model. By injecting prompts, developers can guide the model’s responses toward specific themes, tones, or styles, making the generated content more aligned with their desired outcomes. Prompt injection is a way to shape the AI’s creative process while maintaining control over the generated results.
Prompt injection can be also a vulnerability. Prompt Injection in the world of Generative AI is similar to what SQL Injection is in the world of databases. Check Prompt injection attacks against GPT-3 to learn more.
Check out my previous post about ChatGPT for your data where I created Q&A app for querying your own data with natural language. Like you would ask ChatGPT.
]]>ChatGPT for your data2023-08-20T00:00:00+00:002023-08-20T00:00:00+00:00https://jj09.net/chatgpt-for-your-data
The everyday need to extract information from documents isn’t exclusive to analysts or data scientists—it’s a common requirement for all knowledge workers. Thanks to Large Language Models (LLMs), embeddings, and vector databases you can create a ChatBot, which can answer your questions about a particular set of data.
It’s a very powerful use case for building knowledge bases. Imagine that you want to become a triathlete. You probably have 100s of questions about how to even start. There are a lot of resources online to find answers, but it would be much better if you could just ask your questions and get answers right away.
ChatGPT is pretty good at answering questions you have, but it’s not yet good enough when it comes to nuanced details. The rationale behind this lies in its limited access to the entirety of online data. Hence, there is a huge market opportunity for building domain-specific knowledge bases.
ChatBot for your data with LangChain and OpenAI
LangChain is a framework for building LLM-based apps. Using LangChain, and OpenAI API we can create a Q&A app that points to chosen by you data source in a few lines of code.
To get started, you need Python, and a few packages:
You need to put the OpenAI API key in OPENAI_API_KEY environmental variable. You can do that by adding the following line to your ~/.bash_profile file on Mac:
export OPENAI_API_KEY=<YOUR_OPENAI_API_KEY>
Remember to run source ~/.bash_profile to load OPENAI_API_KEY into the environment.
Query data from text file
The simplest approach is to put your data into a text file.
This is a sample text file data.txt with a few details about me:
Jacob Jedryszek is a software engineer at Meta. He has experience in web and mobile development, product growth, cloud computing, and artificial intelligence.

He worked on the following products:
- 2014-2016 - Azure Portal
- 2016-2017 - Azure Mobile App
- 2017-2019 - Azure Search
- 2017-2019 - SeeingAI
- 2019-2021 - Facebook Marketplace
- 2022 - Super - Live Q&A platform for creators

His hobbies are:
- cycling
- triathlons
- hiking
- sailing
- soccer
- martial arts
This Python program allows you to query that text file:
fromlangchain.document_loadersimportTextLoaderfromlangchain.indexesimportVectorstoreIndexCreatorloader=TextLoader("./data.txt")index=VectorstoreIndexCreator().from_loaders([loader])print(index.query("Who is Jacob?"))
The result of running the above program is:
> python qna-text.py
Jacob Jedryszek is a software engineer at Meta with experience in web
and mobile development, product growth, cloud computing, and artificial
intelligence. He has worked on several products, including Azure Portal,
Azure Mobile App, Azure Search, SeeingAI, Facebook Marketplace,
and Super. His hobbies include cycling, triathlons, hiking, sailing,
soccer, and martial arts.
When I change the query to When did Jacob work on SeeingAI? I get the following answer:
> python qna-text.py
2017-2019
This is mind-blowing! With just 5 lines of code, you can easily extract insights from your data!
Query data from web page
You can also query data from a given URL. I recently wrote a blog post about weight loss. You can query it with LangChain by replacing TextLoader with WebBaseLoader:
fromlangchain.document_loadersimportWebBaseLoaderfromlangchain.indexesimportVectorstoreIndexCreatorloader=WebBaseLoader("https://jj09.net/simple-path-to-weight-loss")index=VectorstoreIndexCreator().from_loaders([loader])print(index.query("How can I lose weight without exercising?"))
Running the above program gives the following answer:
> python qna-web.py
You can lose weight without exercising by counting calories and macros and eating fewer calories than you burn. A 500 calorie deficit per day can result in losing 1 pound per week.
Other loaders
As of today, there are a lot of different loaders available for LangChain. You can load data directly from PDF, Azure Storage, CSV files, Google Drive, Github, and more! You can learn how to use each loader at LangChain Loaders docs.
Using local LLM
Using OpenAI API is pretty expensive. Depending on how large your document is you can quickly utilize free limit. Running 1000 queries on a document with ~3000 words would cost you $7. For more about pricing check OpenAI API Pricing Calculator.
The tradeoff of running models locally is speed. OpenAI models are deployed in the cloud and run on super-fast GPUs. One query, on my local machine (MacBook M1), takes between 10 and 30 seconds! Of course, you can deploy open-source models to the cloud and run your apps on GPUs, but then you have to pay for it.
The big advantage is full control of your end-to-end flow. If OpenAI decides to close its API, or drastically increase price, there is very little you can do about it. Running open-source models in the cloud puts only one constraint on you: the cloud provider’s cost and their environment. These change much less often.
Fine tunning LLM
Another option to build a “ChatGPT for your data” is through Fine-tuning. It involves taking a pre-trained large language model (LLM) and adapting it to comprehend and respond to specific questions related to your dataset. By further training the model on a narrower dataset containing questions and answers relevant to your domain, you can enhance its ability to provide accurate and contextually relevant responses.
Finetuning allows the chatbot to learn the nuances of your data, making it more proficient in answering questions accurately. This approach can be particularly useful when you have a specific dataset with domain-specific information, and you want the chatbot to be a knowledgeable and effective tool for interacting with that data.
This approach is much more complicated than using embeddings, requires multiple steps, and more computational power. Additionally, you have to retrain your model whenever your data changes, which is more expensive than creating embeddings.
You can build Q&A ChatBot for your data with LangChain and OpenAI API. If you don’t want to pay for OpenAI API, you can use the Open Source model locally. This still requires computational power but might be cheaper than paying for OpenAI API if you run it in production.
You can also consider Fine-tuning the pre-trained model. It’s more complicated, requires significant computational power, and you need to re-train your model whenever your dataset changes.
]]>Simple path to weight loss2023-07-06T00:00:00+00:002023-07-06T00:00:00+00:00https://jj09.net/simple-path-to-weight-lossAre you tired of endless diets, complex workout regimens, and conflicting advice on your quest to shed those extra pounds? Weight loss doesn’t have to be overwhelming or complicated. It’s all about calories in and calories out.
My path to weight gain and weight loss
At the end of last year, after becoming Ironman I was roughly 10-15 lbs overweight. I was overeating on purpose to don’t get sick while training. With a full-time job, I didn’t have enough time to work, live, train, and rest enough. I assumed that food will compensate for lack of rest, and help with immunity. It worked. I didn’t get sick.
After Ironman I went for a week to Hawaii where I had way too much of Hula pie. On top of all that, there was Christmas food, and I got sick for over a month. None of these helped with weight. I gained another 5-10 lbs, which put me at 20-25 lbs overweight. I’ve never been so much overweight in my life.
I decided to make my weight a priority, and over the last 6 months, I lost almost 25 lbs. This put me at my optimal weight.
I didn’t use any rocket science diet. I ate moderately healthy, and I didn’t eat too much. I counted how many calories I consumed, and how many I burned. I also exercised, as that’s part of my routine now. I used a spreadsheet to keep track of everything.
How many calories you can eat per day
To find out how many calories you need daily you need to know your Basal Metabolic Rate (BMR). You can use Free BMR Calculator to find that out.
For 6ft tall, and ~181 lbs male it is 1,799 Calories/day. That means that if you don’t do anything, but lie in bed, you need 1,799 Calories/day. You are usually moving, and doing things, thus your calorie intake needs to be higher. The BMR calculator provides estimates of how much more you need based on your activity level:
Activity Level
Calorie
Sedentary: little or no exercise
2,159
Exercise 1-3 times/week
2,474
Exercise 4-5 times/week
2,636
Daily exercise or intense exercise 3-4 times/week
2,788
Intense exercise 6-7 times/week
3,103
Very intense exercise daily, or physical job
3,418
I recommend using the sedentary value and measuring calories burned during your workouts separately.
You can measure how many calories you burn during the entire day with Oura Ring. I recommend Oura Ring also for sleep tracking. It’s the best device on the market. Sleep is an important part of keeping your weight, health and fitness intact. If you want to learn why, read Why We Sleep.
My approach for calculating my calorie budget was to use the Sedentary value as a base and add the calories I burn during workouts. I use a Garmin watch and Heart-Rate Monitor for that. I also used Oura Ring total calories burn to cross-check the values.
Counting Calories
To burn 1 pound, you need to develop a deficit of 3500 Calories. Do not try to lose more than 1 pound per week, as it will cause undesired side effects like exhaustion, tiredness, and the yoyo effect later on. 1 pound per week is still not bad: you can lose 4 pounds over 1 month, and 26 pounds in half a year.
Sorry, losing all 10-20 lbs in 1 month is not sustainable. Many people fall into that trap, and they quickly regain the weight.
To count calories, I recommend MyFitnessPal. A premium subscription allows you to scan the bar code from foods, which will automatically log calories and all nutrients.
You can connect MyFitnessPal to your smart scale and track your progress daily. You can also connect with Garmin or Strava to automatically count calories burned during workouts.
I also recommend keeping track of calorie deficit with a spreadsheet.
Counting calories itself results in eating less. When you don’t know how many calories you ate, you may think that you need more food. Just being aware that you ate enough can trick your brain into craving less.
Healthy eating with chocolate and ice cream
When I started caring for my weight for the first time, a few years ago, I decided that I need to figure out a sustainable diet, which I’ll be able to maintain throughout my entire life.
Many people want to go through torture, and just lose all additional weight in 1 month. Unfortunately, after that, they go back to old eating habits, and their weight is back. This results in demotivation and unwillingness to pick up that challenge again.
It’s important to keep a good balance of carbs, protein and fats. Ideally about 50% carbs, 30% protein and 20% fat. If you don’t do that, you will end up hungry, and tired. Not keeping this balance is the main reason for weight gain. Eating pasta, which has a lot of carbs is causing the total calorie count to go up, but macros are out of balance. Your body still needs protein. Usually, people overeat carbs and fats but undereat protein. They reach the needed amount of protein by simply eating too many calories, or they don’t at all.
I often struggle with reaching my protein goals per day. It is helpful to use protein powder for that purpose. I add it to yogurt with blueberries or oatmeal if I have it for breakfast.
I love chocolate, and I like some not very-healthy foods like burgers, pizza, ramen, etc. It is fine to eat these foods, but in moderation, or occasionally. The most important thing is to balance macros. If you had a chicken salad (high protein) for lunch, you can have ramen (high carbs) for dinner.
The key is to treat the calories you consume like the money you spend. There are some good and bad investments.
Sample “bad investment foods”:
1 slice of cheese has ~100 kcal and a lot of fat
1 tbsp of mayo has 90 kcal while ketchup or mustard has only 20-40
Everyone is a human, and we need some treat from time to time. Even daily! The key is to be aware of how much each treat costs calorie-wise. Eat only delicious sweets. Don’t eat “meh” and “ok” sweets!
I prefer 2 Snickers bars (220 kcal each) over IMO average tasting brownie.
Another strategy is to don’t eat sweets for a few days and have a feast once or twice a week.
When I want to eat something, I always ask myself: “Is it worth that many calories or I would rather eat something better?”.
Watch out for the sugar intake. Any sugar you eat, when you don’t exercise, goes into your sides. The best time to eat sugar is before or during exercise.
alcohol - when alcohol enters the body, it is used primarily as a fuel source as the body has no way of storing it. This means that any other calories consumed while drinking are more likely to be stored as fat. It applies especially to beer, but also to other alcohols. I noticed that when I drink more than 1-2 drinks per week it’s harder for me to lose or maintain my weight. It usually results in gaining weight.
Exercise has not only health benefits but also helps to increase your calorie budget. That allows you to accommodate things you like that are not necessarily healthy. Depending on your weight, and your exercise intensity you can burn even 500 kcal during 30 minutes workout! This is a nice big scoop of ice cream or 2 Snickers bars!
The higher your heart rate the more calories you burn. The easiest, and fastest way to burn calories is running. Just put your shoes on, go out for 30 minutes and you can burn 200-400 calories. I found biking a little harder to burn calories than running as it’s harder to get to equivalent HR with a similar effort. Swimming is even harder. When it comes to efficiency, it’s best to exercise for up to 1h. Longer runs or rides require extra nutrition before or during the workout. That takes calories from your budget, and you need more time to rest post-exercise.
I usually aim for 2 runs of 30 minutes or so and 1 long bike ride. During the summer I like to swim in the lake for 30-60 minutes. When I’m training for a triathlon, I exercise more. I like to sign up for a race as it motivates me to work out. I usually create an 8-12 weeks training plan before the race. Thanks to that I don’t have to go through a mental exercise of what type of workout should I do every day. I just look at the schedule.
I have observed that workouts are highly effective in curbing cravings. Whenever I find myself idle, my desire for chocolate tends to be stronger compared to after a run or a bike ride. This makes exercising doubly advantageous: not only does it increase my calorie budget, but it also helps reduce my cravings for junk food.
Summary
Count calories and macros. Don’t eat more than you burn. 500 kcal deficit per day results in losing 1 pound per week.
Exercise for health, and fitness, and to increase your daily calorie budget.
Losing weight is not about going through a process and then going back to the previous life. It’s about becoming a different person. A person that doesn’t overeat, and chooses their meals consciously.
I recommend reading Atomic Habits. A great book about achieving goals through micro changes, and consistency. In the same way how 1% improvement per day results in a 37x improvement in 1 year. Losing 0.1 pounds per day results in 36.5 pounds in a year! Smaller changes are easier to adapt and maintain. If you keep repeating them for 20 days it’s more likely you will stick with them for longer. After 66 days new habits are becoming a normal part of your life.
Don’t get discouraged by days when you exceed your calories budgets, or small unexpected weight gains during the journey. Look at my weight chart at the beginning. There are a lot of ups and downs. There were weeks in which I gained weight, by sticking to the process. There were also weeks when I didn’t and I lost weight anyway. Our body is not a perfect machine, but being consistent eventually will pay off.
If you want to develop a sustainable diet and get back to your desired weight, start tracking your weight and calories in the Weight Loss Tracker spreadsheet. It’s a great feeling when you see the weight chart going down.
Remember the importance of sleep. Lack of sleep results in an energy deficit that is often compensated by eating more.
]]>The Complete Guide to Full Stack MARN Web Apps Development: MongoDB, Apollo (GraphQL), React, and Node.js2022-12-15T00:00:00+00:002022-12-15T00:00:00+00:00https://jj09.net/the-complete-guide-to-full-stack-marn-web-apps-development-mongodb-apollo-graphql-react-nodejsThis is a step-by-step overview for creating the front-end, backend, and persistence layer with MARN Stack: MongoDB, Apollo Server, React and Node.js. I also created a video version of this tutorial, which you can find on YouTube.
What is the MARN stack?
MARN stands for MongoDB, Apollo Server, React and Node.js.
Why Apollo Server instead of Express? Everything has its pros and cons. I like Apollo Server for its ease of setup, GraphiQL console (very useful during development), and support for many front-end frameworks. For more check out Comparison of Apollo Server with express-graphql.
There is a lot of documentation and tutorials for building GraphQL backend with Apollo Server. There is also a lot of documentation for consuming GraphQL API from React. Yet, there is nothing about building end-to-end web apps with React, Apollo Server backend, and MongoDB persistence layer.
In this article, I will show you how to build end to end web app with React front-end, and Node.js backend with GraphQL API (powered by Apollo Server) and MongoDB persistence layer.
I created a video version of this guide:
Getting Started
Installing dependencies
Install node.js: I recommend installing node with brew (I’m using node 16.14.2 and npm 8.5.0):
import{ApolloServer}from'@apollo/server';import{startStandaloneServer}from'@apollo/server/standalone';importgqlfrom'graphql-tag';// GraphQL SchemaconsttypeDefs=gql`
type Query {
hello: String
}
`;// GraphQL Resolversconstresolvers={Query:{hello:()=>"Hello from Apollo Server"}};constserver=newApolloServer({typeDefs,resolvers});const{url}=awaitstartStandaloneServer(server,{listen:{port:4000},});console.info(`🚀 Server ready at ${url}`);
GraphQL schema describes the shape of your available data.
GraphQL resolvers are responsible for populating data into fields in Schema.
The above code defines 1 field (hello) in GraphQL Schema, and the resolver function returns "Hello from Apollo Server" when querying that field.
Start Apollo Server with:
npm start
If you go to http://localhost:4000 you should see GraphQL Playground where you can execute queries:
Create Web UI with React
Create react app from your project root directory:
To query the Apollo GraphQL endpoint we can use useQuery React hook provided by @apollo/client module.
Call 'hello' query from React
Let’s create Hello React component that will perform a call to GraphQL API and display the returned result. We need to define a GraphQL query and pass it to useQuery. The neat thing about the Apollo server is the ability to directly copy/paste queries from the playground.
To make it work we need to update App.js with changes mentioned in the previous section: initializing ApolloCLient and wrapping components with ApolloProvider:
This will set us up for the next section. You should always extract independent modules as much as possible to keep your code clean.
CRUD with MongoDB
CRUD stands for Create, Read, Update, Delete. It’s the backbone of every web app. Except Twitter. They didn’t support Update for a while xD
In this section, I’ll describe how to create simple CRUD for books. Every book will have a title and year when it was published. Data will be stored in MongoDB. Web UI will have an interface to display (Read), add (Create), edit (Update) and delete books through GraphQL API.
I recommend using MongoDB Compass for working with data in MongoDB. It’s much easier than using MongoDB Shell (mongosh). Of course, if you prefer using mongosh, go for it.
To get started with Books Library, let’s create new database called marn and new collection called books. It can be done easily with Compass:
Connect to MongoDB from node.js
To connect to MongoDB from node.js we will use mongoose.
It has to be installed from Apollo Server directory:
cd apollo-server
npm install mongoose
To connect to MongoDB we can establish a connection in src/index.js by adding this code:
importmongoosefrom'mongoose';mongoose.set('strictQuery',true);constdb=awaitmongoose.connect("mongodb://localhost:27017/marn",{useNewUrlParser:true,});console.info('📚 Connected to db',db?.connections[0]?._connectionString);
Make sure your MongoDB uses port 27017. If not, update the URI. You can find the URI in Compass UI:
Create Book model and query data from MongoDB
We can map MongoDB collections to JavaScript objects by creating models with mongoose. Create Book model in src/models/Book.js file:
We can query all books by simply calling the Book model:
Book.find({})
To make data accessible through GraphQL, we need to add Book type to GraphQL schema and books query that returns an array of Book elements in src/models/typeDefs.js:
importgqlfrom'graphql-tag';exportconsttypeDefs=gql`
type Query {
hello(name: String): String
books: [Book]
}
type Book {
id: ID,
title: String,
year: Int,
}
`;
We also need to add the resolver that is querying MongoDB with mongoose in src/resolvers.js:
The Books component will use the Book component to display all books from MongoDB. It will also fetch data from GraphQL API. We need to define GraphQL query (which we can copy from Playground), and query Apollo Server with useQuery. Create new file src\components\Books.js:
import{gql,useQuery}from'@apollo/client';importBookfrom'./Book';constBOOKS_QUERY=gql`
query Books {
books {
title
year
id
}
}
`;exportdefaultfunctionBooks(){const{data,error,loading}=useQuery(BOOKS_QUERY);if(error){console.error('BOOKS_QUERY error',error);}return<div><tableclassName='table'><theadclassName='thead-dark'><tr><th>Title</th><th>Year</th></tr></thead><tbody>{loading&&<tr><td>Loading...</td></tr>}{error&&<tr><td>Check console for error logs</td></tr>}{!loading&&!error&&data?.books.map(book=><Bookbook={book}key={book.id}/>)}</tbody></table></div>;}
Import Books component in App component and display it on the main page:
When you go back to the website you should see the book, which we added to the database displayed in a table:
React Router
Before we start working on creating, deleting and updating books, let’s add navigation to our UI with React Router. This will allow us to separate different views instead of cluttering them on the same page.
First, we need to install react-router-dom in our React app:
cd web-ui
npm install react-router-dom
We need to wrap all components in BrowserRouter, map routes to components, and add links allowing us to navigate between routes.
All changes that need to be done take place in src/App.js:
After that, you should see the main page with navigation and links to home that displays Hello component, and a link to books that display the list of books from MongoDB in a table:
Create book mutation
To insert a new book into MongoDB, we need to create a Mutation.
In GraphQL we can fetch data with Query, but to create or modify data, we need to create a Mutation.
Let’s start with updating the schema. Mutations are in a separate block in the schema. We will add create a mutation that takes title and year parameters, and returns Book object to src/models/typeDefs.js file:
importgqlfrom'graphql-tag';exportconsttypeDefs=gql`
type Query {
hello(name: String): String
books: [Book]
}
type Book {
id: ID,
title: String,
year: Int,
}
type Mutation {
create(title: String, year: Int): Book
}
`;
Now, we need to implement a resolver for the create mutation. Similarly to the schema, we need to add a new block Mutation to our resolvers and create a function. In the create function we need to add logic to create a new book and save it to MongoDB. This is src/resolvers.js after updates:
We can test creating books with GraphQL Playground:
If everything went well you should see a new book in MongoDB. Notice __v0 field in the book inserted with Mongoose. This is versionKey property, which is set on each document when first created by Mongoose.
UI for creating books
Let’s start with a new CreateBook component. We need to create a new form to collect title and year, and call the create mutation we created in the previous section.
We will utilize useState hook to access input field data (title and year).
To call mutation, we will use useMutation hook from @apollo/client.
We can get CREATE_BOOK_MUTATION from GraphQL playground.
Make sure to convert year from string to integer when passing it as a variable to mutation. Otherwise, it will return an error. You can simply add + before the variable to convert a string to an integer.
Add src/components/CreateBook.js file to web-ui folder:
import{useState}from'react';import{gql,useMutation}from'@apollo/client';constCREATE_BOOK_MUTATION=gql`
mutation Mutation($title: String, $year: Int) {
create(title: $title, year: $year) {
id
title
year
}
}
`;exportdefaultfunctionCreateBook(){const[title,setTitle]=useState('');const[year,setYear]=useState('');const[createMutation]=useMutation(CREATE_BOOK_MUTATION);consthandleSubmit=evt=>{evt.preventDefault();console.info('Creating Book...',title,year);createMutation({variables:{title,year:+year,}});alert(`Book ${title} (${year}) created!`);setTitle('');setYear('');};return<formonSubmit={evt=>handleSubmit(evt)}><divclassName="form-group"><labelhtmlFor="title">Title:</label><inputtype="text"name="title"className="form-control"value={title}onChange={e=>setTitle(e.target.value)}/></div><divclassName="form-group"><labelhtmlFor="year">Year:</label><inputtype="text"name="year"className="form-control"value={year}onChange={e=>setYear(e.target.value)}/></div><inputtype="submit"value="Create"className="btn btn-primary"/></form>;}
We will also create a separate route /create to display the CreateBook component, and a link to that route. Update src/App.js:
As you can see, we need BOOKS_QUERY, which we already defined in Books component. To do not copy/pasta, let’s extract all GraphQL queries and mutations to src/graphql.js file:
import{gql}from'@apollo/client';exportconstCREATE_BOOK_MUTATION=gql`
mutation Mutation($title: String, $year: Int) {
create(title: $title, year: $year) {
id
title
year
}
}
`;exportconstBOOKS_QUERY=gql`
query Books {
books {
title
year
id
}
}
`;
Now you can remove BOOKS_QUERY variable from Books component and just import it from graphql.js:
import{BOOKS_QUERY}from'../graphql';
Similarly in, CreateBook component you can remove CREATE_BOOK_MUTATION, and import both CREATE_BOOK_MUTATION and BOOKS_QUERY from graphql.js:
Delete mutation will be very similar to create mutation from the previous section. We just need a mutation that takes id of a book we want to delete.
Let’s update schema in src/models/typeDefs.js by adding delete mutation that takes id parameter and returns the same id if book is successfully deleted:
importgqlfrom'graphql-tag';exportconsttypeDefs=gql`
type Query {
hello(name: String): String
books: [Book]
}
type Book {
id: ID,
title: String,
year: Int,
}
type Mutation {
create(title: String, year: Int): Book
delete(id: ID): ID
}
`;
And implement the resolver function in src/resolvers.js:
To enable editing from UI, we will add an edit button to Book component. It will change text to input fields when in editing mode, and display save and cancel buttons to commit or discard changes.
Let’s start with adding EDIT_BOOK_MUTATION to src/graphql.js:
exportconstEDIT_BOOK_MUTATION=gql`
mutation Mutation($id: ID, $title: String, $year: Int) {
edit(id: $id, title: $title, year: $year) {
id
title
year
}
}
`;
Update src/components/Book.js by adding editing state, buttons and call to update book:
To make sure that everything works as expected, you can double-check if books are being properly created, deleted and updated in Mongo with MongoDB Compass.
Summary
Congratulations! Now, you know how to build web apps with MARN stack!
You can very easily swap different components for MARN stack. E.g., swap React with Vue.js as I did for vue-apollo demo project.
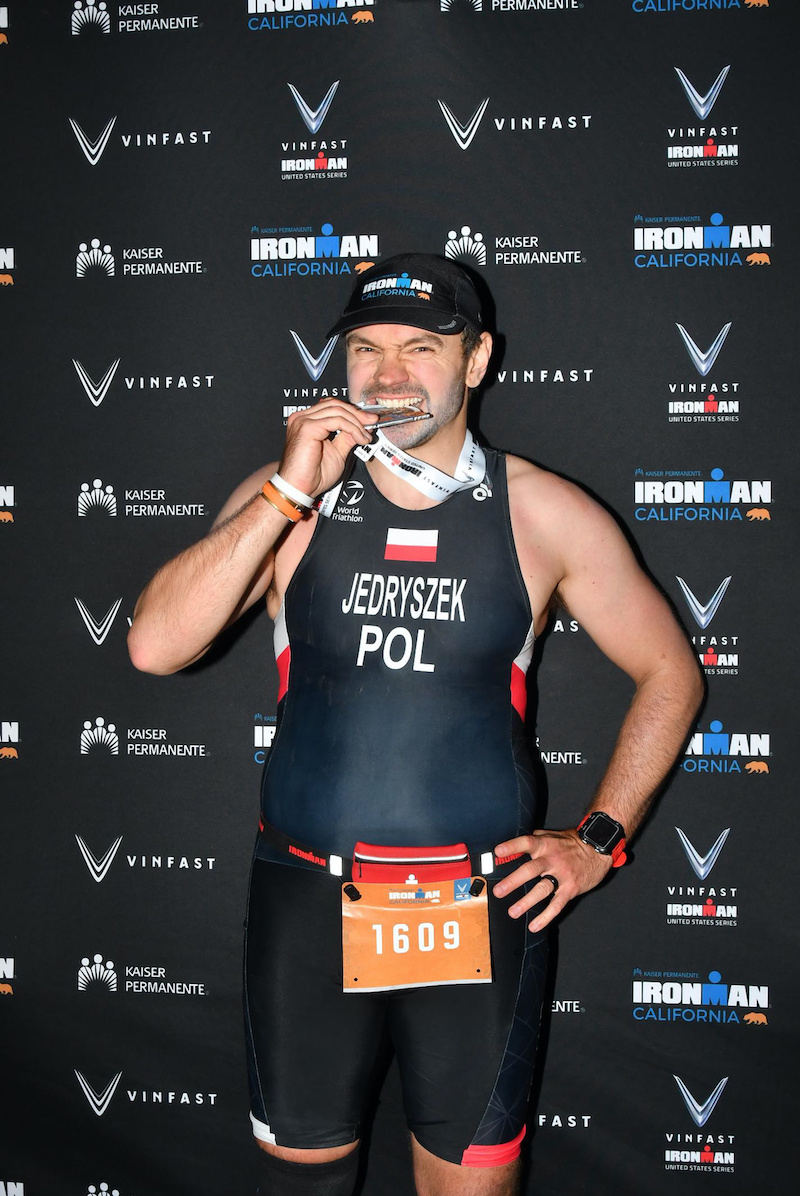
]]>I am an Ironman!2022-11-15T00:00:00+00:002022-11-15T00:00:00+00:00https://jj09.net/i-am-an-ironman
The Ironman triathlon is 2.4 mile swim, 112 mile bike and 26.2 mile run (marathon). You have 17 hours to finish in order to become an Ironman.
How I got into triathlons
I’ve been doing triathlons for over 5 years now. Mostly Sprint and Olympic distances. I also did a few half Ironman distance races (AKA Ironman 70.3).
This is what each distance contains:
Sprint: 750m swim + 20k bike + 5k run
Olympic: 1.5k swim + 40k bike + 10k run
Half Ironman: 1.2 mile swim + 56 mile bike + 13.1 mile run (half marathon) - the total distance is 70.3 miles, therefore it’s also called Ironman 70.3.
I love biking since I was a kid. I decided to try triathlons when I was in college. Unfortunately, it took me a while to do my first triathlon, because of knee injury. Coming back to sports after that took over 1 year.
The first triathlon, I’ve ever done was indoor triathlon i55: 10 mins of swimming + 30 mins of biking + 15 mins of running. The final result was based on the total distance covered. As most beginners, I pushed too hard on bike, and was barely able to run for 15 minutes. Despite that, I was hooked, and soon after that I signed up for my very first sprint triathlon.
The first sprint triathlon I signed up for (Kirkland Triathlon) didn’t happen, because of the water quality at Juanita Beach in Kirkland. A few days before the race, they changed triathlon to run-bike-run, which was ultimately a duathlon. I still got triathlon finisher medal as they had them made before finding out about the water quality issue.
Despite all the obstacles, I decided to keep going. I kinda did sprint, so I went ahead and signed up for an Olympic Triathlon next year. It was Troika Triathlon in Spokane, WA. It was almost my first, legit triathlon. Almost, because the swim was cut short due to the weather issues, and bike distance was extended to compensate for shorter swim. I really enjoyed the challenge, and decided to take it to the next level. I did one more Olympic tri and entered the serious triathlon World by doing half-Ironman distance race. It was actually much easier than I thought, and I was thinking that maybe I would’ve been able to pull a full distance that day!
While training for half-Ironman, I learned that you cannot live life like you use to and just throw trainings in the spare time. You need to add time for rest, and take care of the nutrition. I learned that hard way. One week before the half-Ironman I was soo tired that I spent entire weekend in bed. I wasn’t sick. No cold, or sore throat. I was just exhausted.
Over years I did a few more sprints, olympics and one more Ironman 70.3 triathlon. While olympic distance races went well, the half-Ironman was a challenge. I was dealing with foot injury, and decided to just run less during the training for the race. This, didn’t ended up well. After the race, I messed up my foot so bad that I was barely able to walk. Fortunately, after a week or so I was fine. At that time I didn’t even stretch before and after workouts! Still had a lot to learn.
After the Ironman 70.3, which ended up with injury I concluded that races above Olympic distance are not healthy. They require more time to train that you need to stay healthy. There is too much strain on your body. Often resulting in injuries. There is also need to spend more time that I would like to in training. You want to go hiking this weekend? No, I need to do my planned swim. If I won’t my training plan will get screw up, and I’ll have to readjust it…and I won’t be prepared for the race as good as if I’ve done the planned session. So I sticked with Sprints and Olympics for a while.
Ironman journey
I knew that at some point in my life I wanted to finish the full distance Ironman triathlon. I was delaying it, because I knew that it would require significant time commitment. Not only for the time to train, but also for time to rest. When COViD happened, and put a pause to my favorite sport, I realized (again) that life is short and I shouldn’t postpone things. In 2020, when all races were cancelled, I did Sprint and Olympic triathlon with friends. We just swam, biked and run on our own. It was fun, but not as fun as real races.
When, in 2021 triathlons started happening again, I decided to do Ironman 70.3 Oregon. I was hungry. As running was my weakest discipline, because of the knee injuries, I decided to do half Marathon earlier that year. My thinking was: if I finish half marathon, I can do half Ironman. Swimming and biking wasn’t a problem for me. I did half marathon, followed by Olympic triathlon, and finished half Ironman without problems. Injury free! After the race a thought came to my mind: why not keep training and do a full Ironman this year? There was Ironman California, just 3 months away. This would give me enough time to build up from half to full Ironman. After discussing it with my wife, I signed up!
Training
I followed My First Ironman Training Plan. I made one adjustment: I was doing only 1 swim per week instead of 2. Why? Swimming takes a lot of time! Not swimming itself, but before and after. Driving to the pool (or lake), changing, driving back, etc. It’s much more time consuming than biking and running. Additionally, the Ironman California has down river swim, which makes it much easier. I decided to prioritize biking and running.
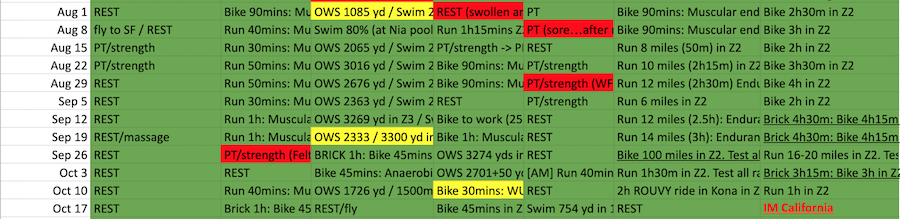
I maintained a Google Spreadsheet where I tracked all my workouts. I used green for workouts I did as planned (at least 80% or more of planned distance), yellow for workouts that were cut short (below 80%), and red for workouts I skipped. Marking workouts as done (green) was one of the best parts of my day.
Half way through my training I decided to do a quick consult with a coach. This made me to realize how much I didn’t know, and how much more I could’ve learn. I recommend anyone who want to attempt an Ironman to get a coach FROM THE BEGINNING!!! It will make your training more efficient, more enjoyable and less stressful. Is that enough? Am I doing it right? Isn’t that too much if I just want to finish? Coach, who has already done Ironman and trained others, can help to answer these questions. Thanks to my coach I realized that I won’t be able to run the marathon during Ironman. Together with other 80% of athleets. Only pros and top age-groupers run entire marathon. Most of people run/walk or just walk! I developed run/walk strategy that made my running more efficient: 0.3mi run / 0.1mi walk.
Life
Training for Ironman is not only about making time for training, but also about making more time for resting! I underestimated how much more time I would need for rest. Especially, during the weekends after long workouts. I just wanted to lay down in bed and watch TV…
Sometimes, easy thing like attending friend’s baby shower at 2PM on Saturday or joining friends to watch the new James Bond movie in the cinema that my friend rented was impossible. I couldn’t do baby shower because that day I had to ride 100 miles. For me that was ~8h. I would have to start at ~5AM, and shower/stretch/drive to baby shower in 1h. Not ideal. Especially taking into account that sunrise at the time was after 7AM. When planning to watch the new Bond movie with friends at 1PM, I had only 90mins run planned for that day. However, I had to change that plan, and I had to run 16 miles instead, which took me almost 4 hours. I planned to start at 8AM, but my body said no to 6AM wake up to eat ~2h before the run. I ended up starting after 9AM, and finished around 1PM. I skipped the movie. The Ironman dream was more important.
When reading this you probably think: couldn’t you just move that workout to different day or do it after the movie? Well, it’s not that easy. Doing it after the movie would require me to start around 5PM at best. Finishing long run at 9PM is not great. Moving to another day? It’s not easy to ensure that you do enough of swimming, biking and running even when everything goes according to the plan. Trying to move things around when you have full-time job, especially closer to race, is hard. Of course you can do it, but…you would be less prepared. You don’t want to DNF (Did Not Finish), because you decided to watch a movie instead of train, right?
The weather is another component that comes to play. The rain and cold can mess up your plans for good. I was actually pretty fortunate, taking into account I live in Seattle. Weather here, in September/October (peak training months), can be not the best. I had to shuffle workouts a bit, do some Zwift biking instead of running outside, and replace Open Water Swims with pool. The most important long runs and long bike rides I was able to do outdoor! Yay! I’ve seen other athleetes who had to do long 4h+ rides with trainer…I would’ve hate that.
Challenges
On top of already mentioned time-management issues and weather, you may also run into another very common challenge: injuries. This happened to me ~4-5 weeks before the race. My knee didn’t handle training load well. I also messed up by forgetting a knee brace that I usually wear for one of my long runs.
Many people quit at that point. I decided to do whatever it takes. I wanted to become Ironman. I didn’t want to postpone the dream. Especially, because I already put a lot of time and effort into this. Countless PT sessions, stretching, messages and hours of exercises at home on top of my workouts helped to alleviate the issue. I was still not very confident that I will be able to finish the race.
I did whatever I could, overcame all the obstacles: time management, sacrificing social life, and managing injury. Unfortunately, I couldn’t overcome the final obstacle. The race was cancelled because of Bomb Cyclone! They announced it at the race morning when I was putting my wetsuit on. It was the right decision. That day winds were 30-40mph, and it was raining. The day after, there were fallen trees on the bike course, and run course was flooded.
I was devastated. All sacrifices and hard work for nothing. I tried to look at the bright side though. I decided to properly recover from injuries, and attempt it again next year!
Recovery
When Ironman got cancelled I jumped straight into Physical Therapy. Dan Benson from ForeFront PT is the best specialist I’ve ever worked with. Strongly recommend! He not only helped me to recover, but also gave me some tips that helped to improve my running. It took over 4 months from the time I started regular PT exercises until I could finally run. I was doing sets of exercises, which take 30 mins or more every other day. I hated it! I was doing it only because of my dream: becoming an Ironman. There is nothing fun about PT exercises like hip rotations, penguin walks with band, side squats or speed skitters. I was very happy that I was able to go back to running. I strengthened my hip muscles, and actually started running properly. Per Dan’s advice I also tried to keep 175 steps per minute cadence, which is not easy! I was usually below 150 spm! Everytime when I was hurting, increasing cadence seemed to fix it. That was a silver bullet. After 4 months I could run, and I did 5k race that went smooth.
Smarter Training
Thanks to the experience from the previous year, I knew better how to manage my time during the training. No social life for 3 months, with 1 exception for a party in 1 weekend. No international travel during that time neither. I really spent 3 months focused on the race. My life was: work, training, rest. Not much room for anything else. I sometimes work 50-60h/week, and it was hard not only for me but also for my wife. We were both commited though, as we both knew it would be just one and done. I am very grateful for her support. Without that becoming Ironman wouldn’t be possible.
In my second attempt, I prepared better in all disciplines. I followed the same My First Ironman Training Plan. I still swam only once per week. This time I modified long runs to be distance based building up to 16 miles as longest run per my coach recommendation.
I vastly improved nutrition, both during and after training. 60g+ of carbs per hour during, and protein shake after workouts longer than 1h.
I showed up on the start line stronger than year before and injury free.
Successful race
My goal for the race was to finish. I estimated that in the best case scenario I can do it in about 14 hours, but realistically closer to 16. Again, the time limit is 17 hours. If you finish after 17 hours and 1 second you are NOT Ironman.
My pacing plan:
swim: treat it as a warm up; swim at good pace, but don’t push
bike: 80-90 rpm, HR below 144 bpm
run: walk first 10 minutes, then run 0.3 mile / walk 0.1 mile, walk through every aid station
My nutrition plan:
bike: during hours 1,3,5, and 6/7 - drink tailwind+gatorade mix (40-80g carbs per hour), in hours 2,4,6 - eat 1x honey stinger, 1x gel, 1x cliff block
run: 1 gel every 15 mins, tailwind+gatorade on the half way point (special needs bag)
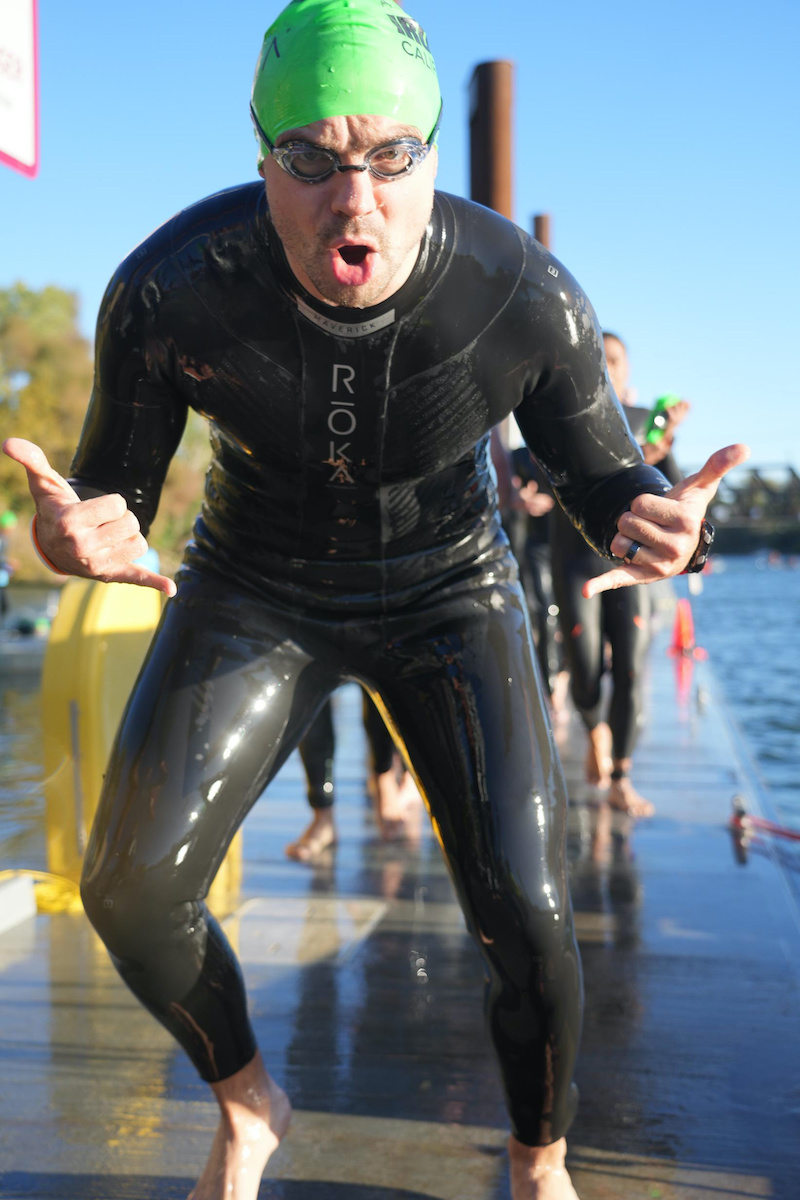
There were some challenges during, and before, the race that I didn’t anticipated. The transition was setup at the Stadium in Sacramento, CA. Getting in and out required a lot of walking. Before getting to water I walked 5000 steps! I also spent 1 hour in line to the shuttle, which was taking athleetes from the transition zone to swim start. However, after that the Lose yourself at the swim start, when I was entering the water, gave me good kick, and swim went great. It was very enjoyable experience. After it, another challenge: I had to run barefoot on concrete for 1 mile from swim exit to transition. I was worried that I could get injuried, and the race will be over. I took it very easy, walked parts of it, and made it to bike.
The 112 miles bike ride was not easy. I experienced the strongest winds I’ve ever biked with: 20-30mph! It was worse than biking in Kona, which is famous for brutal winds. I biked there year before. Bike course had two out and back loops (56 miles each). In some parts of the course I was getting tail wind, but other parts had head wind, and the worst possible: cross winds. I had to hold on to my aero bars and be focused every single second to don’t crash. It was very energy and mentaly draining. A few athleetes ended their race by crashing on the bike due to the wind. The last few miles were especially tough. It was against the wind, and wind was getting stronger later in the day. It was windy utill the very last turn into the transition!
When I got off the bike it was hard to walk. I was asking myself: “How am I gonna run a marathon now?”. I thought it was impossible, but I was trying not to think too much about it. Instead, I was focusing on executing my race plan. I took my time during the transition, changed to running gear, and walked for the first 10 minutes. After that, I started my run/walk strategy 0.3mi run / 0.1mi walk. I was also walking through aid stations, sometimes stopping for bathroom breaks.
First 9 miles went pretty well. After that, I experienced what Ironman athleetes call the dark moment. It was literally dark. We entered the park after sunset, and there was no lights there. Sometimes, total darkness. Thankfully to Ironman race organizers, there were providing head lamps for athleetes. However, even with the head lamp it was dark…
The miles were passing slowly and I was getting weaker. I had my rocket fuel mix (tailwind+gatorade) at run special needs bag, which was at mile 10.5. I drank almost entire bottle. After that I felt like puking for next 30-45 mins. I knew however, that I would be better off not feeling great than bonking.
Sometimes, I was wondering where is the next mile marker. A few times I thought that maybe I missed it, and the next one would be the following mile. Only to find a few minutes later that I just got to the one that I thought I passed…
The park section was out and back. After making the u-turn at mile 14.5 I started seeing the path to victory (AKA finish). It was more and more painful though. I started calculating how fast I need to run/walk, and it looked good. I even decided to walk 1 mile to see how much faster I am running than walking. It wasn’t much. Less than 5 minutes per mile! However, at that point it was more painful to walk than run!
In the last 10 miles I switched from eating gels to pretzels, chips and coca cola. It was great! Change from sugar to savory did magic. It was actually getting down easier than gels! That gave me a boost.
When I finally got to mile 20, one volounteer said that it’s only 10k to finish. 6.2 miles is 10k! This gave me another power boost. From that point I threw my strategy out of the window and just went on. I walked some parts of last 10k, but last 5k was my fastest split, and last mile was my fastest mile!
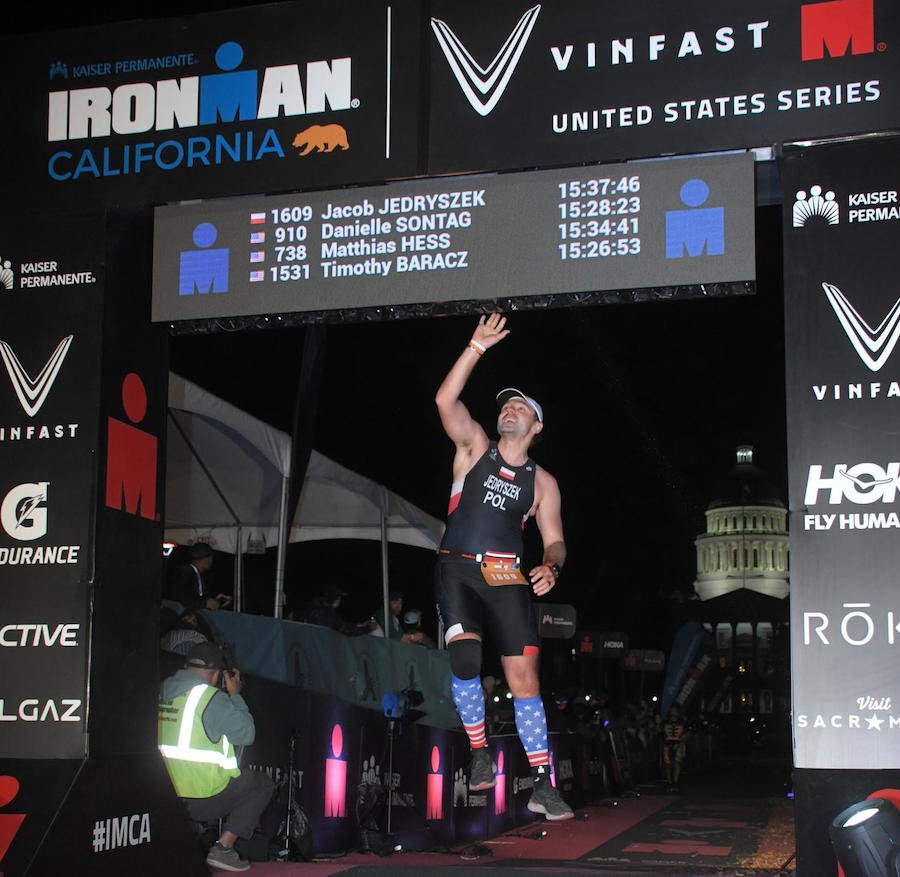
I finished in 15 hours and 17 minutes. A little below 16h I was targeting, but way above assummed best case scenario of 14h. The winds and long transitions prevented that. None of this matters now. I am an Ironman!
Crossing the finish line was awesome! I wish it lasted longer than a few seconds.
Reflection and Lessons Learned
If I was about to do it again, there are a few things I would’ve done differently.
I would probably cap my runs by time as recommended in My First Ironman Training Plan, and for the longest run just do 16 miles instead of recommended 20.
I would still do 1 swim per week. Even if it wasn’t down river swim, I would’ve swam 2.4 miles without issues.
I would cut my dose of carbs from tailwind by half. Instead of 80g from tailwind I would get 40g, and try to get another 20-30g from gels or gatorade.
I would put gatorade flavor I like in the bike special needs bag. The orange gatorade endurance provided on the course was awful. I couldn’t drink it, which forced me to switch to water. This resulted in less electrolytes.
I would start eating chips/pretzels with coca cola earlier during the run. Probably after 5-6 miles.
I would definitely get chicken broth whenever it was available. They were offering it when I was on the way out (about mile 11) and I was planning to get it on my way back…but when I was coming back they ran out.
Things besides training that helped me a lot:
Stretching after every training.
PT combined with strength exercises 1-2 times per week
Making time for rest. Not planning anything after long bike rides and long runs on the weekends. It’s hard…but it helps a lot!
Support from your partner, and understanding that 3 months before the race (or maybe even more) would be dedicated for Ironman. Not much time for travel or social life.
As I mentioned before, training for Ironman is much more than just putting hours of training. You need to be smart at handling unexpected life events, managing your life well to don’t get sick and most importantly knowing when to stop pushing to don’t end up with injury. Especially during the run. This is where majority (if not all) of athleetes get injuries.
Proper diet and enough amount of sleep is crucial. Otherwise training won’t be effective. In Fast-Track Triathlete Matt Dixon recommends to do not bother with training if you are not well rested as it will have the opposite effect.
Although Ironman challenge was a great journey, I am looking forward to go back to Sprint and Olympic distance races.
Maybe I’ll do Ironman in Kona after I retire ;)
Call to action!
It’s recommended that all of us do 30 mins of exercise per day. This is actually enough to train for both Sprint and Olympic distance triathlon!
If you do 2x30 mins run + 1x30 mins swim + 2x1h bike it would be more than enough to finish sprint triathlon! That’s total of 3.5h per week, which is 30 minutes per day.
For Olympic: 2x30 mins run + 1x30 mins swim + 1x brick (1h45m bike + 15m run) + optional 1x30-60mins run
That’s it! 4 times per week. 30mins/day average!
If you are interested in triathlon I recommend to join local triathlon club. For Sprint and Olympic distance races I recommend to use free training plans from Phil Mosley. To learn more about triathlon: Your First Triathlon book is a great resource to get started. For more advanced I recommend The Triathlete’s Training Bible. If you have a full-time job and want to participate in Ironman 70.3 or Ironman distance races check out Matt Dixon’s Fast-Track Triathlete.
Triathlon is fun, and it’s a great mix of different disciplines to keep your body in shape and healthy. I love this sport, and I recommend it to everyone! Hope to see you on the race course!
]]>Vue.js for React Developers2022-06-13T00:00:00+00:002022-06-13T00:00:00+00:00https://jj09.net/vuejs-for-react-developersIt’s been a while since I learned “yet another” JavaScript framework. I recently joined the Super team at Meta and the Super web app is written in Vue.js.
I’ve been working with Knockout, Angular, React and Aurelia in the past. Vue has a lot of similarities with pretty much all of them. It’s like an intersection of Angular and React. This blog post is a short overview of gotchas and differences between Vue and other JS frameworks.
Basics
I’ve been doing development in VSCode, with the Vetur extension. It’s very useful because vue is using Single-File Components. Vue components have .vue extension and following structure:
<template><!-- html –>
</template><script>// JS code</script><style>/*cssstyles*/</style>
You can generate a Vue app with Vue CLI. It’s useful for quickly generating app skeletons, and also provides out of box bundling and minification for production.
Vue JS 3 Tutorial for Beginners - more comprehensive overview of all vue features, if you watched above, I recommend especially the videos about composition API, which is specific for Vue 3:
Official vue.js tutorial - quick overview of all vue features (recommended after going through tutorials to refresh your knowledge)
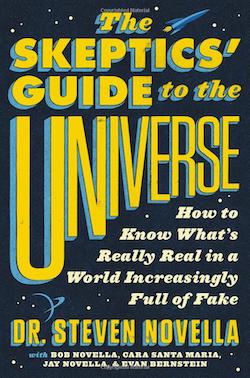
]]>Skeptics Guide to Universe - Concepts Summary2022-04-06T00:00:00+00:002022-04-06T00:00:00+00:00https://jj09.net/skeptics-guide-to-universe-contepts-summary
Skeptics Guide to Universe is a great book about different mechanisms of deception and biases. After reading it I decided to summarize all the concepts from the book for the future reference. Especially because I didn’t find any good summary online.
Concepts
Neuropsychological Humility and Mechanisms of Deception
Memory Fallibility and False Memory Syndrome - entirely false memories can be easily fabricated, sometimes by misguided therapists or by Fusion (We can fuse the details of different memories, mixing them up or even combining two separate memories into one), Confabulation (Put simply, we make shit up), Personalization (There is a tendency to shift memories from happening to other people to happening to ourselves), or Contamination (We are social creatures. Part of our social nature is that we place high value on the testimony of others.)
Fallibility of Perception - occur when a person’s perception does not match the sensory stimuli, which causes a misperception.
Pareidolia - tendency to perceive a specific, often meaningful image in a random or ambiguous visual pattern
Hyperactive Agency Detection - tendency to interpret events as if they were the deliberate intent of a conscious agent rather than the product of natural forces or unguided chaotic events
Hypnagogia - transitional state of consciousness between wakefulness and sleep, which can produce unusual experiences often mistaken for paranormal ones (I often think I see a person sitting on the chair when I wake up in the middle of the night…it takes me few seconds to realize it’s just chair with bunch of clothes on it)
Ideomotor Effect - involuntary subconscious subtle muscle movement driven by expectation, which creates the illusion that the movement is due to an external force (https://en.wikipedia.org/wiki/Ideomot…)
Metacognition
Dunning-Kruger Effect - inability to evaluate one’s own competency, leading to a general tendency to overestimate one’s abilities (90% people think they are top 10%)
Motivated Reasoning - biased process we use to defend a position, ideology, or belief that we hold with emotional investment
Arguments and Logical Fallacies - invalid connection between a premise and a conclusion, where the conclusion does not necessarily flow from the premise(s) but is argued as if it does
Cognitive biases - flaws in the way our brains process information.
Heuristics - rules of thumb or mental shortcuts that are not reliably true and therefore also lead to biased thinking.
Confirmation Bias - tendency of individuals to seek out or interpret new information as support for previously held notions or beliefs, even when such interpretations don’t hold up to statistical scrutiny
Appeal to Antiquity - special form of the appeal-to-authority fallacy. In this case the alleged authority is the assumption of ancient wisdom, or the notion that an idea that has stood the test of time must be valid.
Appeal to Nature - logical fallacy based upon the unwarranted assumption that things that are natural are inherently superior to things that are manufactured. Additionally, it relies upon a vague definition of “natural.”
Fundamental Attribution Error - cognitive bias in which we ascribe other people’s actions to internal factors such as personality while rationalizing our own actions as being the result of external factors beyond our control
Anomaly Hunting - something that sticks out because it doesn’t seem to make sense or it appears to contradict established knowledge or scientific theory. The fallacy of anomaly hunting comes from looking for anything unusual, assuming any apparent anomaly is unexplainable, and then concluding that it is evidence for one’s pet theory
Data Mining - process of sifting through large sets of data looking for any possible correlation, many of which will occur by chance. While this is a legitimate method for generating hypotheses, such data are not confirmatory and the method is easily abused.
Coincidence - chance alignment of two variables or events that seem to be independent, especially if it seems as if the occurrence defies the odds
Science and Pseudoscience
Methodological Naturalism - philosophical basis for scientific methodology that proceeds as if the universe follows natural laws in which all effects have a natural cause
Postmodernism - philosophical position that science is nothing more than a cultural narrative and therefore has no special or privileged relationship with the truth
Occam’s Razor - when two or more hypotheses are consistent with the available data, then the hypothesis that introduces the fewest new assumptions should be preferred (assumption that simpler explanation is true)
Pseudoscience and the Demarcation Problem - claims and procedures that superficially resemble science but lack the true essence of the scientific method. In practice there is a continuum from rank pseudoscience at one end to rigorous science at the other, with no sharp demarcation line in between
Denialism - motivated denial of accepted science using a series of invalid strategies
P-Hacking - misuse of data analysis to find patterns in data that can be presented as statistically significant when in fact there is no real underlying effect
Conspiracy Theories - a belief system that involves at its core the claim that a vastly powerful group is carrying out a deception against the public for their own nefarious ends
Witch Hunts - dedicated and unjust investigation or prosecution of a person or group in which the extreme and threatening nature of the alleged crimes is used to justify suspending or ignoring the usual rules of evidence
Placebo Effects - apparent response to a treatment or intervention that is due to something other than a biological response to an active treatment
Anecdote - story or experience, often offered as evidence, that was not controlled and is therefore subject to a host of biases and confounding factors.
Iconic Cautionary Tales From History
The “Clever Hans” Effect - unconscious nonverbal communication of information from a researcher or agent to an animal or other subject. This unconscious communication creates the illusion of cognitive or supernatural ability.
The Hawthorne Effect - simply observing something may alter its behavior, thereby creating an artifact that leads to an incorrect conclusion
Cold Reading - a collection of mentalism techniques used to create the illusion of having gained specific knowledge about a target through supernatural means. The techniques involve use of vague statements, high-probability guesswork, and feeding back knowledge gained from the subject themselves, while the target makes connections to their own personal experience. Cold reading is used in stage magic for entertainment, but also by a wide variety of less honest practitioners to feign psychic or arcane abilities.
Free Energy - claim that the law of conservation of energy can be broken, that we can create some process that creates more energy than it uses
Quantum Woo - a hostile takeover of the success and weirdness of quantum theory to support pseudoscientific beliefs and junk science
Homunculus Theory - class of medical philosophy that assumes one part of the body contains a functional map of the entire organism
Intelligent Design - notion that the complexity of the universe can only be explained as the result of an intelligent force, a designer. Critics maintain the idea isn’t a proper scientific theory because it is fundamentally unfalsifiable.
Vitalism - belief that living things are animated by a life force, or “vital” force, that gives them not only the quality of being alive but also their essence
Dualism - the same concept applied to consciousness—that the mind is more than or separate from the physical brain
N-Rays - hypothesized form of radiation, described by French physicist Prosper-René Blondlot in 1903, and initially confirmed by others, but subsequently found to be illusory
Positive Thinking - “If you think positively, positive results will come.” (and you don’t need to do anyhing)
Pyramid Scheme - type of business that lures in new recruits by promising them an income from those they recruit themselves. Typically, people who engage in these businesses need to spend money to buy products or other materials related to the business. The training they receive is geared toward finding new recruits. If you imagine a pyramid, new recruits must find another bigger layer of recruits below them, and that new layer will go on to find yet another, even larger layer. Money is paid up the pyramid to those above. Math: if 6 people have to recruit 6 people, after 12 levels we have 2 Billion people.
Summary
Remember to be skeptical about this book and ideas presented in it!
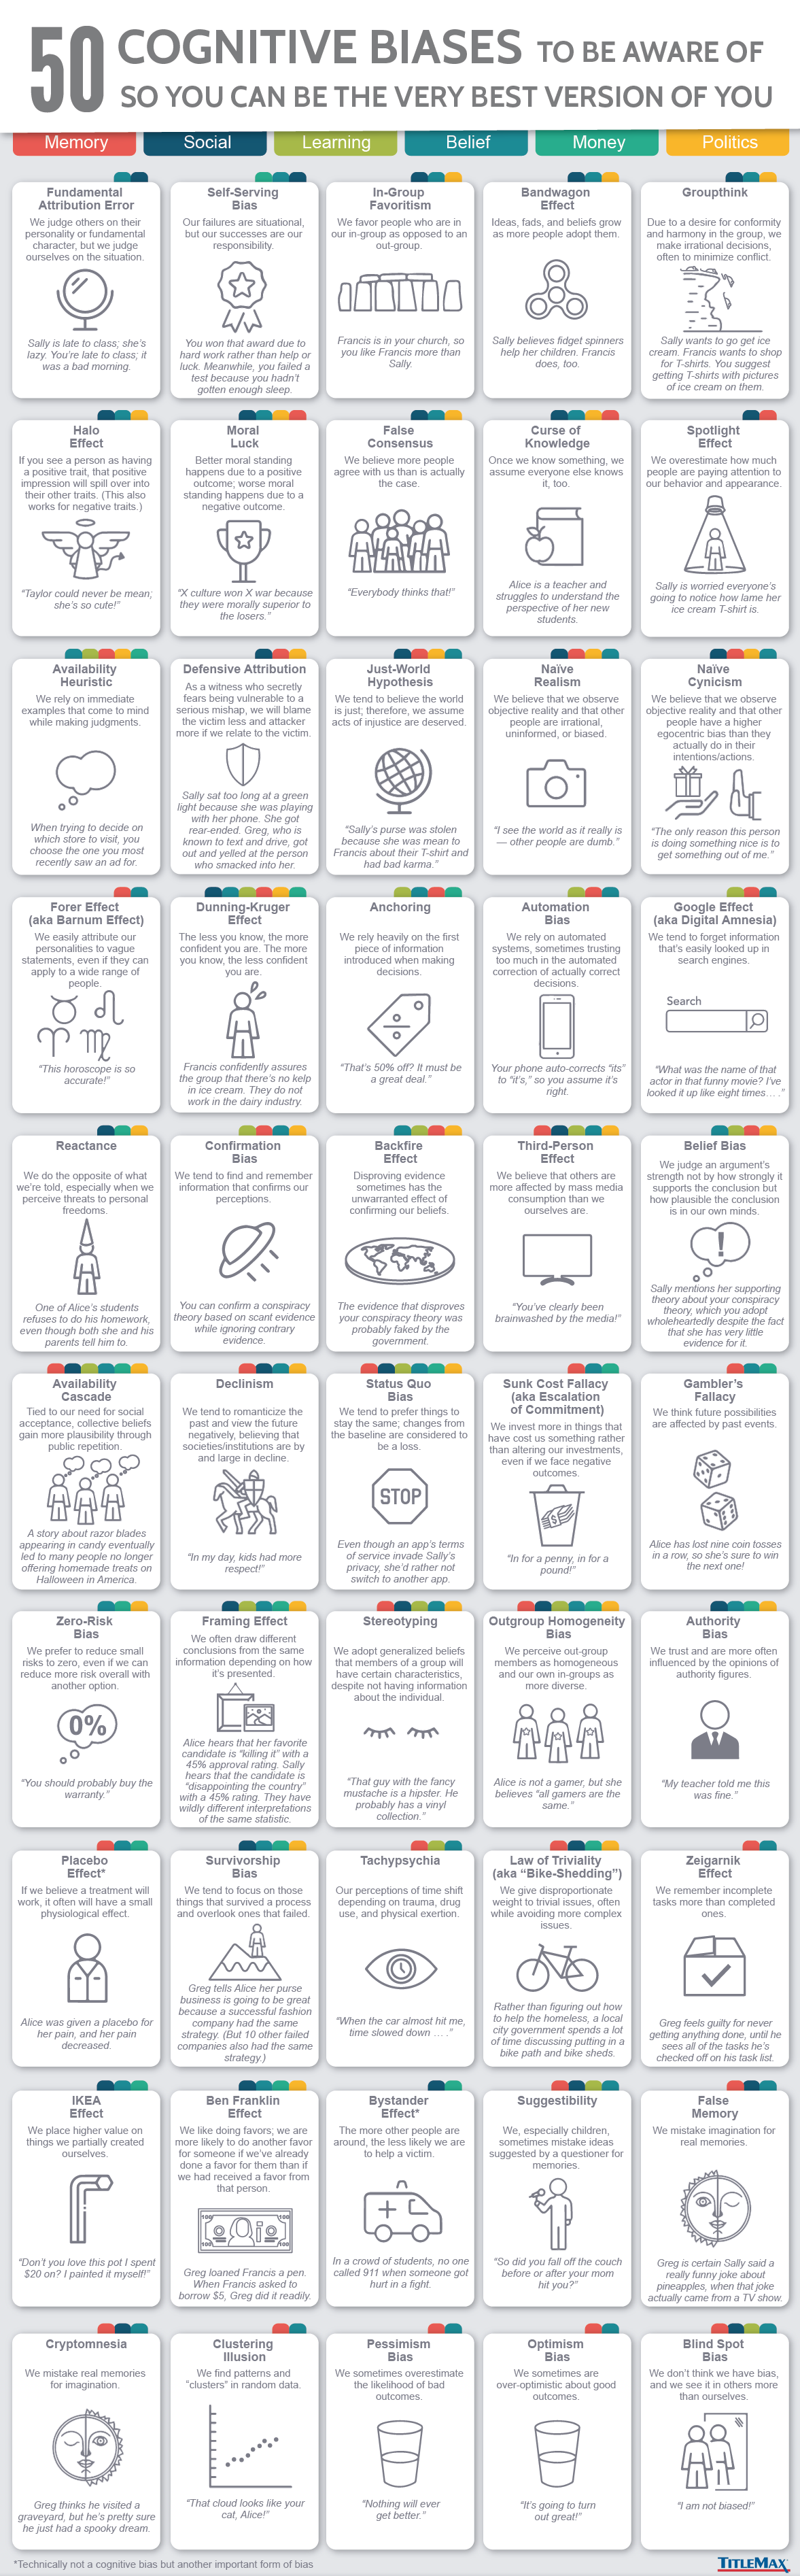
I found out about this book from Elon Musk’s tweet. In his other tweet he shared awesome infographic
showing 50 biases to be aware of. It is a good supplement for this book:
Measure some shit, try some shit, test some more shit, throw the stuff that doesn't work. It's not that complicated!
Chamath Palihapitiya
I spent almost 3 years on the Facebook Marketplace Growth team. I helped to grow Facebook Buy and Sell Groups, contributed to the growth of C2C Shipped transactions by 10x in less than 6 months, and led a team that increased young adults engagement on Marketplace and on Facebook App.
How did we do that? This post is a brain dump of all some things I learned during that journey and beyond.
Find Product Market Fit First
You shouldn’t focus on growth until you find PMF (Product Market Fit). PMF means - people actually find your product useful. If it’s shit, it won’t fly. By growing too early you may attract people who will try it once, and never come back. Even if you improve your product a lot. You need to focus on people with high intent who need your product the most.
How to determine whether you reached PMF? The most popular heuristic is to survey customers about your product asking them a question how would they feel if they could no longer use your product:
Very disappointed
Somewhat disappointed
Not disappointed
If at least 40% percent of them say that they would be “very disappointed” then you have PMF.
Pioneer (an awesome platform supporting founders) has a nice course Find Product Market Fit that guides you through the process. I recommend checking it out if you want to learn more about what PMF is.
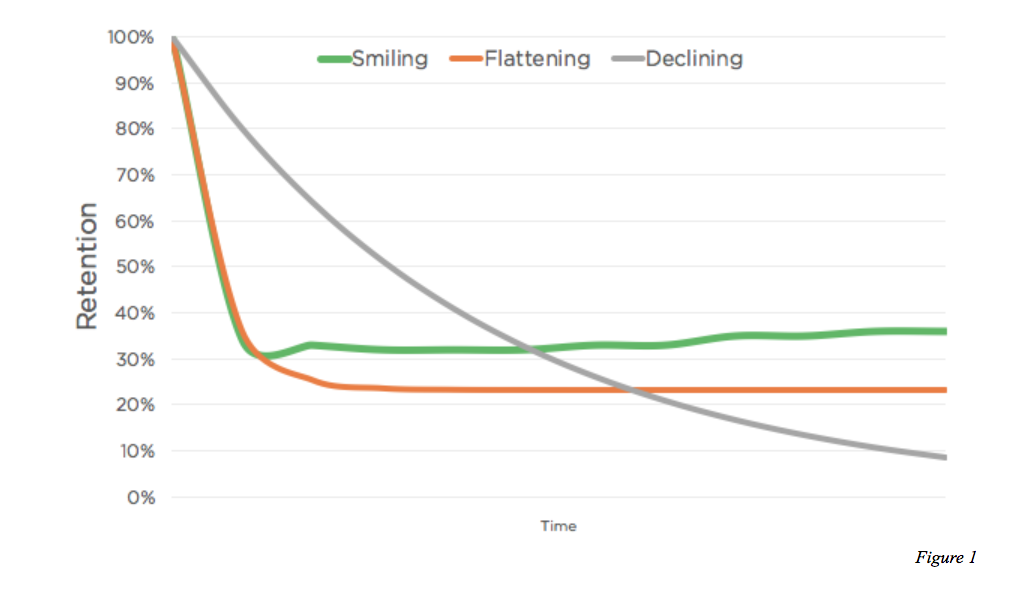
Another way to measure PMF is to look at your retention curves - whether people are coming back to your product or not. If you see a “smiling curve” as described in this article then you have PMF.
There is also a third way: if you have PMF you know it. There are usually multiple indicators: user growth, people reaching out with positive feedback, people talking about your product on Reddit or Hackernews, etc.
Growth strategies
After you determine that you have PMF, it’s time to grow. There are a lot of different ways to grow. This is a comprehensive, but not exhaustive, list of growth strategies:
Access
Allow more people to have access to your product. Examples:
International Expansion - launching your product in more countries
Demographics expansion - launching your product for different age groups, or creating value proposition for different generations
relaxing requirements to use your product - removing the need to create an account, provide ID verification, etc.
enabling third-party login (no need to create an account)
providing logout experience (if your product requires login)
Is your product launched only in the US? Launch it to Canada, and Mexico as well. Then the EU, Asia, etc. Some Asian countries, like India or Indonesia, are huge markets! India has 1.5B people. It’s almost 5x US! Launching your product in India has the potential to grow the user base by 5x. EU is about 1.5x the size of the US. That’s an opportunity to at least double your user base.
Be aware of the cost of international expansion. Potential language translation, if you launching to non-English speaking countries, payments/taxes handling, operational cost, or compliance with different laws like GDPR in European Union. When doing international expansion always analyze the cost, and how big the opportunity is. Launching in Canada may have very little additional work, but not much user growth potential. Launching to India can be huge, but may require much more additional work. Try to find a sweet spot where a minimal amount of work will yield as much ROI as possible.
If you have never done international expansion before, try to start small. Launch to the “easiest” country first - one that requires a minimal amount of work from your side. This will help you to build muscle for future expansions, and an idea of the impact that you can expect from only opening your product to a different market.
There is another trap: you may have PMF in one country, but not in another. If possible, try to determine, which countries will adopt your product most likely. I.e., US and Europe are pretty similar, but South-East Asia is different.
If your product is not accessible for people under 18 you can consider fulfilling requirements that will make it so. Maybe you can create a separate version of your product for kids. Is your product tailored for a particular demographic, e.g., millennials? Consider expanding the value prop to Gen X or Gen Z.
Again, be aware of the cost of such expansion. Many times juice may not be worth the squeeze.
Another strategy to expand access is to enable login through 3rd parties like Google or Facebook so people don’t have to create new accounts. This can drastically improve your user acquisition. Creating an account, confirming email, etc. is a much higher cost for users compared to clicking “Sign in with Google”. You can also provide a logout experience if you always required a login before. This may help to capture some people who just want to lurk before committing to use your product.
Before growing through access, make sure you analyze the costs of expansion. Ideally, you should compare different access plays, and go after one that brings the most value (users) for the least amount of effort. I.e., expanding to Canada doesn’t require translation, and laws are pretty similar to the US.
Category expansion
You can grow your product by introducing a new variation of it for your current users or to acquire new users.
This is a very broad strategy and it depends on the type of your business. If you are selling t-shirts, start also selling hoodies. If you are selling subscriptions, introduce a new tier with more or fewer features. Selling for individuals? Start selling for businesses, etc.
Cloud providers nailed that strategy to the extreme. There are 10s of products, like Virtual Machines, Databases, etc., and 10s of variations of each product. VM with 8GB of RAM, VM with 4GM of RAM, VM with backup feature and without, Redis on-prem, or self-managed.
There is one thing to be aware of: introducing too many variations may cause analysis paralysis, which may lead to a decrease in sales. Make sure that growing through category expansion is slow, and intentional, and that people want particular variations of your product. Don’t throw at them 100s of options if they would be content with three.
Friction removal
How many clicks does it take to make a purchase on your website? Or any activity that your user wants to perform? Simply reducing the number of actions (clicks, filling out forms, etc.) that are required to achieve something on your website or app would make your users use your product more. There is nothing more frustrating than tens of clicks to go through multiple different views, with a lot of unnecessary information to achieve something. I’ve seen that removing 1 text input from a form can increase the completion rate by 10%! Imagine if you can increase your sales by 10% just by removing one field from a form your users fill out to purchase your product.
Friction is causing your users to feel not great. Is it me or does this app just sucks? Whichever is true, they will go and use an app that doesn’t make them feel that. You need to make your users feel awesome when they are using your product. Better, and more efficient they are at using your product, the more likely they will keep using it.
In-app upsells
To bring awareness of new features, or simply try to promote something on your website or app, you can add prompts across different surfaces. Your upsell will be more successful if it’s put in the right context, at the right time. E.g., if someone is buying a book, maybe they also want to buy a pdf summary for an extra $1? You might be less successful if someone came to your website to use a real estate investment calculator you created, and you are trying to upsell your Vue.js Tutorial.
The best way to increase your product retention is to send notifications to remind your users about your product. There are multiple notification channels: in-app (shown in the notification section), mobile push notification, or email. Push notifications are now also available in browsers!
Similarly like with in-app upsells, notifications will be most successful if targeting and timing are correct. You should also keep track of notification metrics like views (how many people have seen your notification), CTR (Click Through Rate), and CVR (Conversion Rate). Conversion Rate tells you how many people performed the desired action (like buying your product) as a result of the notification. You may have notifications with high CTR that do not result in any conversions.
Paid ads are easy to make, but not easy to make them cost-effective! It’s not do and forget thing. You need to constantly iterate and monitor your ad campaigns. By doing small tweaks in content, CTA text, or artwork you can increase efficiency by 2x, 5x, or even 10x. This can make it profitable or not. If you spend $10,000 on ads that generate $4,000 in sales that are not profitable. You need to improve the efficiency of your ads by 2.5x to make them break even.
Be aware of artificial growth! A few years ago Chamath claimed that 40 cents of every $1 VCs invest in startups go to Facebook, Google, or Amazon. It may make sense to grow your product at all costs in the beginning, but keep in mind that this strategy is not sustainable. Probably, sooner or later you will have to increase the efficiency of your ads or move to other growth channels.
Again, be aware that ads are easy to make, but not easy to make profitable and efficient. You can find many courses, books, and tutorials on runnings paid ads online. Be aware that they expire fast! Most advanced advertisers learn how to maximize them to their advantage every day, and you need to be on top of these tricks to keep your ads profitable.
Search Engine Optimization. SEO is for making your website rank in search results as high as possible. If you are on page 2 of Google results, probably no one will visit your website through that channel. SEO is probably an even more advanced growth strategy than running ads, as you need to actively invest in it, and the effects are not immediate. You may need to wait for results even a few months. On the flip side, its effects may last for a long time.
SEO usually means optimizing for Google Search. Google has over 90% of the search engine market share. The second is Bing with less than 5%. This means that optimizing for Bing search will probably have 18x less impact than optimizing for Google. Fortunately, the majority of Google SEO tricks apply also to other search engines.
There is no good way to measure SEO efficiency as you cannot A/B test it. You need to apply all SEO changes across your website. The best you can do is to monitor the amount of traffic from searches.
Part of growing your product through SEO is content marketing. Recently, it’s very popular to share insights into building your product. Providing some interesting facts about how you run your business, how you started, showing your progress, how much money you made over time, etc. It may draw people’s attention better than your product itself, and by learning more about you, people are more likely to buy your product. If not today, maybe in the future.
6 simple steps to make your product rank better:
Make sure that search engines can index your site - SPA or sites with login are not good
High-quality and compelling content that people want to read that results in a low bounce rate
Keyword optimization - use keywords that people would enter in the search input box
Performance - fast-loading sites with good UX perform better and have a lower bounce rate
Make content that people will want to share with others
Title, URL, and description to draw high CTR in the rankings (be aware of bounce rate)
People love promotions. If you offer a 50% discount for 1 week you can sell more during that week than over the entire year. People are much more likely to buy the same product if you price it at $100 with a 20% discount than $80 product without any discounts. It’s behavioral economics effect.
What works well for promotions is also seasonal discounts. Black Friday, Holidays, Summer promotions, back-to-school promotions, etc.
Depending on your product you can also offer promotions where people are deciding whether to use it in the off-season.
For example Zwift - virtual cycling app is most popular in the winter months. Usually around November or December is when people are debating whether they should try indoor biking, and which platform to choose. That’s a good time to run a promotion. Another good time is after the season: in March/April, when people are going back to outdoor biking, throwing 3 months for free if you buy a yearly subscription might be attractive. Especially because they still remember the good experiences they had during the winter months. In July they will probably forget…unless there are forest fires, and it’s unhealthy to bike outside. Another good opportunity to run a promotion.
LeetCode runs promotions usually around holidays. This is a time of code freezes when engineers have more spare time for coding. Getting a LeetCode subscription is much more likely than during deadline times.
Running promotions can be a powerful tool to fight competition. Uber and Lyft use promotions to outcompete each other. The same with food delivery apps like DoorDash, Postmates, and Uber Eats. Do you remember a week without any promotion on Uber, Lyft, or DoorDash? Upsells like “$0 delivery in the next 3 days for orders above $20”, “Spend $100, get $15 coupon” are almost permanent elements of their apps. This game is still ongoing, but each of mentioned companies was able to build an advantage in some submarkets thanks to promotions.
You have to be careful when running promotions. Always consider the cost of promotions. If you run large-scale promotions it can kill your profits. People who would buy your product anyway will buy it at a discount, and instead of profiting from selling more, you may end up losing more money.
Referral Program
The referral program is rewarding your current users for inviting new users to use your product. You can offer monetary rewards, discounts, additional product features, or some internal currency like coins in games.
There was a time when Uber was offering $10 off for the next ride for you and a friend who you invited to the platform. In the early days, PayPal used a referral program to acquire new users. If you referred someone, both you and the new user got $10 on your PayPal account. Today, many banks use that strategy. Discover offers $50 for every friend you invite to start a credit card with them. Your friend also gets $50. Thus, the cost of acquiring customers is $100! If you want to run a similar referral program, make sure to run an analysis before! If your acquisition cost is higher than the lifetime value of the user it may not be the best strategy. Keep in mind that referral programs can be exploited, which would make it very costly, and not effective.
You do not necessarily have to offer monetary rewards. Dropbox offers 1GB of additional storage for you and the user invited by you to the platform. You can also offer on-platform “points”. For example, in FIFA World Cup you can buy players with coins. You could offer coins in exchange for the referral. Remember, that less attractive reward results in fewer referrals.
Another referral program strategy is to create an invite-only platform. Only people invited can use it. That strategy helps with the quality of users and creates an exclusivity impression. Gmail used that strategy in the early days. They discontinued that after reaching market domination.
The ultimate dream of a referral program is to achieve viral growth. Viral growth means that every user brings more than 1 new user. It’s not necessary 2, 3, or more. It could be 1.1, which means every 10 users bring 11 new users. Even 1.01 - every 100 users bring 101 new users - is great. If your product is good enough, you don’t even need to offer incentives. You just need to have a very frictionless referral flow: from sending a referral to a user sign up for the platform. It could involve enabling people to send invites directly to people from their Gmail contacts or their Facebook friends.
Running a referral program is not easy. You need:
a mechanism to track who signed up through a referral
keep track of how many referrals the given user has, and maybe even the lifecycle of referred customers
keep track of potential rewards that should be awarded
you need to shield from exploiting your program: i.e., one person can create multiple fake accounts to get referral bonuses
you need to keep track of the cost and ROI of the program all the time
Similar to a referral program is an affiliate program. However, affiliate marketing focuses on using third parties to send customers to use your product. Amazon has an affiliate program. You can put personalized referral links on your blog, YouTube video or social media, and when people make purchases through these links you get a small share of profits.
Growth Hacks
In addition to the larger initiatives described above, you can also try simpler, faster-to-implement ways to grow - growth hacks.
Growth hacks are small changes that can implement quickly, and power your user’s growth.
Some example growth hacks you can apply to your product:
Change Content - make it shorter and show DIRECT VALUE for the user; explain what is user getting by engaging with your product or taking a particular action.
Change CTA (Call To Action) content or color of text or background.
Add some unit/text/CTA to some impactful view - if you want people to take some action, upsell it where you get the most traffic.
Add insights or remove not needed insights - people like seeing stats about how they are doing; e.g. if they listed something for sale, a notification saying “your product got X views in the last Y days” can increase engagement. Even without any explicit call to action in content, people tend to engage with the product to find out more. Strava is pretty good about it. Sometimes they send emails, like your monthly summary: “You ran X miles last month”. I found myself going to check more details about my performance in the app very often. It’s working!
Improve performance (removing things from page/view helps with perf, adding things hurts perf) - better performance can lead to growth as users can be more productive, and less frustrated when using your app or website. It’s also good for SEO.
Remove some not needed unit/text/CTA - an often overlooked growth hack is to just remove some of the least impactful or not relevant any more things from your product. It’s very easy to end up with feature bloat, but product teams rarely audit and remove them.
Prefill the form with defaults (e.g., do not ask the user to select a subscription plan, preselect the most popular plan for them) - reducing friction in forms can drastically increase the completion rate, which can lead to a significant increase in sales.
Change the number of items shown - if you are displaying, e.g., the newest 4 items, consider displaying 6 or just 2 or 3. If you display less, you may score performance gains. Displaying more may lead to more impact as people have more choices and opportunities for engagement.
Coming up with ideas never was the biggest problem for my teams. We always had more ideas than what we could execute. Our brainstorming sessions (powered by mural) always produced 100s of ideas. The dilemma was what to work on.
The simple framework that can help you prioritize ideas is ICE Framework. ICE stands for Impact, Confidence, and Ease of implementation. You score ideas on a scale of 1-10 in every category and then rank them by summing them up.
I’ve seen a lot of engineers throughout my career focusing too much on impact while neglecting ease of implementation.
Examples:
Redesign landing page:
Impact: 7
Confidence: 6
Ease of implementation: 3
ICE score: 16
Create a new notification:
Impact: 3
Confidence: 6
Ease of Implementation: 9
ICE score: 18
Launch product in India:
Impact: 9
Confidence: 5
Ease of Implementation: 1
ICE score: 15
Do this for all potential projects, narrow your list down to the top 10, and start working on the first one. You can keep other ideas in the backlog but don’t focus on them too much to not get too distracted. You should always be focused on 1 idea, keep 10 in mind, and the rest keep in the backlog.
How to estimate impact and confidence? Opportunity sizing
There is no straightforward formula for estimating ease of implementation. It depends on the engineers, their familiarity with the product, etc. However, you can estimate impact and confidence with opportunity sizing.
For example: you want to upsell a new product you are selling by creating a Facebook ad. You can estimate the number of people who will see the ad. Based on that you can estimate the number of people who will click on it, and the number of people who will purchase after visiting the product page.
Let’s say your ad will be seen by 100,000 people. Based on your past experiences, targeting quality or by just guesstimating based on some data found online about funnel performance, you can estimate your ad’s CTR. Let’s say it would be 2%. This gives you 2000 people visiting your landing page. How many people will buy the product? Ideally, you can estimate that based on the % of people who buy a product after visiting your landing page. If you’ve seen that 1% of people who land on the product page buy it (that would be pretty good!) then your opportunity size is 1% of 2000 = 20 products.
You can do a similar estimation for notifications or other growth channels.
Note: be aware of cannibalization. If you reach the same people with 2 growth channels they won’t produce a sum of expected results. I.e., if someone sees your ad twice you probably won’t double the number of visits. Maybe you will increase visits by 20-30%.
For more about opportunity sizing check out this, this or that.
Growth Lessons
After working on growth for a few years I noticed a few non-obvious things I wish I’d known before.
Doing trumps Planning
Trying things always produce better results than endless planning, and analyzing. Over the years I observed that growth is not proportional to how much effort you put into a single change, but rather to the number of different things you tried. It doesn’t mean to do some shitty changes and hope it will magically bring users. Rather, it emphasizes the importance of execution and trying different things. No matter how crazy and unlikely to bring growth they are!
MVE - Minimal Viable Experiment
When you are not sure if something is going to work, instead of building full-fledged features try to run a directional experiment that requires a minimal amount of work. If the experiment shows some positive results, double down and build a fully-fledged feature.
Make your users winners
In the book Badass: Making Users Awesome, Kathy Sierra explains the importance of making your users feel good while using your product. You need to make users feel “successful” when they are using your product. They need to feel like they are winning something while using your product. If there is no win, there is no point in using your product.
Iterate, iterate, iterate
If something didn’t work at first, but you have a strong hypothesis about why it should’ve (e.g., data or just intuition), you should iterate. I’ve seen many times people give up too early. I have also seen when something didn’t work because there was no trivial bug affecting a large portion of the users. I rarely see something taking off to the moon on the first try. Even if it does, there is probably still an opportunity to iterate and get an even greater impact from it.
Do not run too many experiments at once
In an ideal scenario, you just run 1 A/B test for your product. As you want to move fast you may need to run multiple experiments in parallel. In that case, you will get the best results if you isolate them. I.e., you experiment with one thing on the minimum population needed to show statistically significant results, e.g. 20% (10% get a test, 10% control treatment), another thing on different 20% of users, etc. What if you won’t get meaningful results with a running test on 20% of users? You may rerun it later with a larger population when you won’t have other experiments to run. Running a bunch of 50/50 A/B tests may result in randomizing user experience and you won’t be able to tell which of the changes is causing (or not) desired results.
Use back tests and holdouts
When you try new things, you may run into novelty effects. I.e., some new feature is causing a temporary spike in engagement, but after some time it goes back to neutral or even negative. Running a test for 2 weeks, and making a decision based on data from only week two should be sufficient to remove the novelty bias. But not always. Feature performance can degrade after a month or two. To monitor the long-term effects of a feature you should consider using backtests. This means launching new experiences for the majority of the population and keeping a small number of users who still get the old experience. To monitor the compound effect of changes made in some period of time, consider also using holdouts. Keeping a small number of users who won’t get any of the new features that you introduced in a given period. This can help you assess the total impact of changes you made over time. Usually, there is a cannibalization effect and the sum of all backtests won’t equal the holdout impact. Keep in mind that using backtest and holdouts require a pretty large number of users to get statistically significant results. Thus, consider these techniques only when your product is more mature, and you have a lot of experiments running at the same time.
What didn’t work in the past may work now
Before joining the Facebook Marketplace Growth team I often heard: “We tried this in the past, but it didn’t work. Don’t waste your time”. In my early days on the Growth team, when I was trying to find different ideas, one engineer advised me to look at past experiments that didn’t work. “If it didn’t work in the past, it may work now”. Timing is one of the key elements of building a successful product. If you are too early with an idea you won’t get anywhere. Another factor in addition to timing is execution. There were multiple attempts at Electric cars before Tesla, and there were a lot of different social networks before Facebook.
North Star Metric
North Star Metric is a metric that the best measures value of your product. It could be Daily Active Users, the number of transactions per day, or the number of posts users create on your service.
When you grow your product, you should have North Star Metric and focus all your efforts on growing it. Would some change increase your North Star Metric? Do it. Otherwise - abandon or postpone. This helps tremendously with correct focus and prioritization.
If you want to learn more about growth I recommend the below resources. Get familiar with them and try out some growth ideas in your product. Remember that the more things you try, the more likely you will be successful.
]]>Moving from WordPress to Jekyll2022-02-06T18:59:24+00:002022-02-06T18:59:24+00:00https://jj09.net/moving-from-wordpress-to-jekyll
Brief story of this blog and why WordPress
I started this blog in 2013. It was my first year living in the USA. I was in Grad School at the time. It has been almost 10 years! I started this blog mostly to improve my English and for documenting my own learnings. I decided to use WordPress as it was a to-go platform for beginners back then. I need to admit, it was pretty neat and straighforward to setup.
Intially I was hosting my blog on webio.pl (that was BC time - Before Cloud). I moved it to Azure App Service in 2014 (it was called Azure Website back then). I did many tweaks and improvements since then:
Added Google Analytics
Added custom domain: jj09.net
Created a web job that was performing backup of all files + database (blog post)
Enabled comments with Disqus
Added performance optimizations (minifications, image compressions, etc.) - all with WordPress plugins
Later on, the web job was not needed anymore as App Service introduced Backup. In Azure I trust I thought. Azure also introduced an in-app MySQL database, so I didn’t have to maintain a separate MySQL instance. Yay! Everything is great. Database was backed up together with App Service instance. Nice!
I was super cautious and I was also making a copy of a database backup periodically and putting it on Dropbox.
WordPress blog needs to be maintained
For last 2 years I didn’t do much blogging, and I didn’t do much maintenance neither. I didn’t even bother to update plugins or WordPress version.
It was always bothering me though when I was seeing these “update available” upsells. Should I do it now? What am I getting? Do I care? Am I willing to risk an hour if something goes wrong? Will I even know whether something went wrong?
Some time ago I started seeing a big red warning asking me to upgrade to PHP 7. My blog was using PHP 5.6 (default from App Service). Everything was working so I ignored it.
WordPress to Jekyll migration
I was thinking about migrating from WordPress to Jekyll for some time. Why? It seemed much simpler to maintain (just static pages, no database), and cheaper (AKA free) when you host in Github Pages!
I started with 4 Steps To Migrate From WordPress To Jekyll, and first step was to export my current content with Jekyll Exporter plugin. I wasted a lot of time on that step. First, it turned out that I couldn’t install the plugin as it required more recent PHP version. As I had backups I just went and upgraded PHP. After that none of my posts didn’t show up :O
I freaked out a little so I went to restore backup. After that, I loded my home page and…WordPress asked me to setup my blog!!! My heart rate spiked. The last database backup I had was from 2018 :( I went to backup settings and it looked like backing up database was unchecked :(
I tried to use previous backup (from day before), and…it worked fine. It restored database! Yay…but WTF?! I quickly copied database to my Dropbox, just in case, and upgraded PHP version again. After second attempt I went and installed Jekyll Exporter, but I couldn’t export my stuff because of timeouts. I tried to play with set_time_limit, but no luck. I screwed up my WordPress instance a few times along the way, and I had to restore backup a few times. It always took 2 restores to properly restore the in-app MySQL database! This convinced me that my current setup is too fragile to keep it that way and I need to migrate to Jekyll now. I actually started this effort with plan to just export WordPress to Jekyll format, and see how much work it’s gonna be to do the migration. Plan changed: I’m doing migration :)
List things I did (and to be done as I’m done yet):
Export wordpress.xml (easy)
Rename posts from .html to .md (easy with simple node script)
Migrate syntax highlighting tags: <pre> to \{\% highlight \%\} (I did it manually instead of writing a script, as I had multiple variations of code snippets and wanted to fix text formatting along the way)
optimize perf (Google Page Speed)
[ ] optimize images (link)
[ ] have landing page like mfranc and dhh
[ ] upgrade template to more performant?
configure backup to Dropbox
SEO
Pros and Cons
After a few days with Jekyll I absolutely love it!
Pros:
simplicity - just text files on Github
no database, no random issues like this I encoutered in the past
no need to maintain Azure App Service
free hosting on Github Pages <3
much less fear of something going wrong and losing all my posts: one WordPress plugin update can corrupt Db, I don’t care if I mess up my Jekyll setup as my posts are in .md files that won’t be touched
writing posts in MarkDown is much better! I prefered HTML over WordPress visual editor anyway. Writing posts/making changes is much faster (for me) using Jekyll than WordPress. I just open VSCode and have blog post readily available. In WordPress World I need to go to wp-admin, then posts, then find my post (multiple steps). Many times, WordPress would mess up my HTML formatting, which was annoying. Now, I’m in control.
can write posts offline
editing themes is much easier: I just play with html/css without loging in to FTP
Cons:
none for me! - people say that it’s complicated for non-programmers, no CMS, no WYSWIG editor, but none of these are an issue for me
I first learned about Jekyll in 2014/2015 from my ex-MSFT coworker Justin Beckwith. During migration I recalled that he wrote a blog post where he described his migration adventure. I wish I just used that guide from the beginning as it has everything what’s needed :)
Meet Tony "Teddy Bear" Montana. My new family member since October last year.
I wanted to have a dog for a while, but before COViD I was always on the go. Traveling outside of the city or outside of the country at least once a month. My lifestyle was not good for having a dog. Especially a puppy! However, when COViD hit I thought: now or never. My plan was simple: I’ll get a puppy during COViD, and before the pandemic is over he will be a well-trained dog.
As raising a puppy is not easy, I decided to journal my experience for the future me and friends. This is not a comprehensive guide as there is a bunch of stuff all over the internet, but I would share my gotchas and notes.
Before puppy arrival
I am all about learning from others and their mistakes. Thus, I read a few books before even getting a dog:
The Art of Raising a Puppy - good set of tips on how to train a puppy from the first days. It has some good ideas about creating a routine for your puppy, etc.
The Power of Positive Dog Training - comprehensive guide on how to train a dog with step by step instructions for teaching particular commands. I strongly recommend this one, especially after you figure out the basics (potty training, etc.)
Another things to be aware BEFORE you get a puppy:
first days/weeks will be rough - sleepless nights, waking up at 1am, 3am and 5am to take your puppy pee, and constant supervision will be needed
the most important is consistency - this is hard, because we humans are not robots; to be most successful with a puppy you need to behave consistently in EVERY situation in order to not confuse him: even getting him food in specific way can be confusing
The puppy needs to get used to YOUR schedule - he does not need to go to work, but you do; he does not need to go grocery shopping, but you do; he does not need to take you out, but you need to take him out...you have much more responsibilities than him, and you shouldn't feel guilty that you are leaving him alone while you are working or taking care of errands
First 2 weeks
It was a little bit more challenging than expected. I was fortunate that my now fiance helped me throughout this experience!
For the first few days you need to sleep next to your puppy's crate. Yes, you need a crate, otherwise he can do something you don’t want during the night. Like eating things that cannot be taken out without surgery!
It’s really helpful to have your significant other, or friend who would help you during this time. It was a game changer for us when one night, one person was sleeping (and waking up) by Tony’s crate, and another was in the bedroom (with earplugs) getting an actual night of sleep. We were alternating every day.
It's also recommended to give a limited space to your puppy, and gradually increase it. Giving him access to the entire house might be overwhelming.
On the day of arrival, take your puppy out every hour. Ideally to the same spot and wait until he pees. Then increase it by 5 mins every other day or so. The rule of thumb is: puppy can hold pee for as many hours as many months old he is. E.g., 3 months old puppy should be able to hold it for 3 hours. However, always start with 1h. Even if the puppy is 3 months old. Then increase time between breaks gradually.
I recommend increasing the time between pee breaks on Monday, Wednesday, and Friday. This would add 15mins every week, and ~1h every month. It’s better to not do increases on the weekends as weekends are usually more random than working days.
Remember, accidents will happen. There is no way around it. They will eventually stop. Just be patient! When accidents happen: just say "no" and immediately take puppy out to usual pee spot.
First commands
I recommend getting a few sessions with a good dog trainer. You have no idea how the smallest things you do may confuse your dog and be a game changer. Every dog is different, and a few recommendations from an experienced trainer can be a game changer! E.g., our trainer told us: “you are so lucky, your puppy behavior is great for his age…just do not mess him up”.
People do not realize that THEY have to be trained to have a dog as well! If you need recommendations for a good dog trainer in the Seattle area let me know!
Initially, I was skeptical with treat training as my friend told me that then the dog will never listen to me if I won’t give him treats. However, our trainer proved this to be not necessarily true. Bottom line is: treats are good for training as they cause your dog to associate good feelings with them. You say command, he does something, he gets a nice reward. Remember to have tasty treats! Later on, he will be on autopilot and treats won’t be needed.
We spent a good amount of time deciding which commands are most important. If I was doing it all over again I would teach in this order:
his name (Tony!)
sit
off - in the first days he will be jumping at people all the time, sometimes with biting (in a playful way); you don't want him to have that behavior
leave it - in first days your puppy will try to pick up pretty much EVERYTHING from the ground, faster he learns this command the better for his health
wait/stay - we started with stay, but then learned that we need separate commands for: 'wait and do not move' and 'stay and do not follow me' (e.g., when leaving house); it's also helpful to show pointing finger as dogs react more to body language than words
come
After the first few days, when the puppy gets used to the new environment you can start moving your bed further and further away from the crate, or by moving the crate further away from your bed (~1ft/day). We actually skipped that step and just went to the bedroom after 2 weeks. For the first few days Tony was whining, but he eventually stopped.
When he was 3 or 4 months old we let him sleep outside of the crate...and it was just fine. Actually, one night when I was locking the crate I just locked one door (we have 2 doors crate), because I thought the other door was locked, but it wasn't! At the morning I was wondering why he is not barking (AKA asking to go pee), and found him sleeping by our bedroom door :) After that we knew it's probably gonna be fine to let him sleep outside of the crate :)
Socializing
Remember to first vaccinate your puppy. Avoid dog parks, at least at the beginning. Make them meet the best behaved dogs you know. Tony learned a lot from Porter - my friend's dog who is the best trained dog I know. It was great when Porter stayed with us for a week. We could just tell him what to do, and Tony would simply follow him! Excellent way to teach with little effort.
Sports
Puppies should not run until the age of 6 months. We started with hiking (his first hike at the age of 6 months was 5 miles!), and then running (1 mile: 1min walk, 1 min run, 1.5 miles, 2 miles, 3 miles, etc.).
Swimming is more tricky, as it depends on the breed. Goldendoodles are natural swimmers. Tony’s first swim was when he was in a dog park with Porter (my friend’s dog), and Porter jumped into the water. Tony just followed :P After that we took him for 1h dog SPA where he was swimming in the pool with a trainer. We got him a swim vest and then took him for a 5 min swim (250 yards) at the lake. Then we did 1000 yards, and he was just fine. After that he still had energy to run :O
Other tips
get pet insurance for the first year – this is the period of time when it’s most likely that something will happen to your puppy. Once you get through the first year that likelihood goes down. Then, again when the dog gets older (10 years or so) it’s worth considering again.
do not open crate when he is jumping at the door, wait until he sits and then open crate
make him sit before giving food
when puppy jumps at you: turn around
when you want to avoid him jumping at people on the street separate him from others with your body facing him
useful resources
American Kennel Club - a bunch of resources about dogs, you can sign up for a weekly newsletter with tips on what to do at a particular age (8 weeks, 9 weeks, etc.)
Puppy Primer - nice, quick read about basic aspects of raising a puppy (from potty training to basic behaviors human should do). You can find my notes from that book on GoodReads
How to Behave So Your Dog Behaves - this is very comprehensive guide on how to train your dog. I recommend to pick it up later on, after you went through basic exercises and observed your dog behaviors already. This book will help you to understand why your dog does what he does, and how to adjust nitty gritty details of YOUR daily behaviors.
This is it for now. I will be updating this when I recall other things or learn some new things.


")

")