Adding biometrics authentication to Xamarin.iOS (Touch ID / Face ID) and Xamarin.Android (Fingerprint)
One of the top Azure App users requests was to add Touch ID support for additional security. In this post I will share the details of implementing biometrics authentication for iOS and Android with Xamarin.
There are three aspects of biometrics auth:
1. Enable user to turn biometrics authentication on and off. Users shouldn't be forced to use this additional security feature.
2. Detecting when user should be asked for biometrics authentication, e.g., when app is coming from background, and when app is starting.
3. Authentication process. Includes detecting hardware capabilities (is touch or face id available?), and local setup (does user configured local authentication in system settings).
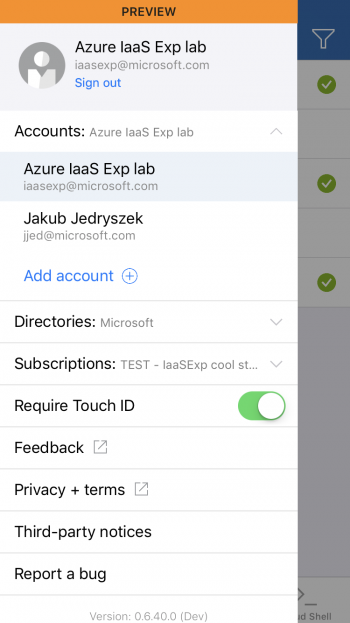
Enabling biometrics authentication usually can be controlled in settings (like in Outlook or OneDrive). We did the same in Azure App:

iOS
Detecting when user is switching back to our app in iOS is pretty simple. Every time when user switch from background, method WillEnterForeground in AppDelegate is being called. We just need to override it with our custom implementation:
public override void WillEnterForeground(UIApplication application)
{
    // biometrics authentication logic here
}
You should also authenticate user when app is being launched. In that case authentication should be performed in your initial view controller.
In iOS we have 2 kinds of biometrics authentication:
1. Touch ID
2. Face ID (available from iPhoneX)
We can also fallback to passcode if touch/face ID is not configured, or user's device does not support it.
The iOS Local Auth API is pretty straightforward, and well documented. I created simple helper to handle feature detection and authentication:
public static class LocalAuthHelper
{
    private enum LocalAuthType
    {
        None,
        Passcode,
        TouchId,
        FaceId
    }

    public static string GetLocalAuthLabelText()
    {
        var localAuthType = GetLocalAuthType();

        switch (localAuthType)
        {
            case LocalAuthType.Passcode:
                return Strings.RequirePasscode;
            case LocalAuthType.TouchId:
                return Strings.RequireTouchID;
            case LocalAuthType.FaceId:
                return Strings.RequireFaceID;
            default:
                return string.Empty;
        }
    }

    public static string GetLocalAuthIcon()
    {
        var localAuthType = GetLocalAuthType();

        switch (localAuthType)
        {
            case LocalAuthType.Passcode:
                return SvgLibrary.LockIcon;
            case LocalAuthType.TouchId:
                return SvgLibrary.TouchIdIcon;
            case LocalAuthType.FaceId:
                return SvgLibrary.FaceIdIcon;
            default:
                return string.Empty;
        }
    }

    public static string GetLocalAuthUnlockText()
    {
        var localAuthType = GetLocalAuthType();

        switch (localAuthType)
        {
            case LocalAuthType.Passcode:
                return Strings.UnlockWithPasscode;
            case LocalAuthType.TouchId:
                return Strings.UnlockWithTouchID;
            case LocalAuthType.FaceId:
                return Strings.UnlockWithFaceID;
            default:
                return string.Empty;
        }
    }

    public static bool IsLocalAuthAvailable => GetLocalAuthType() != LocalAuthType.None;

    public static void Authenticate(Action onSuccess, Action onFailure)
    {
        var context = new LAContext();
        NSError AuthError;

        if (context.CanEvaluatePolicy(LAPolicy.DeviceOwnerAuthenticationWithBiometrics, out AuthError)
            || context.CanEvaluatePolicy(LAPolicy.DeviceOwnerAuthentication, out AuthError))
        {
            var replyHandler = new LAContextReplyHandler((success, error) =>
            {
                if (success)
                {
                    onSuccess?.Invoke();
                }
                else
                {
                    onFailure?.Invoke();
                }
            });

            context.EvaluatePolicy(LAPolicy.DeviceOwnerAuthentication, Strings.PleaseAuthenticateToProceed, replyHandler);
        }
    }

    private static LocalAuthType GetLocalAuthType()
    {
        var localAuthContext = new LAContext();
        NSError AuthError;

        if (localAuthContext.CanEvaluatePolicy(LAPolicy.DeviceOwnerAuthentication, out AuthError))
        {
            if (localAuthContext.CanEvaluatePolicy(LAPolicy.DeviceOwnerAuthenticationWithBiometrics, out AuthError))
            {
                if (GetOsMajorVersion() >= 11 && localAuthContext.BiometryType == LABiometryType.TypeFaceId)
                {
                    return LocalAuthType.FaceId;
                }

                return LocalAuthType.TouchId;
            }

            return LocalAuthType.Passcode;
        }

        return LocalAuthType.None;
    }

    private static int GetOsMajorVersion()
    {
        return int.Parse(UIDevice.CurrentDevice.SystemVersion.Split('.')[0]);
    }
}
There are helper methods determining proper label (GetLocalAuthLabelText), icon (GetLocalAuthIcon) and authentication text (GetLocalAuthUnlockText) depending on available authentication type. There is also one liner IsLocalAuthAvailable checking if Local Authentication (face/touch ID or passcode) is available, and Authenticate method that performs authentication, which takes success and failure callbacks as parameters. It can be used in WillEnterForeground method as follows:
public override void WillEnterForeground(UIApplication application)
{
    if (!AppSettings.IsLocalAuthEnabled)
    {
        return;
    }

    LocalAuthHelper.Authenticate(null, // do not do anything on success
    () =>
    {
        // show View Controller that requires authentication
        InvokeOnMainThread(() =>
        {
            var localAuthViewController = new LocalAuthViewController();
            Window.RootViewController.ShowViewController(localAuthViewController, null);
        });
    });
}
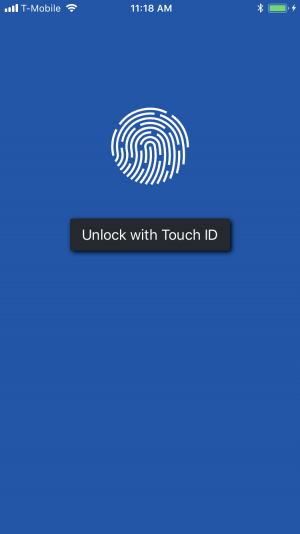
We do not have to do anything on success. The popup shown by iOS will disappear and user will be able to use the app. On failed authentication though we should display some kind of shild (e.g., ViewController) that prevent user from using the app until authorization succeed. This is how it looks in Azure App:

Android
Detecting when app is coming from background in Android is tricky. There is no single method that is invoked only when app is coming back from background. The OnResume method is being called when app is coming back from the background, but it's also called when you switch from one activity to another. Solution for that is to keep a time stamp with last successful authentication, and update it to DateTime.Now every time when activity is calling OnPause. This happen when app is going to background, but also when app is changing between activities. Thus we cannot simply set flag Background=true when OnPause is called. However, when difference between subsequent OnPause and OnResume is larger than some period of time (e.g., more than a few seconds) we can assume that app went to background. Below code should be implemented in some BaseActivity class that all activities inherit from:
public class BaseActivity
{
  public const int FingerprintAuthTimeoutSeconds = 5;
  public static DateTime LastSuccessfulFingerprintAuth = DateTime.MinValue;

  protected override void OnResume()
  {
    base.OnResume();

    if (IsFingerprintAvailable() && LastSuccessfulFingerprintAuth > DateTime.Now.AddSeconds(-FingerprintAuthTimeoutSeconds))
    {
      StartActivity(typeof(FingerprintAuthActivity));
    }
  }

  protected override void OnPause()
  {
    base.OnPause();

    if (IsFingerprintAvailable())
    {
      LastSuccessfulFingerprintAuth = DateTime.Now;
    }
  }
}
The basics of Fingerprint authentication are very well described in Xamarin docs.
Even better reference is a sample app FingerprintGuide from Xamarin.
The main disadvantage of adding fingerprint authentication in Android (over Face/Touch ID in iOS) is requirement to build your own UI and logic for the authentication popup. This includes adding icon, and handling all authentication results. iOS handles incorrect scan, and displays popup again with passcode fallback after too many unsuccessful tries. In Android you have to implement this entire logic by yourself.
Summary
Adding biometrics authentication is useful for apps that hold sensitive data, like banking apps, file managers (Dropbox, OneDrive), or an app that has access to your Azure Resources :)
Implementing local authentication in iOS is pretty straightforward, and iOS APIs provide authentication UI for free. In Android however, the APIs are only working with the backend, and UI has to be implemented by you.
Local authentication should be always optional. Some users may not need nor want it. Thus, it should be configurable in the app settings.
Try out biometrics auth in Azure App!

